The Weird, Yet Practical World of Paint Worklets
A presentation at CSSConf Budapest in in Budapest, Hungary by Jeremy Wagner
The Weirdly Practical World of Paint Worklets CSSConf Budapest — Jeremy Wagner — jeremy.codes — @malchata
Hello! Thank you, all! I really appreciate the opportunity to be a part of CSSConf Budapest. Just massive thanks to the organizers, and most importantly, you all for coming and welcoming me into your ridiculously beautiful and picturesque city. My name is Jeremy Wagner, and I’m a web performance consultant for Siteimprove. My job is to do all I can to make the web faster for our clients. I also write and talk about performance a bit. But this talk is about paint worklets, which has comparably little to do with performance—well, mostly. And right about now, you might be wondering…
What the hell are paint worklets?
🎨 …”Jeremy, what the hell are paint worklets?” It’s a good question, and since I don’t want to assume everyone knows about this, here’s a quick tour of what they are, and what they can do. Paint worklets are one part of a developing set of specifications called…

✨
(seriously!) ✨ …Houdini! [JAZZ HANDS] With the APIs Houdini provides, you can write what are called worklets that let you develop expressive, stateful animations, custom layouts, and—as is the sole focus of this talk—generative artwork using the CSS paint API! [PAUSE, REVEAL “SERIOUSLY”]
Houdini! Seriously!
OK though, but what is a worklet?
⚙ So I haven’t answered you’re question yet, and out there thinking “OK Jeremy, fine whatever, but what even is a worklet?!” Worklets are similar to web workers, but unlike web workers, worklets offer developers lower-level access to rendering pipelines for completing narrowly-defined and super-specific tasks. In the case of paint worklets, we’re talking about artwork that we can generate with JavaScript, and control with CSS.
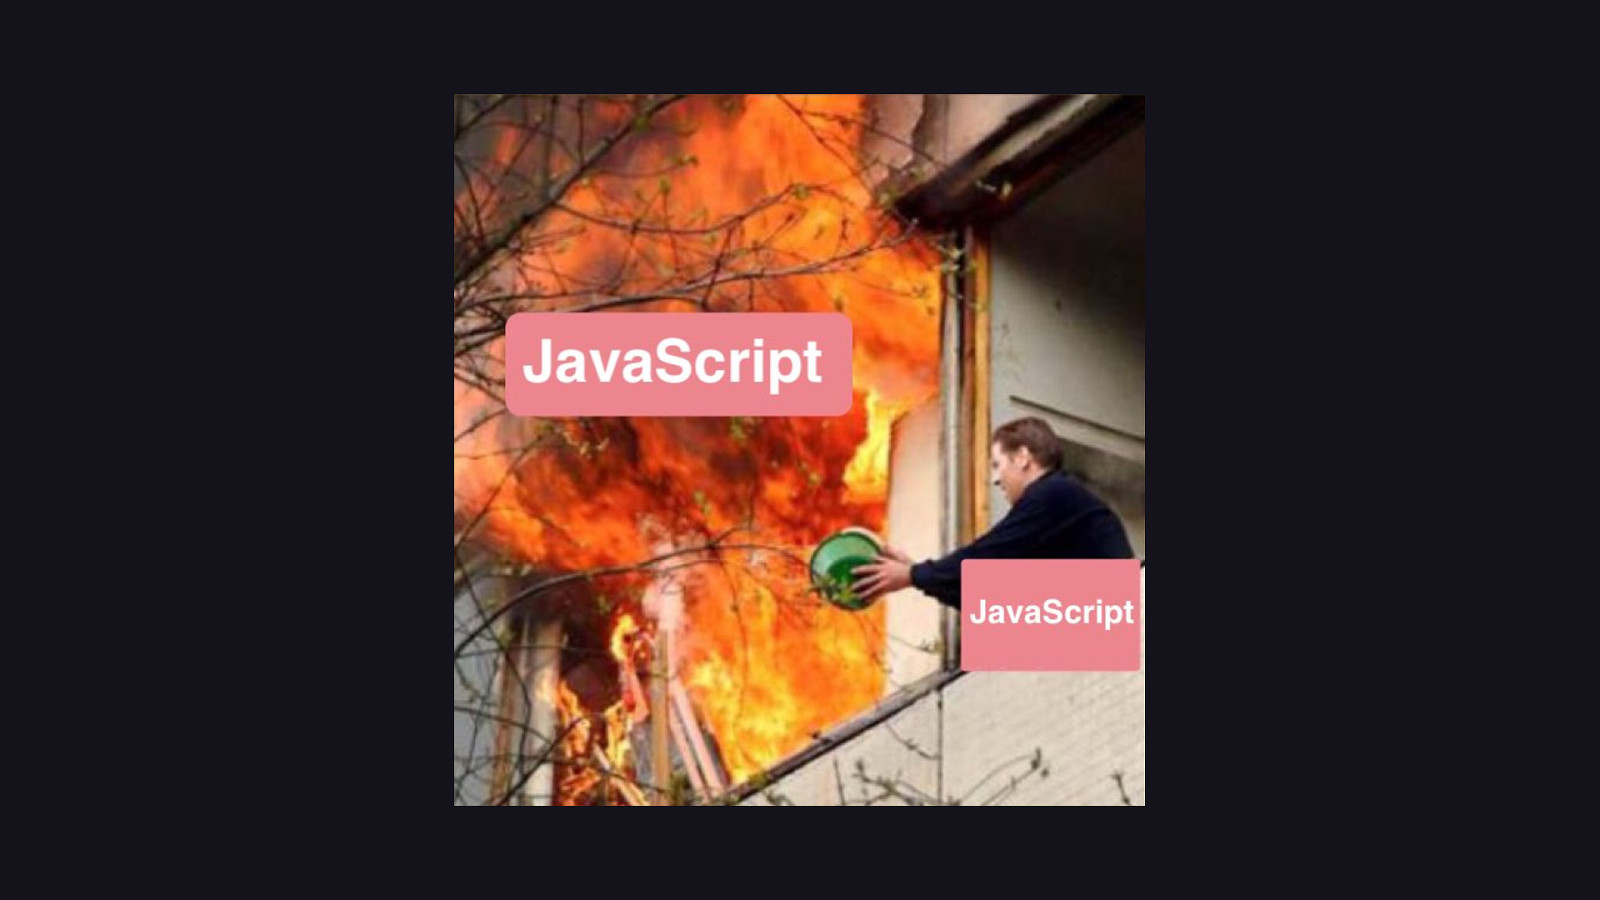
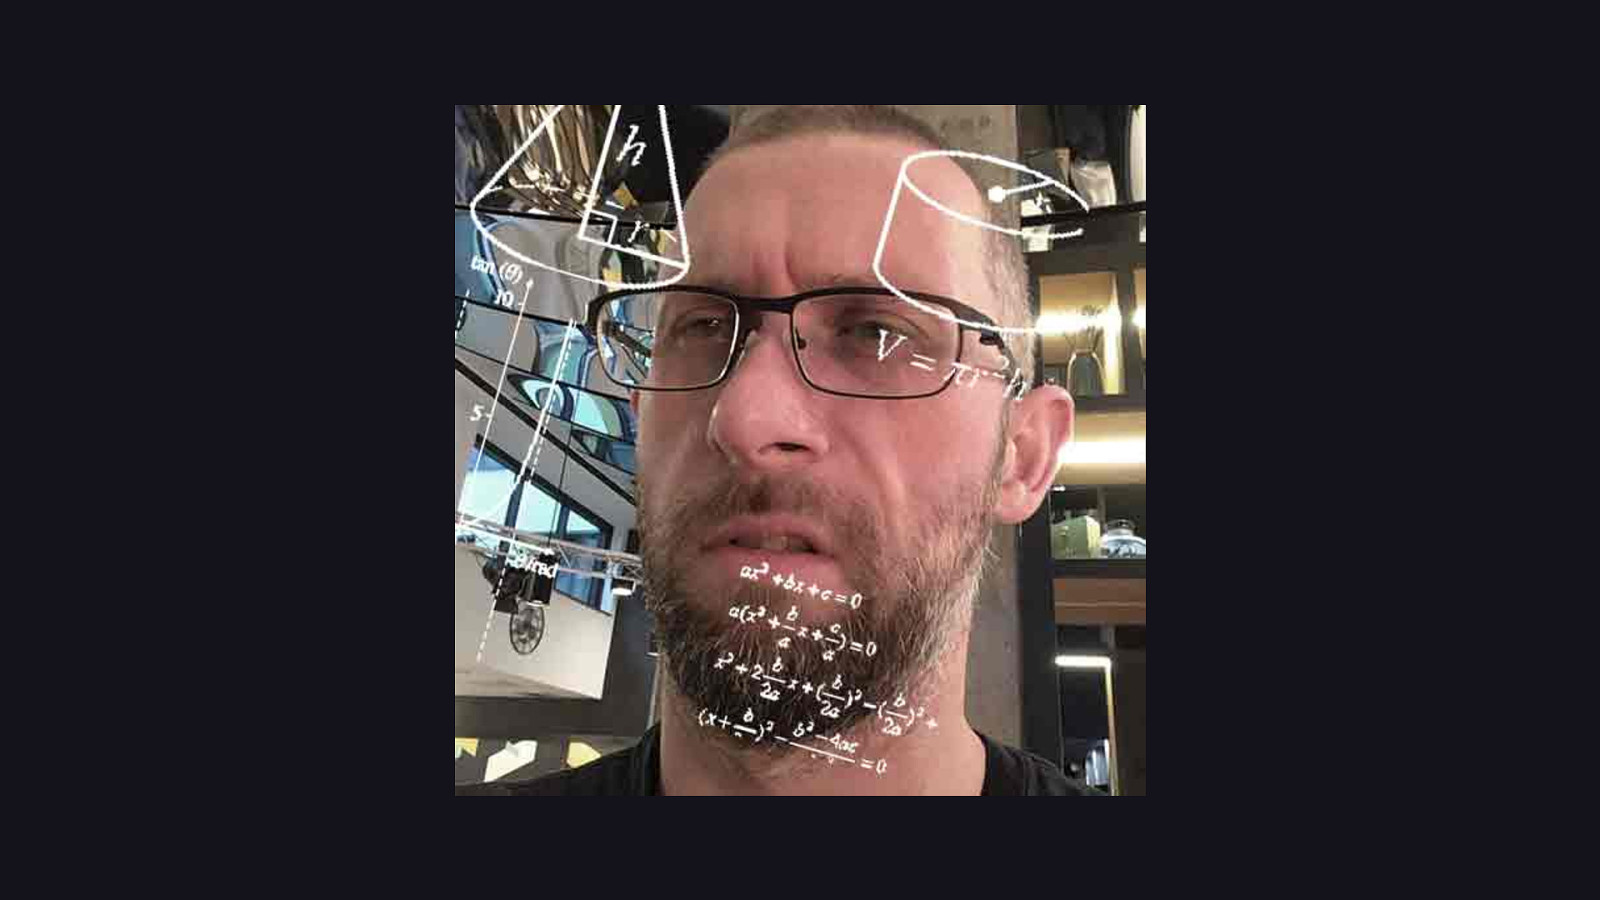
Now I know JSConf is tomorrow and not today, so you’re probably thinking “well what the hell is this, I didn’t ask for JavaScript at a CSSConf!” …and I feel you. As much as I love JavaScript, the web sometimes feels like this. [REVEAL IMAGE]
But I feel this technology is relevant even here at CSSConf, because even if you’re not a JavaScript superfan, you can still use paint worklets which have already been written in your designs without ever having to do more than write a little CSS here or there. This is possible because while paint worklets are written in JavaScript, they’re embeddable in CSS.
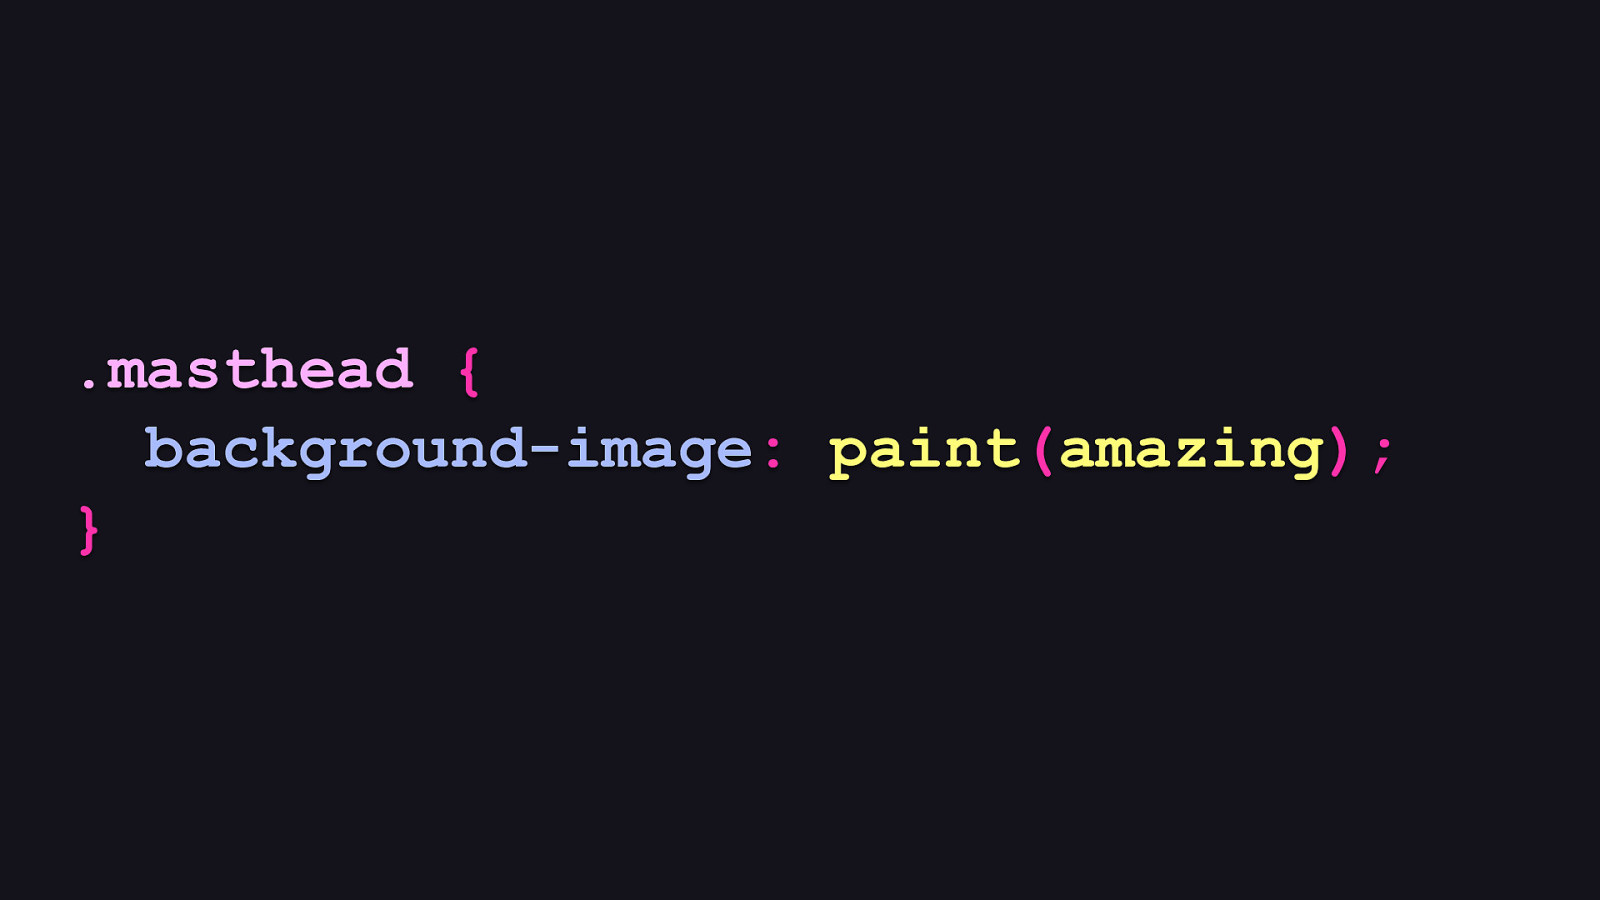
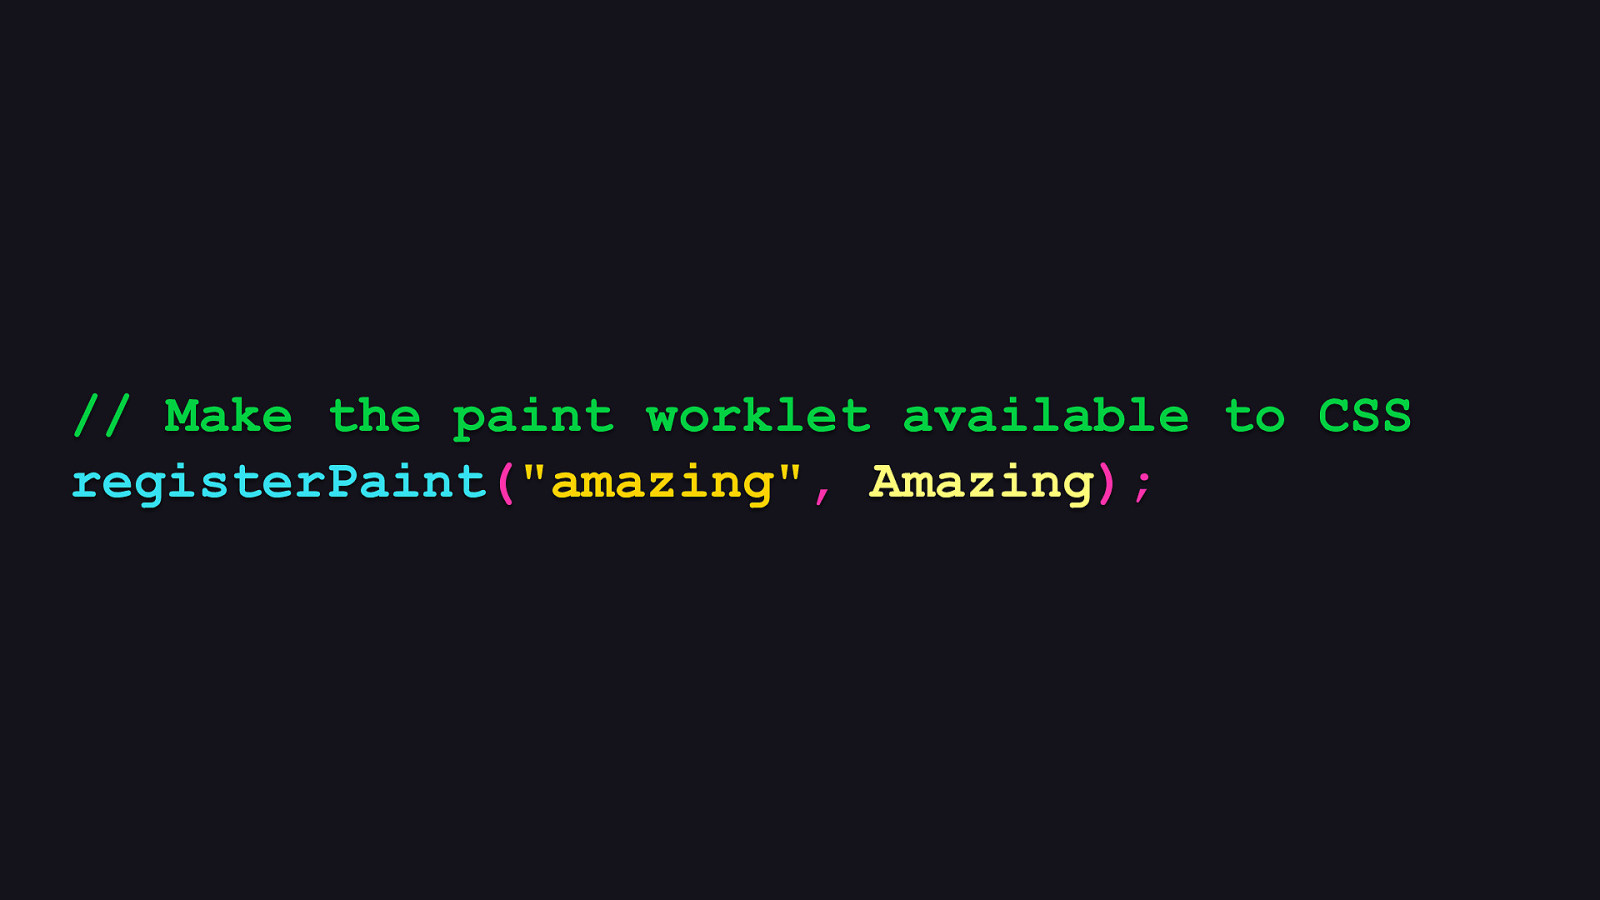
.masthead { background-image: paint(amazing); }
…and this is what I mean by embeddable. When you look at this lonely background-image property, you may be thinking “That’s… not right? Isn’t background-image supposed to take a URL?” That’s certainly the prevailing use case, but in browsers that support paint worklets, the background-image property can accept this paint syntax, too. So if you think of the url() syntax in CSS as a function that accepts a URL string to an image, you can similarly think of paint() as a function which accepts a string that represents and invokes a paint worklet. And in that worklet, is where you write JavaScript to generate background images that CSS can use. In this example, we’re calling paint to invoke a worklet that’s registered under the name “amazing”.

.masthead { background-image: paint(amazing); }
But until we actually register a worklet to that name, this bit of CSS won’t do anything.
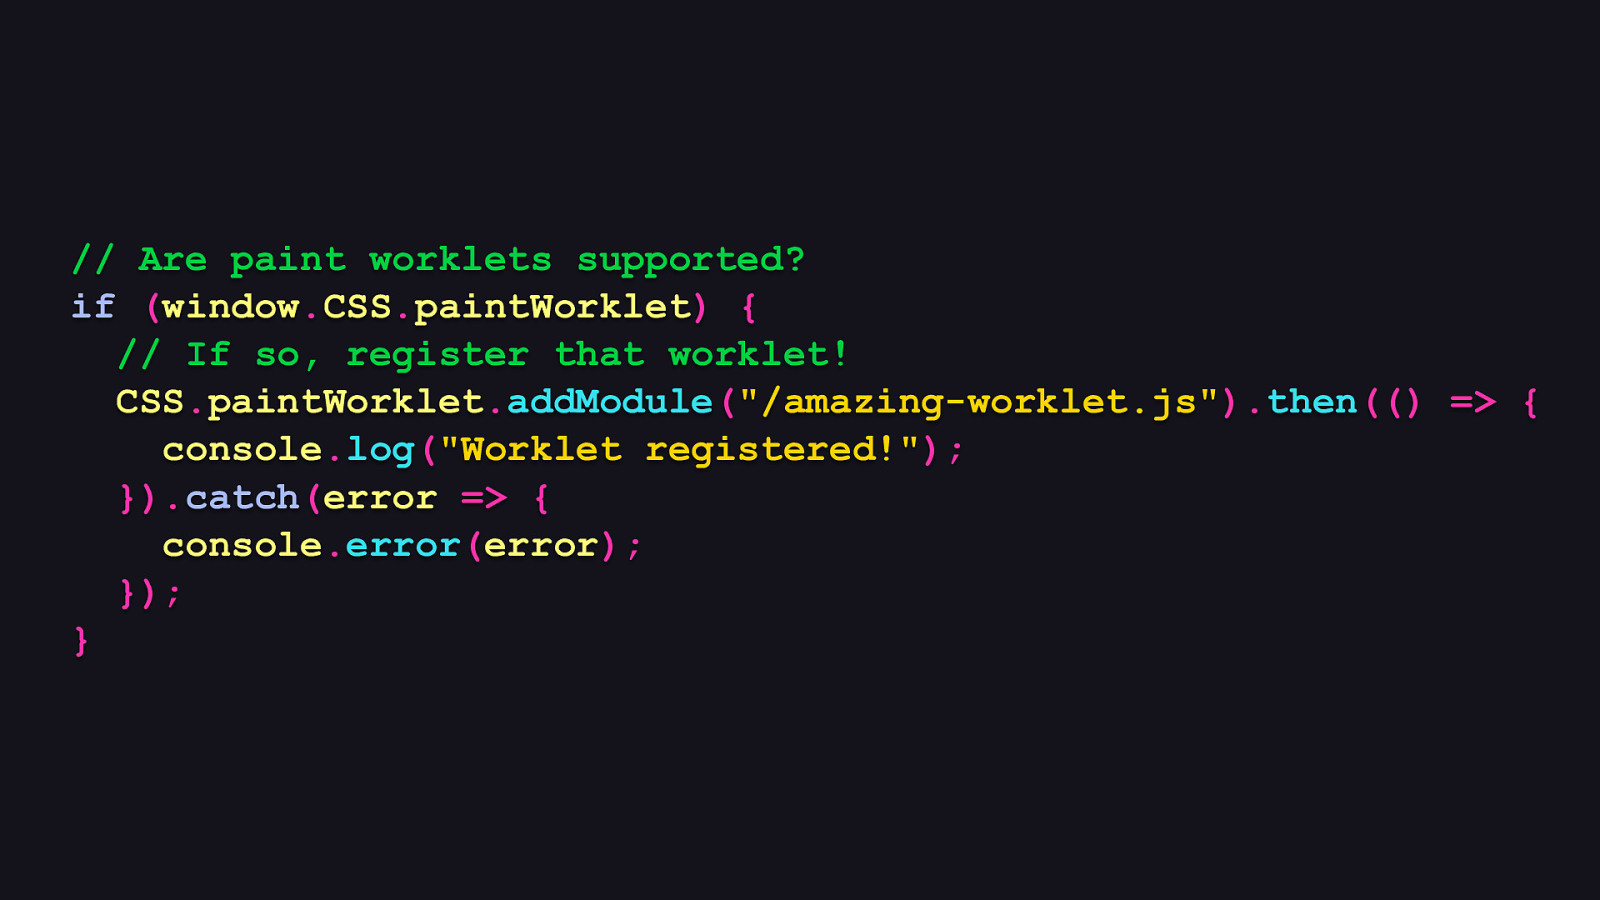
// Are paint worklets supported? if (window.CSS.paintWorklet) { // If so, register that worklet! CSS.paintWorklet.addModule(“/amazing-worklet.js”).then(() => { console.log(“Worklet registered!”); }).catch(error => { console.error(error); }); }
And this is what the registration process looks like, which is done in JavaScript. Because the paint API isn’t available in all browsers, you’ll need to do a quick check to see if window.CSS.paintWorklet is a thing you can use. If it is, you can use its addModule method to load your worklet from a separate JavaScript file.
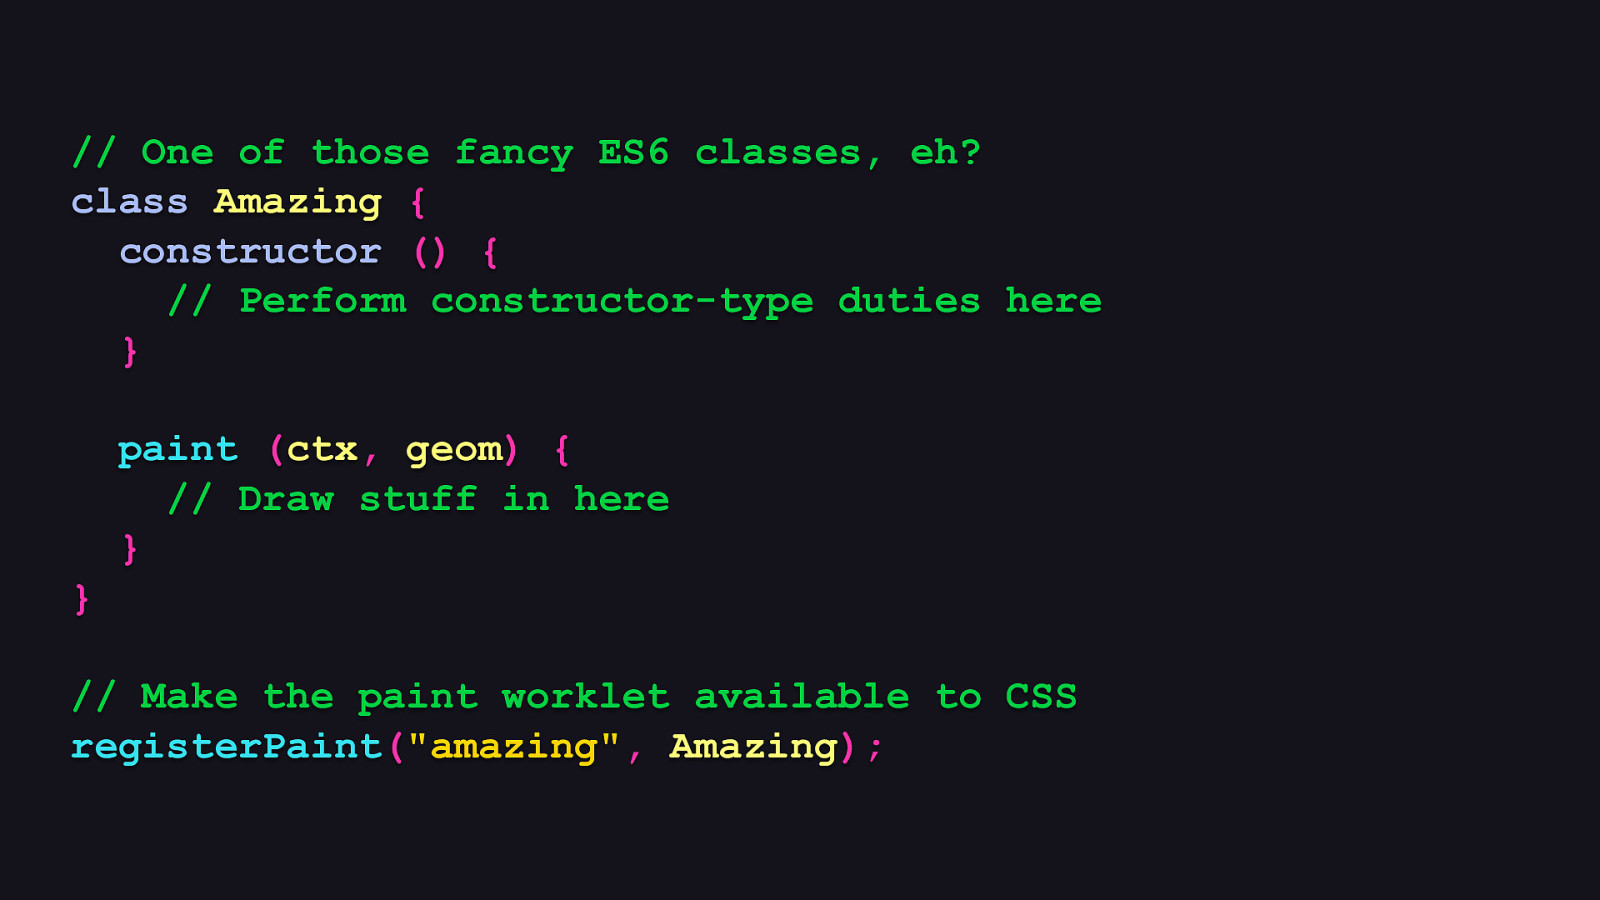
// One of those fancy ES6 classes, eh? class Amazing { constructor () { // Perform constructor-type duties here } paint (ctx, geom) { // Draw stuff in here } } // Make the paint worklet available to CSS registerPaint(“amazing”, Amazing);
And what is a paint worklet, really? Turns out it’s a class with a predetermined shape, which consists of a method called, well, paint. And within that method is where all the code that draws the artwork goes. And the shape of a paint worklet is not restrictive, so you’re free to use other class features to organize your drawing code any way you prefer.
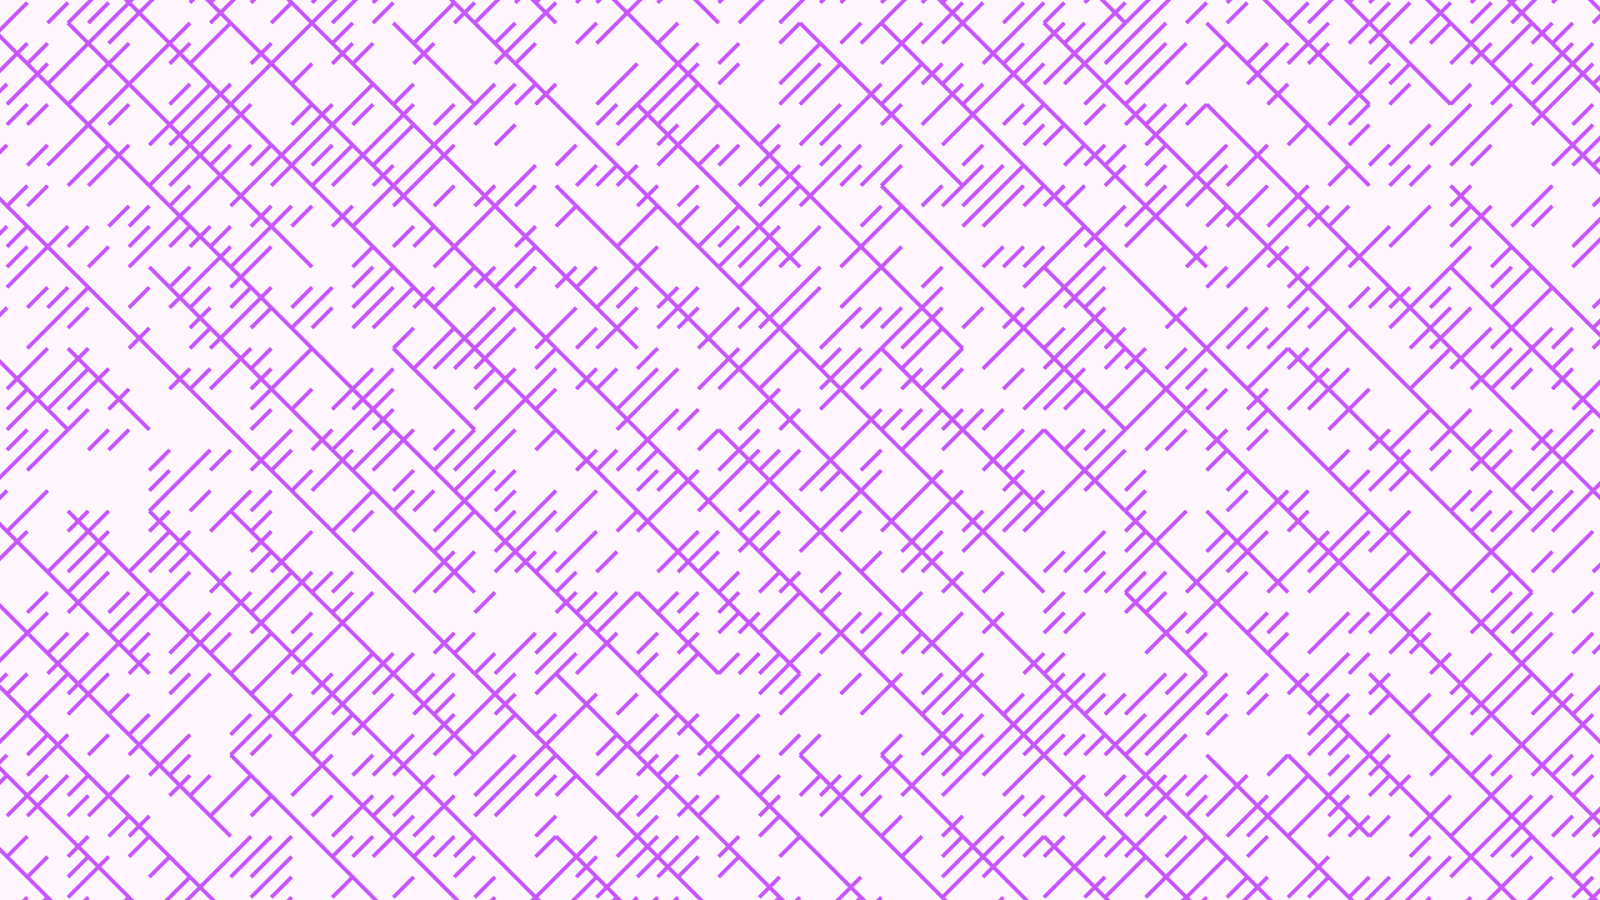
And that’s nifty, because without a little organization, your drawing code can start to look like this. [REVEAL IMAGE]
And we really don’t want that.
// Make the paint worklet available to CSS registerPaint(“amazing”, Amazing);
And then in the same file after and outside of your paint worklet class, you call registerPaint, which requires two arguments: - The first is the name that paint worklet should be registered under, which allows it to be accessed by the paint “function” in CSS. - The second is the reference to the class you just wrote. When this all comes together, a paint worklet finally becomes usable by CSS. But… how do we draw stuff? What does that even look like?
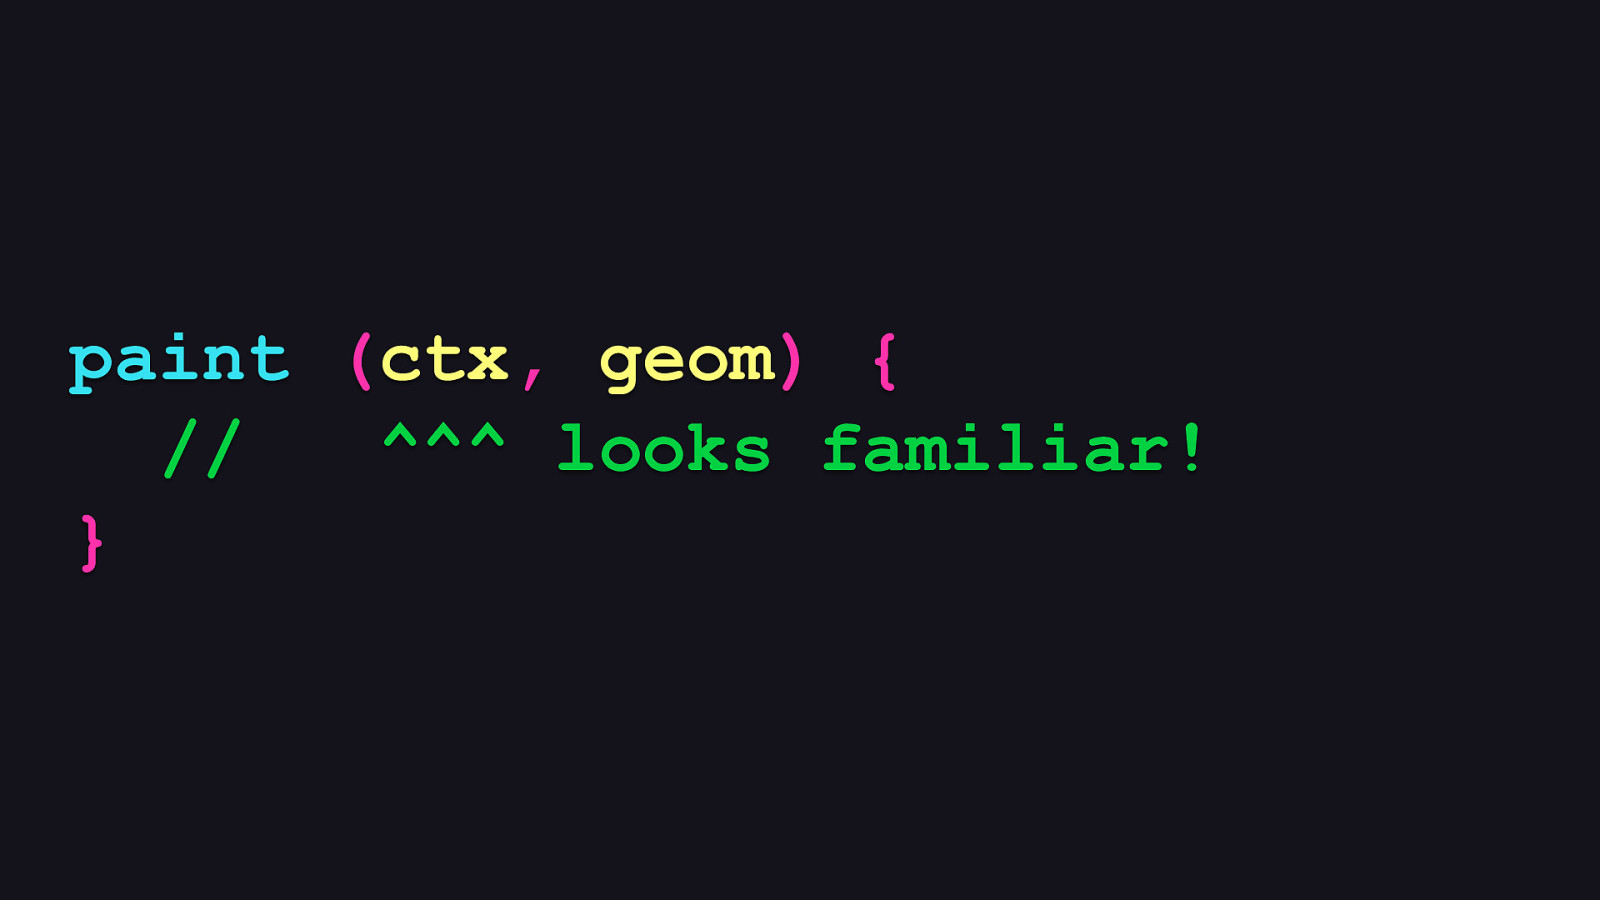
paint (ctx, geom) { // ^^^ looks familiar! }
The API you use to draw stuff is really just the Canvas API’s 2D drawing context. Makes sense! Why develop a separate API for drawing in 2D when a perfectly good one is right there? The second argument is the canvas geometry, which offers the dimensions of the drawing space, and this is essential to ensuring your artwork responds to the available space.
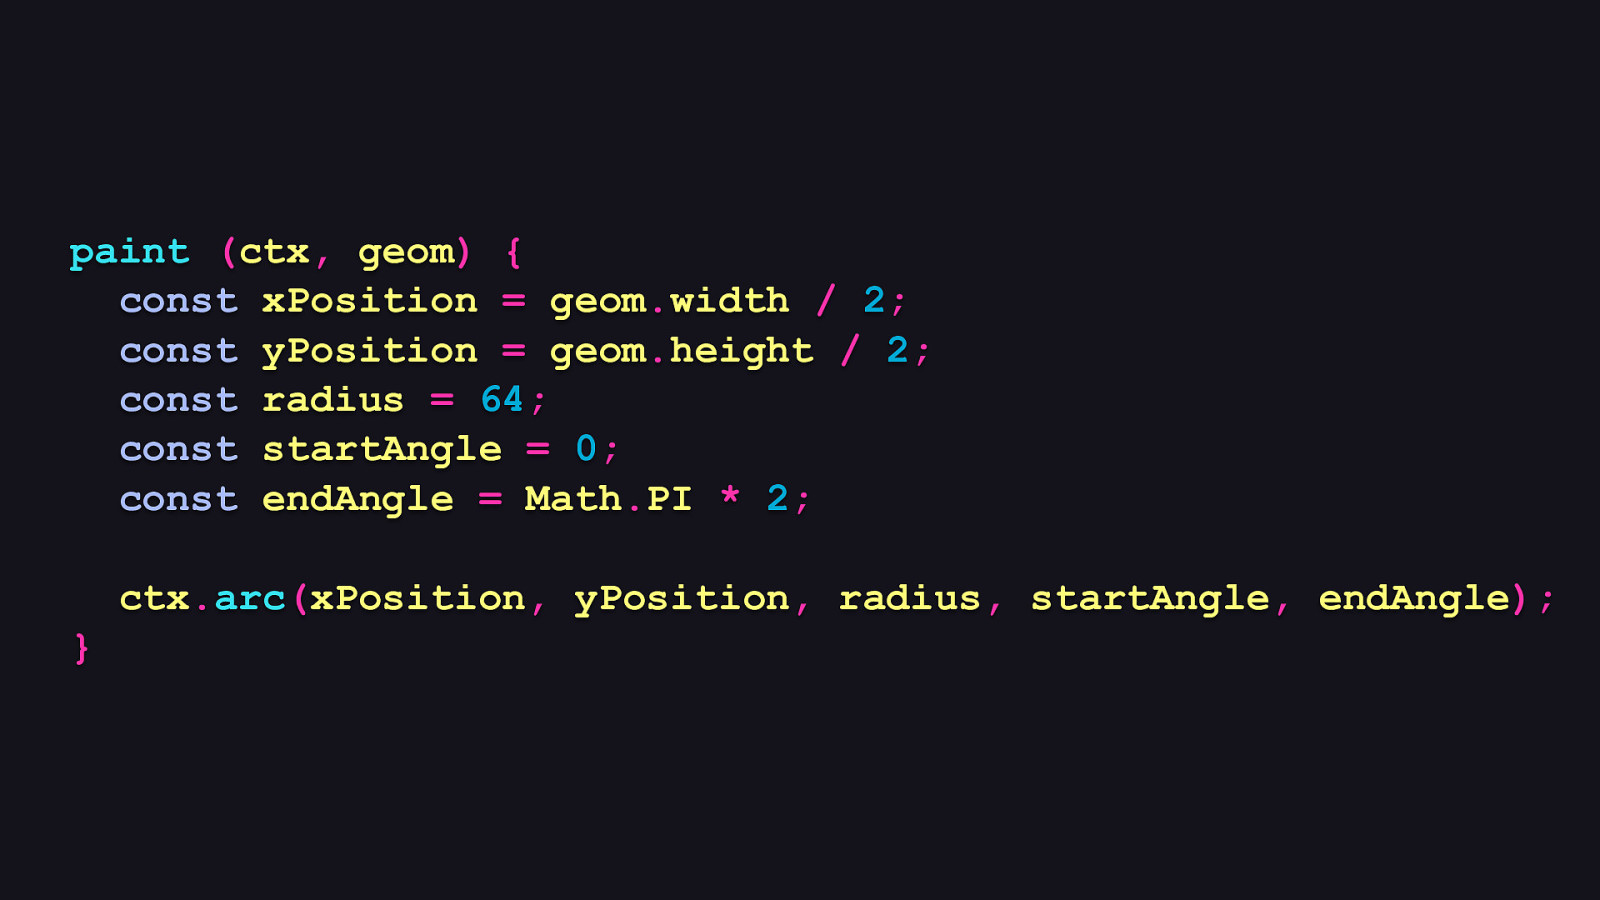
paint (ctx, geom) { const xPosition = geom.width / 2; const yPosition = geom.height / 2; const radius = 64; const startAngle = 0; const endAngle = Math.PI * 2; ctx.arc(xPosition, yPosition, radius, startAngle, endAngle); }
So here’s an example of a minimally viable paint method which draws a solid black circle with a 64 pixel radius smack dab in the middle of the canvas, no matter what the size of that canvas is.

.masthead { background-image: paint(amazing); }
So if we assume this super basic paint worklet gets registered under the not at all ironic name of “amazing”, and we apply it to an element, we’ll get…

…this totally amazing thing, which in no way could be replaced by a static image whatsoever.
[PAUSE]
So, this might be you right about now. [REVEAL IMAGE]
But that simplistic example was meant to illustrate how we get from one line of CSS to something that lets you generate background images with a familiar API. There’s so much more this technology is capable of.
And just think: what if you could use this API to create randomly generated artwork that could enhance your designs in practical, yet spontaneous ways? That’s what we’re going to do, and we’re going to also talk about other important aspects of this technology, too. So when we’re done here, the only thing that will be able to cage your creativity is you. [REVEAL IMAGE]
So let’s see what’s possible with this expressive and cool technology.
But still, knowing where—or how—to start can be paralyzing, so a good frame of mind to get into is to think of the canvas as a set of tiles, where all the tiles are separate, but potentially overlapping or connected pieces which are randomly generated. This mindset trains your focus only on what to do in each tile rather than allowing yourself to be overwhelmed by what to do with the entire space, and once everything is done, you can step back and watch everything come together.
🥴
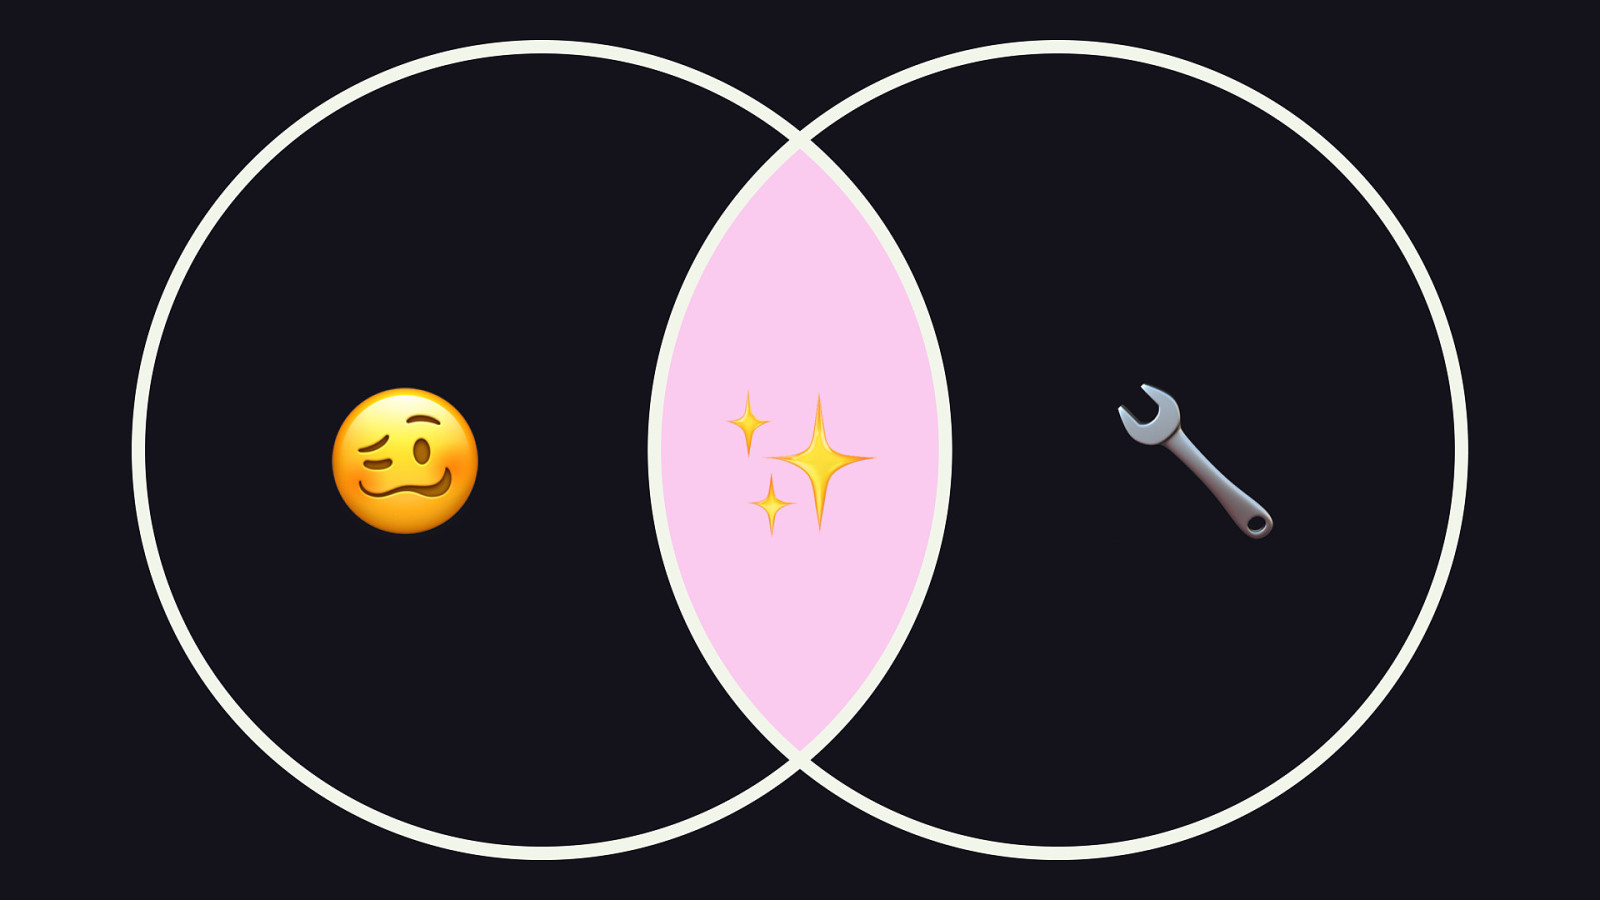
✨ This helps us reach where I’d like to think is the sweet spot with the paint API. We can get weird, yes, but that weirdness can intersect with what’s practical, and therefore usable. And that to me is the best part of web development. The weirdly practical stuff! 🔧
tinyurl.com/timstiles
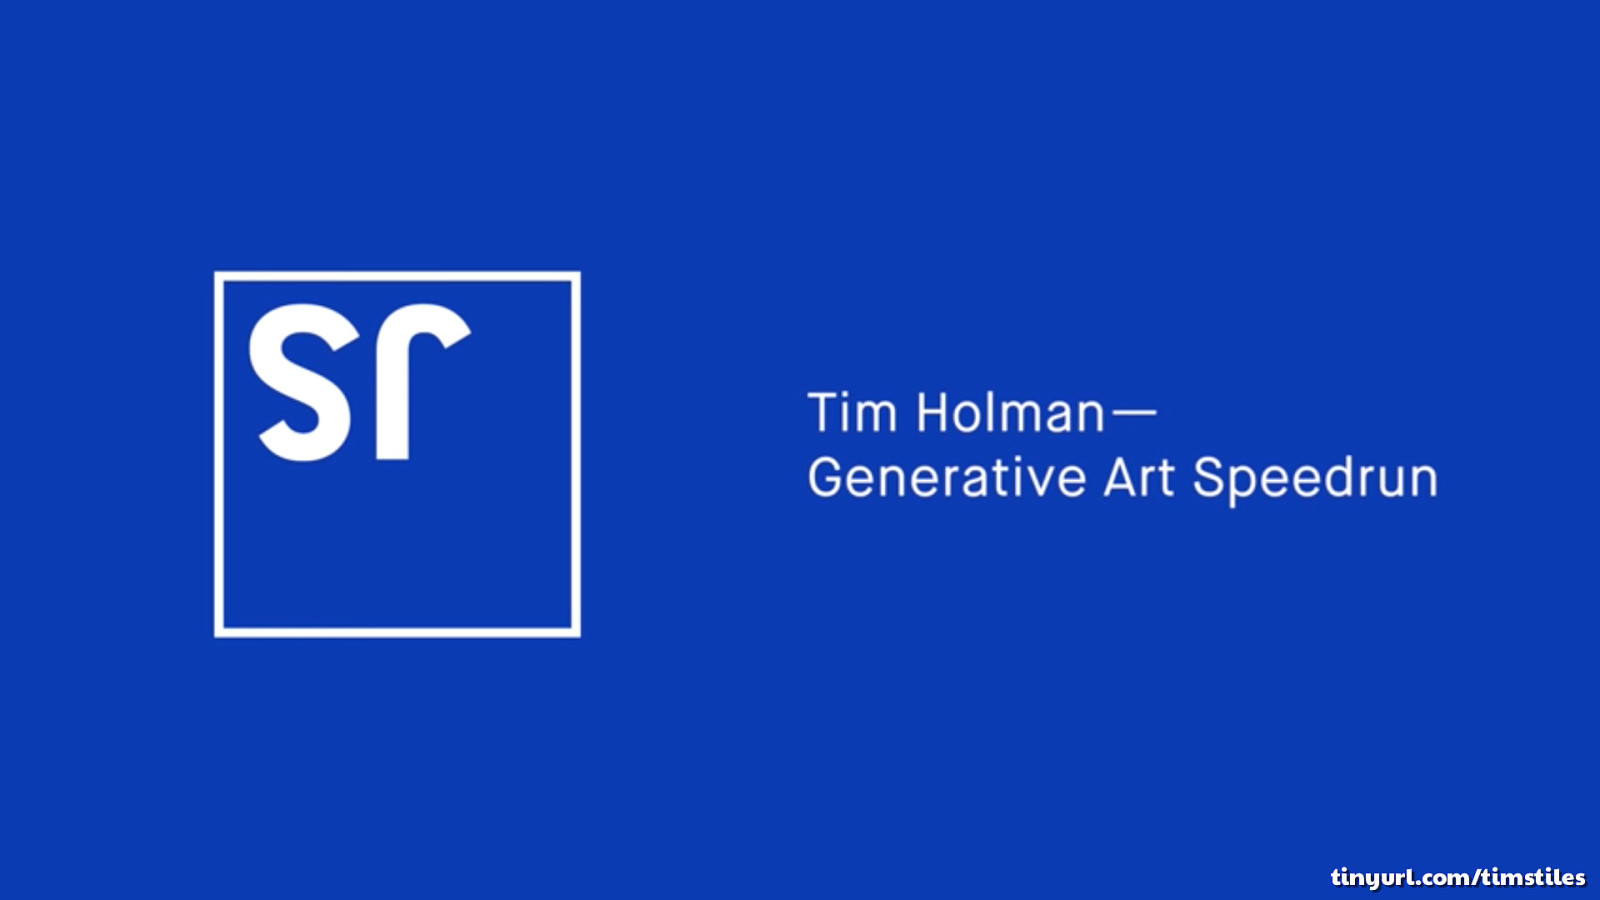
Now, some of what you’ll see is inspired by a wonderful talk Tim Holman gave at JSConf AU last year, where he talked about generative art using the Canvas API. I highly recommend you check it out on YouTube, because he is waaaay better at this stuff than I am. Pretty much everything in that talk is something you can apply to paint worklets in the CSS Paint API. So do check it out.
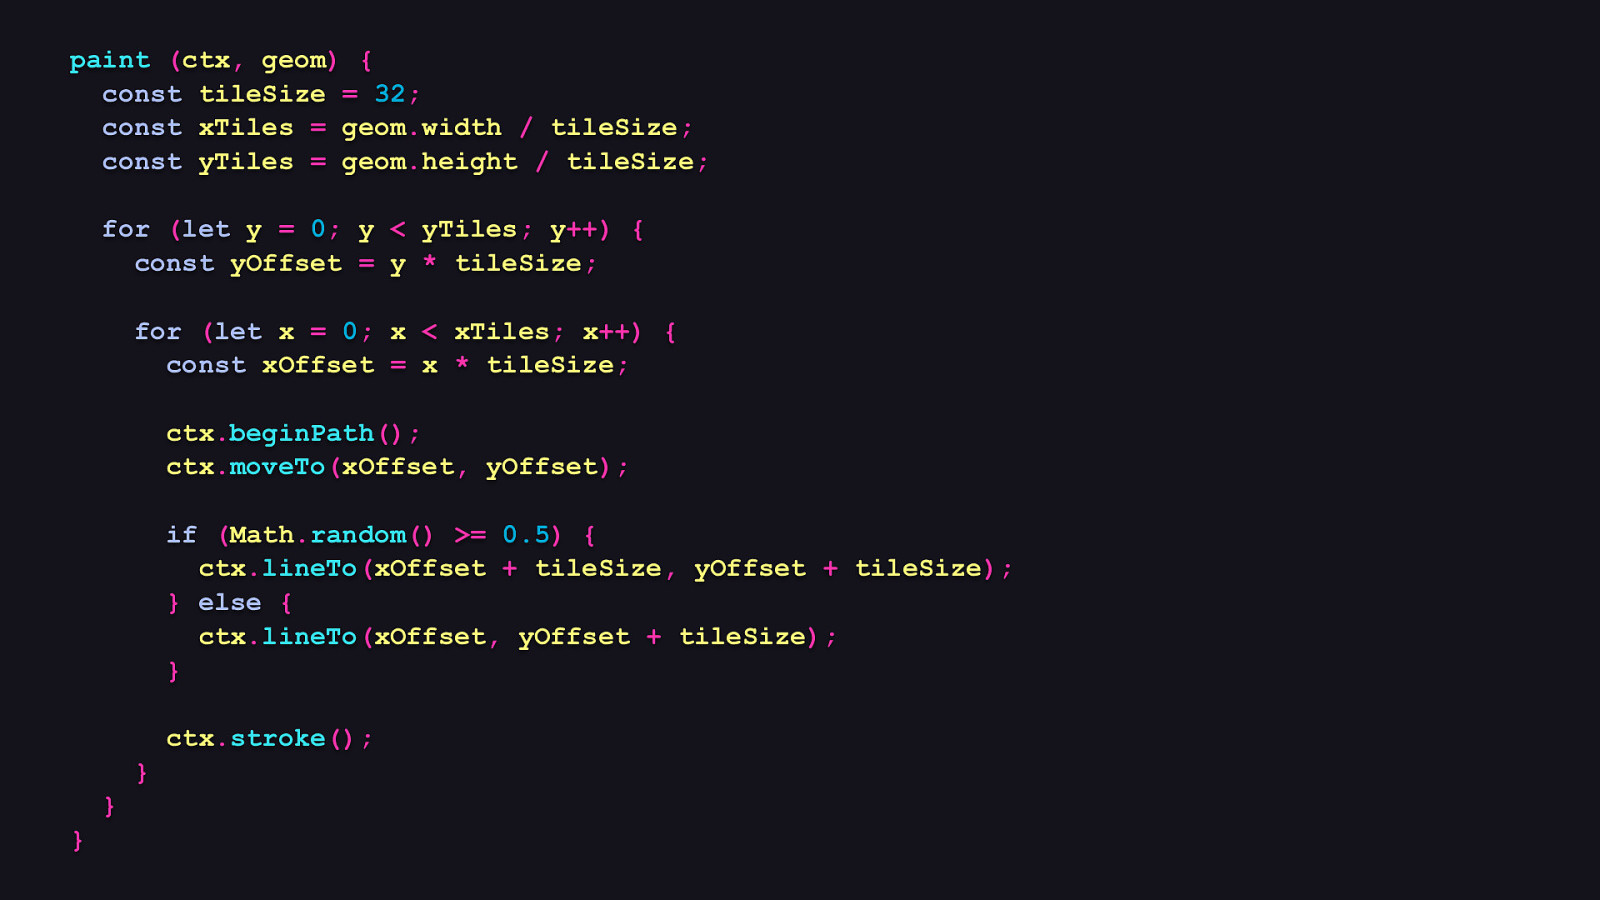
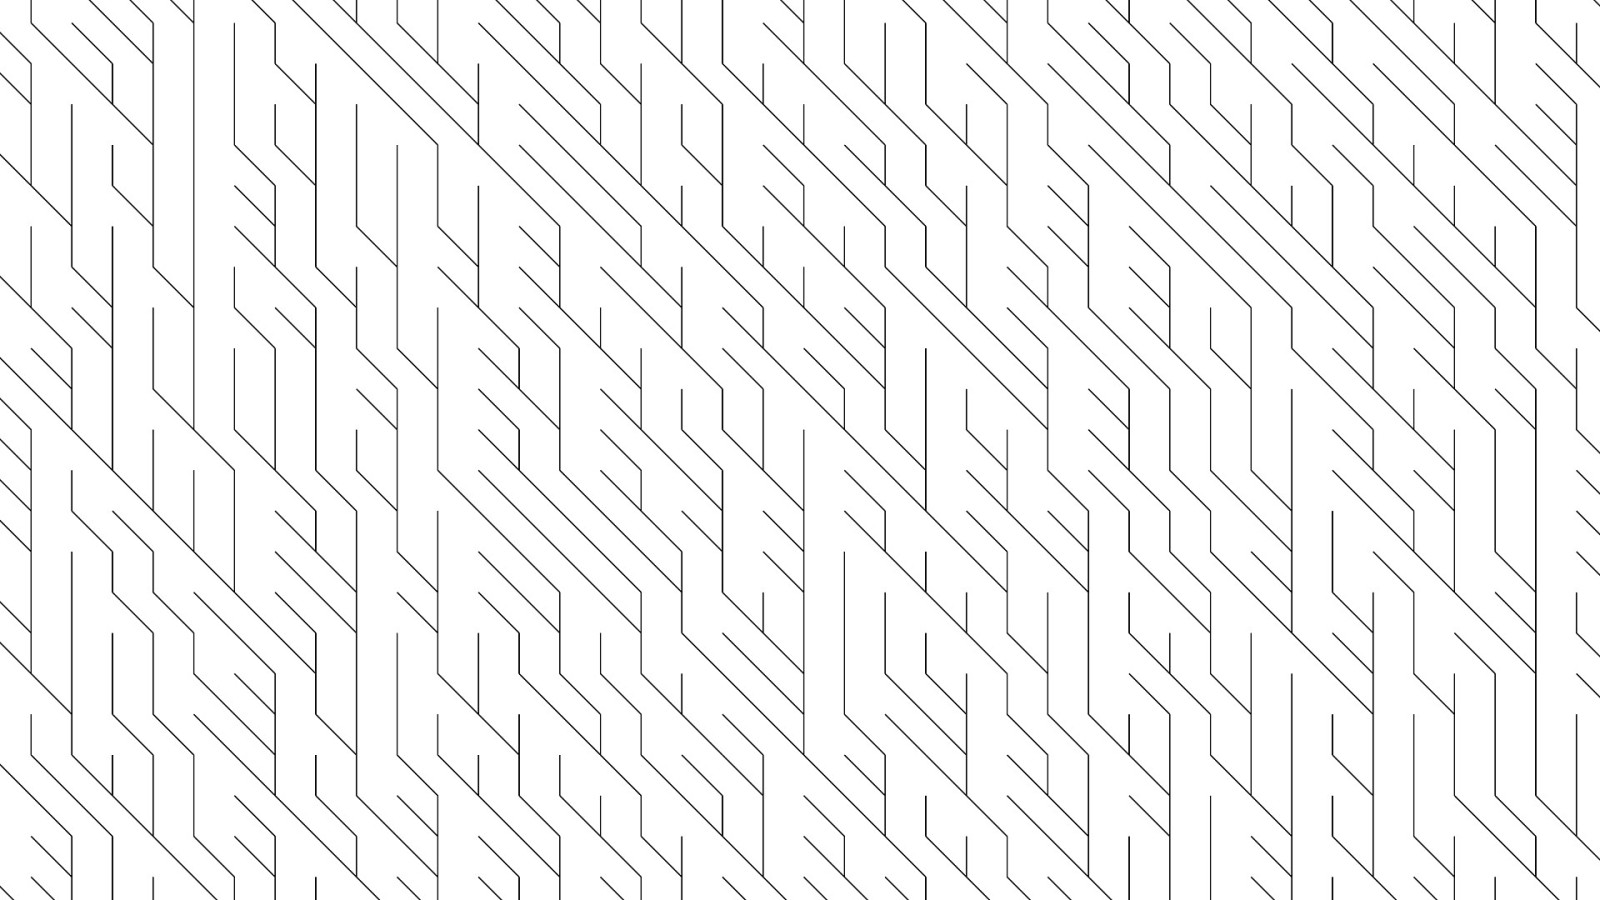
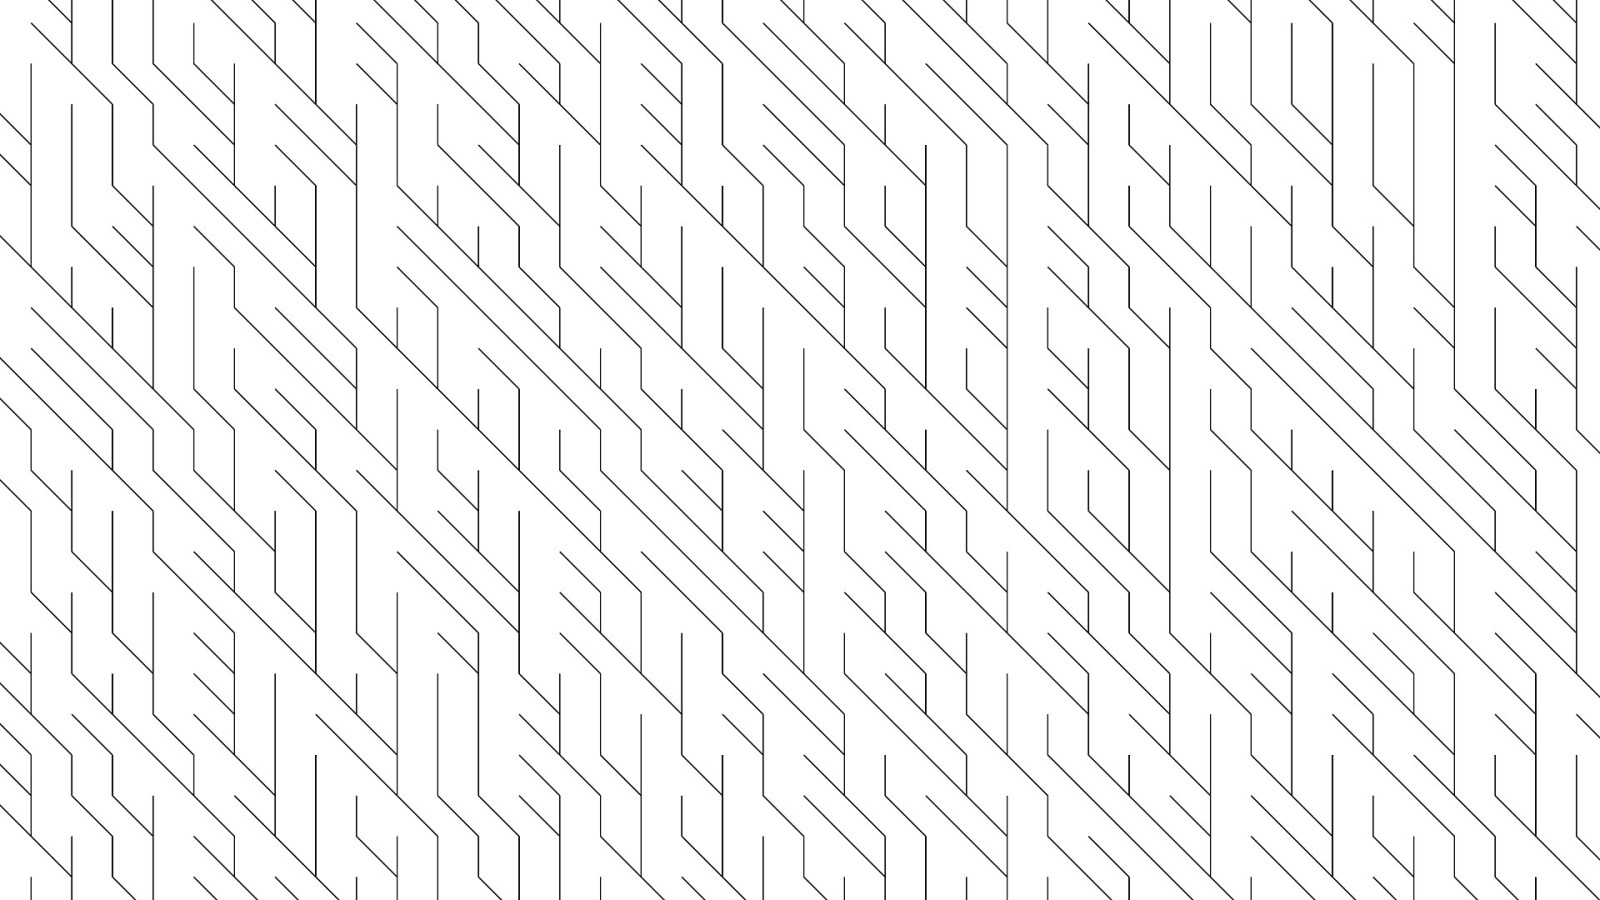
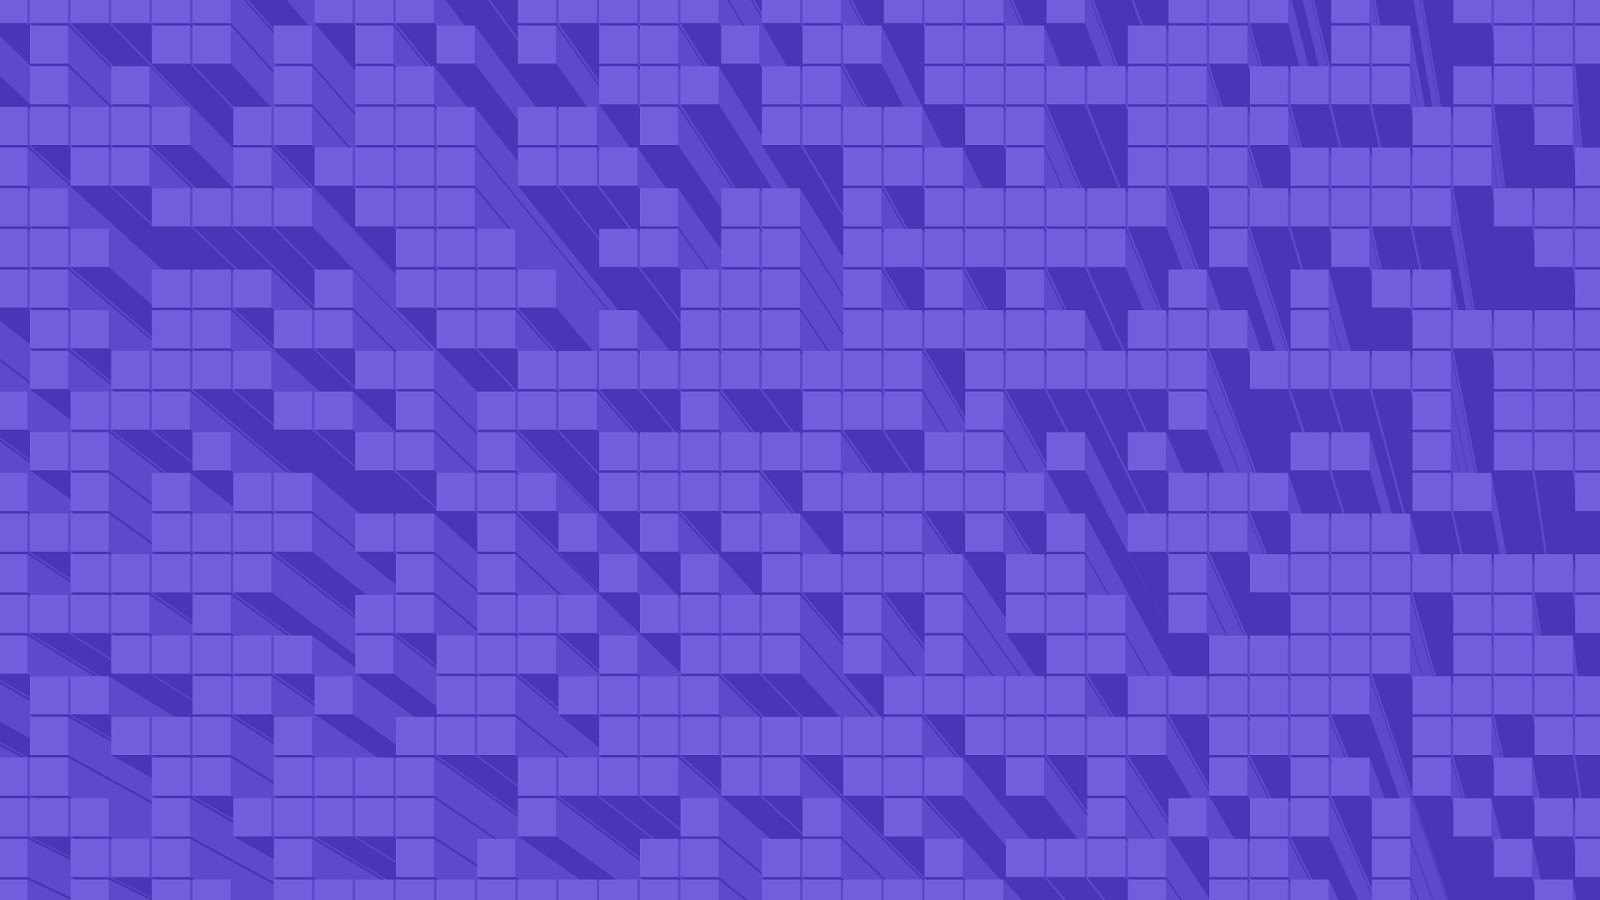
paint (ctx, geom) { const tileSize = 32; const xTiles = geom.width / tileSize; const yTiles = geom.height / tileSize; for (let y = 0; y < yTiles; y++) { const yOffset = y * tileSize; for (let x = 0; x < xTiles; x++) { const xOffset = x * tileSize; ctx.beginPath(); ctx.moveTo(xOffset, yOffset); if (Math.random() >= 0.5) { ctx.lineTo(xOffset + tileSize, yOffset + tileSize); } else { ctx.lineTo(xOffset, yOffset + tileSize); } ctx.stroke(); } } }
OK, let’s revisit the paint method in the Amazing paint worklet class and change things up. There’s more going on in this example than when we were just drawing a mundane circle in the middle of a bleak canvas.
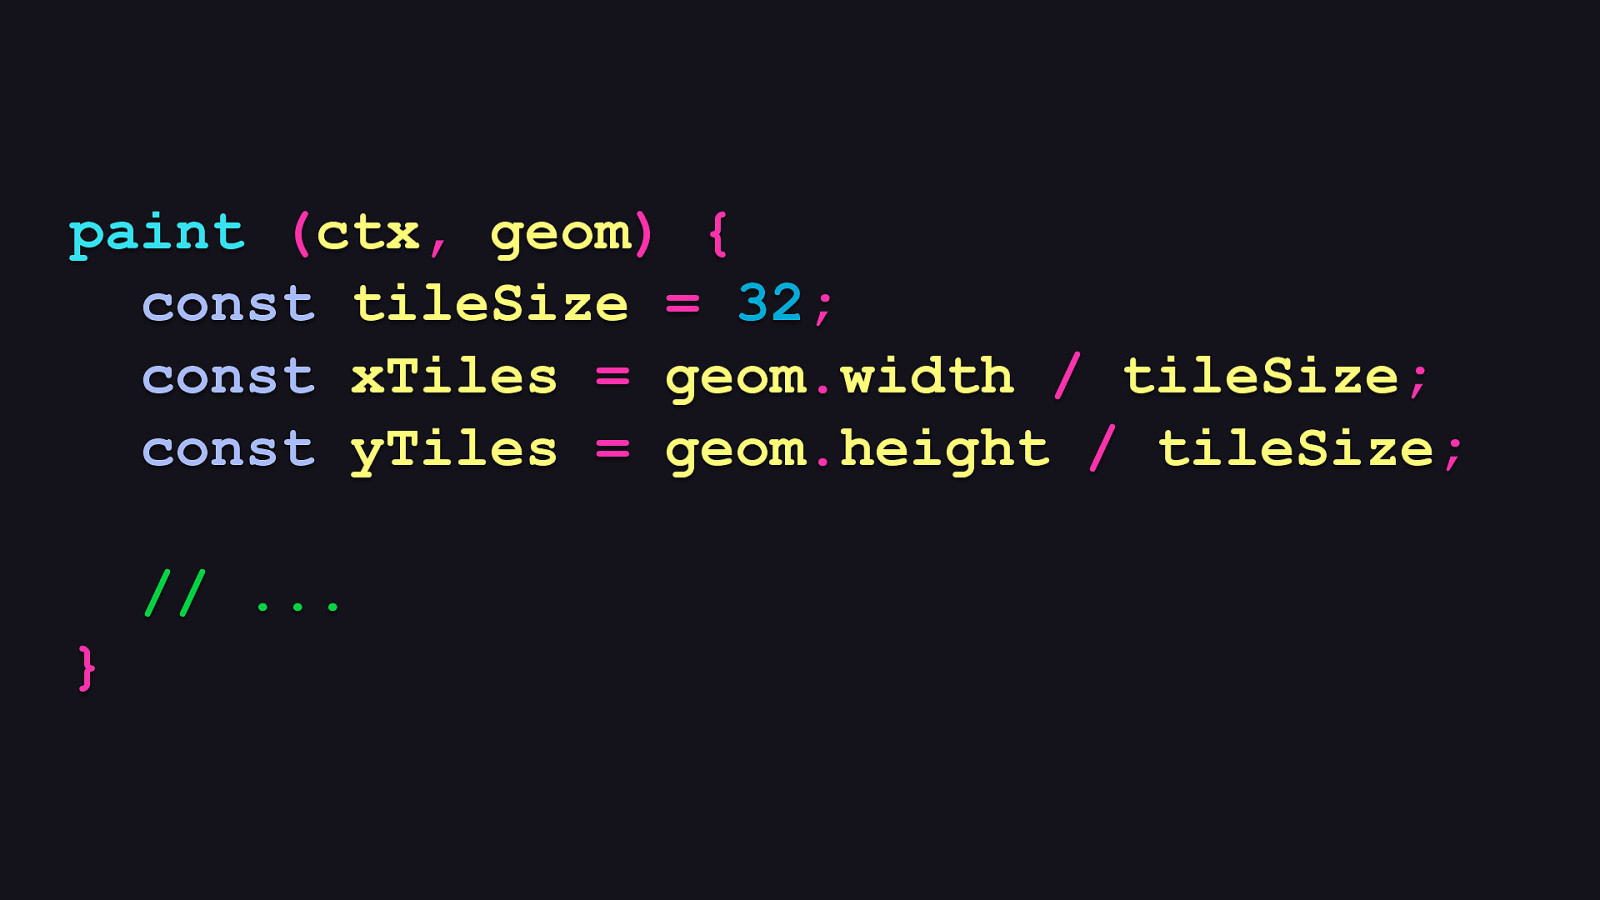
paint (ctx, geom) { const tileSize = 32; const xTiles = geom.width / tileSize; const yTiles = geom.height / tileSize; // … }
First, we establish the size of each tile, which will be 32 pixels square. Then, we divide the canvas’s width and height by the tile size, and then we’ll write two loops using those values to draw each tile.
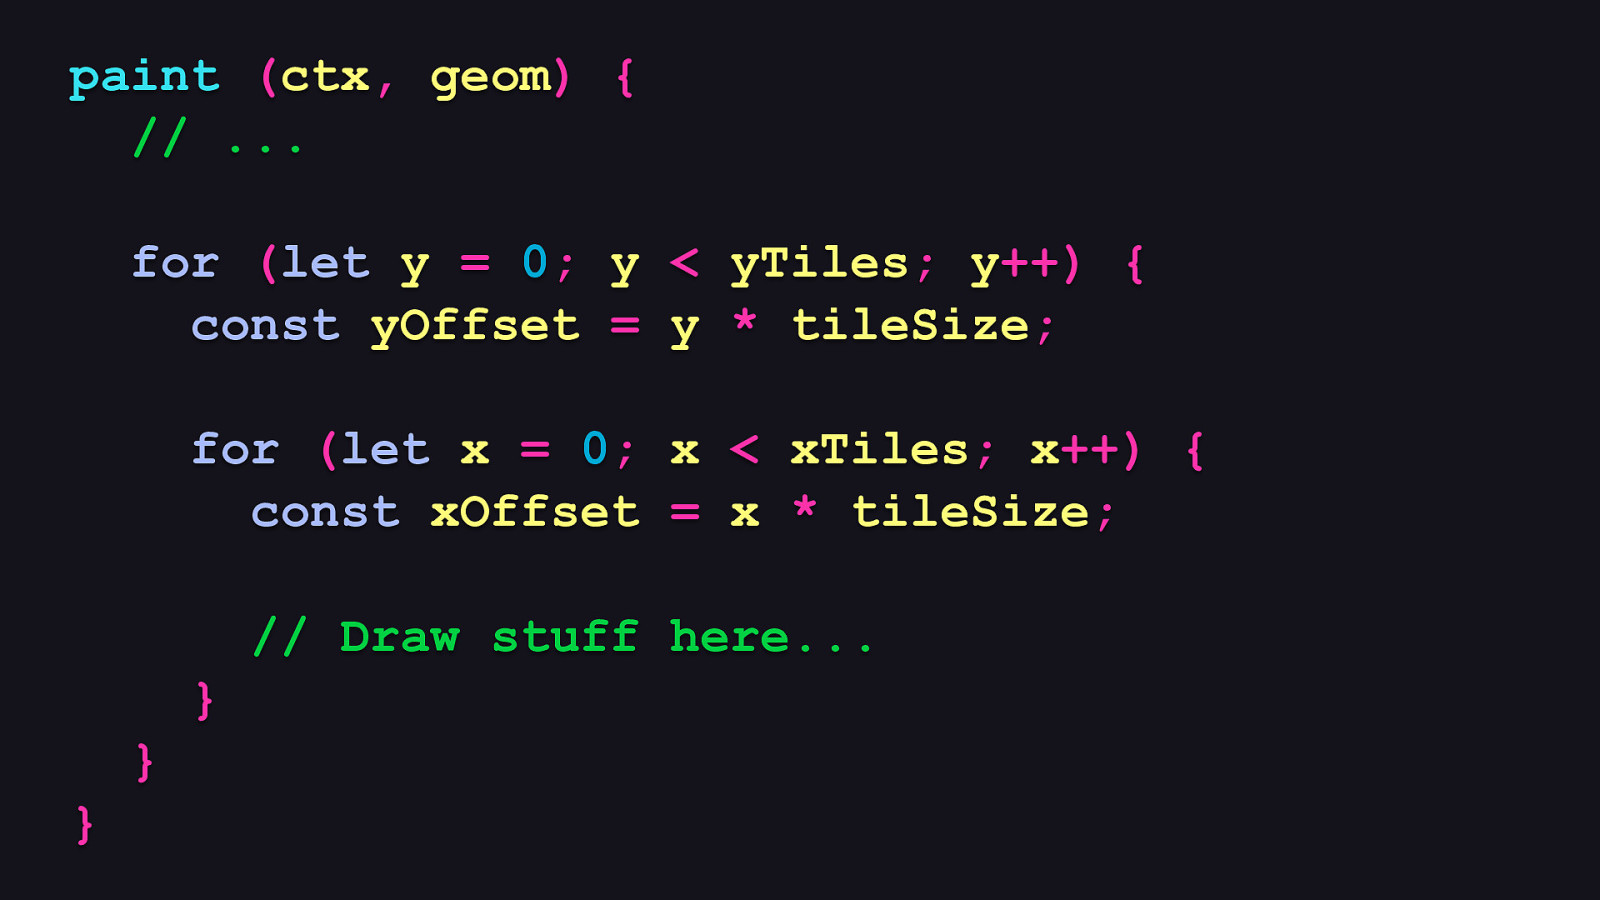
paint (ctx, geom) { // … for (let y = 0; y < yTiles; y++) { const yOffset = y * tileSize; for (let x = 0; x < xTiles; x++) { const xOffset = x * tileSize; // Draw stuff here… } } }
The first loop deals with tiles on the Y axis, and then the second loop deals with tiles on the X axis. The second loop is nested inside of the first. This will end up populating every “tile” available on the canvas with whatever we want to draw.
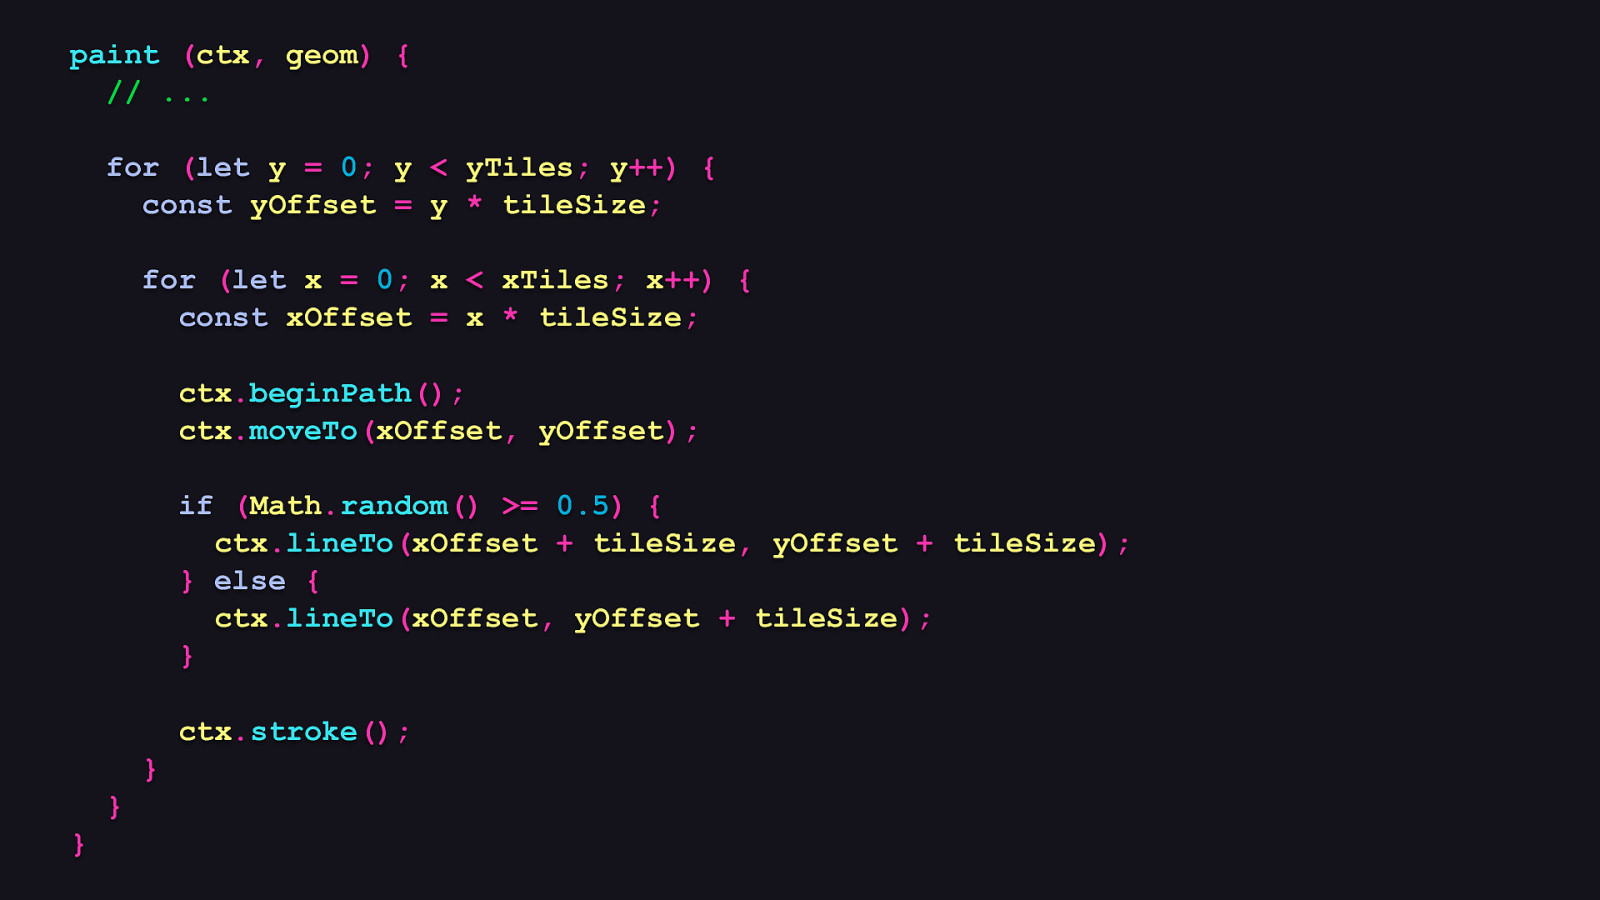
paint (ctx, geom) { // … for (let y = 0; y < yTiles; y++) { const yOffset = y * tileSize; for (let x = 0; x < xTiles; x++) { const xOffset = x * tileSize; ctx.beginPath(); ctx.moveTo(xOffset, yOffset); if (Math.random() >= 0.5) { ctx.lineTo(xOffset + tileSize, yOffset + tileSize); } else { ctx.lineTo(xOffset, yOffset + tileSize); } ctx.stroke(); } } }
Now, what we do here is up to you. In this example, I’m going to draw a line in every tile, but the random part of it will be where the line goes in the tile’s space. In every iteration, I call the context object’s beginPath method to start drawing a line. Then, I leave it to Math.random() to decide if the line will cross the tile space from the upper left corner to lower right corner, or draw a straight line from the upper left corner to the lower left corner. After that, I finish up the iteration by telling the context object to draw the stroke. So… what does that look like?
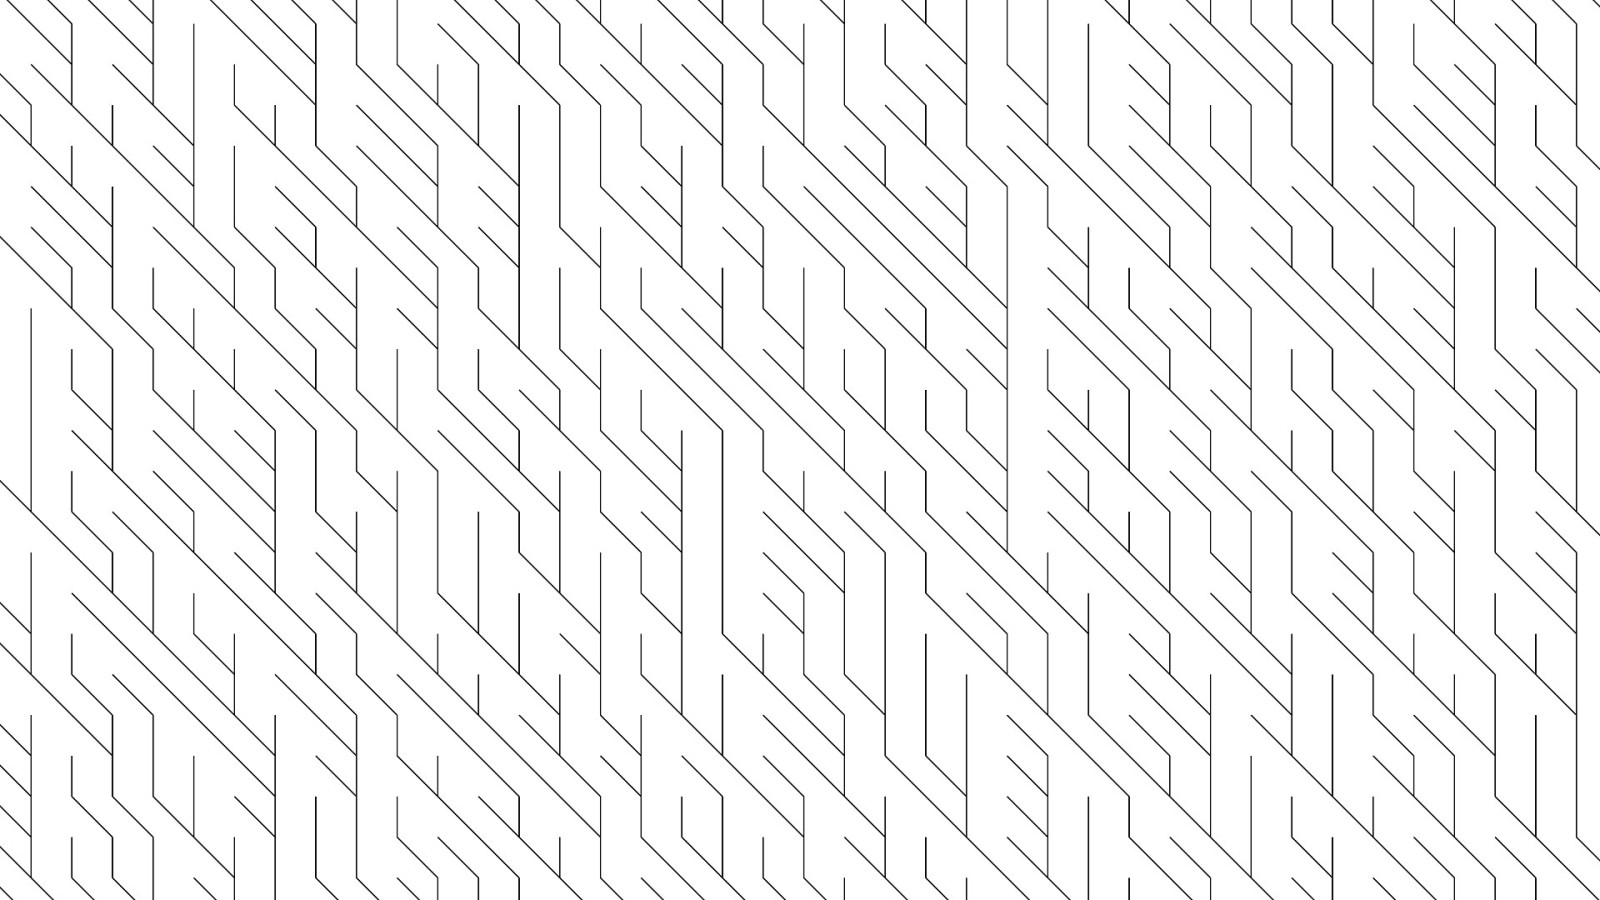
As it turns out, it looks like a kind of cool thing that changes when it’s drawn…
…every…
…single…
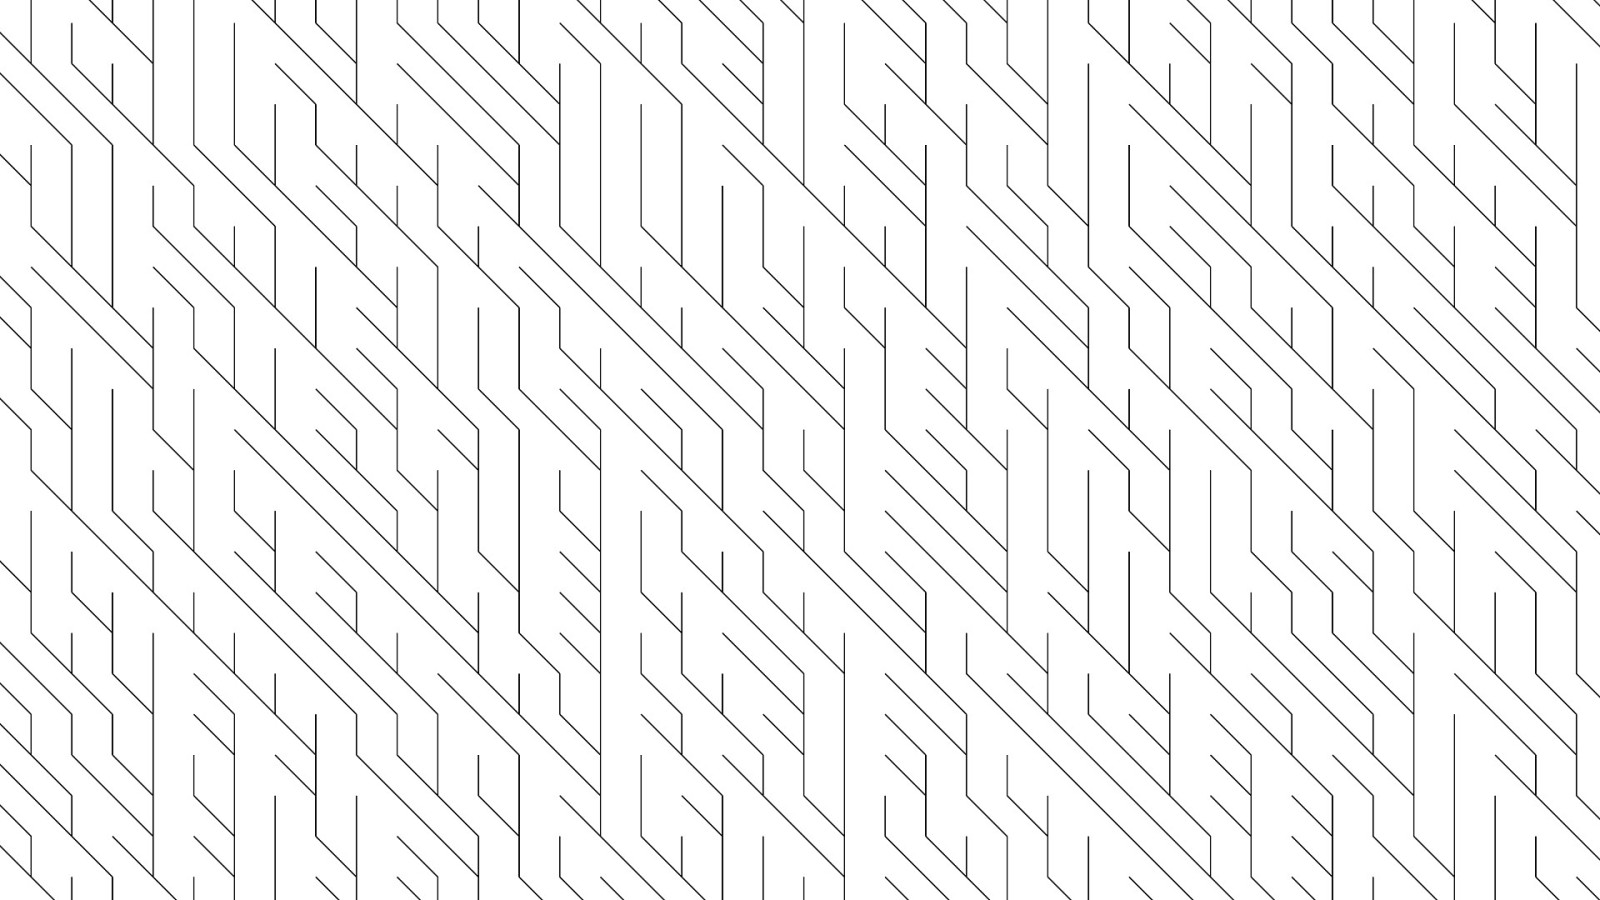
…time! That is the kind of spontaneity and randomness I’m talking about! And that’s just what you can do if you know only a teeny fraction of the Canvas API, but with a little ingenuity, you can go very far.

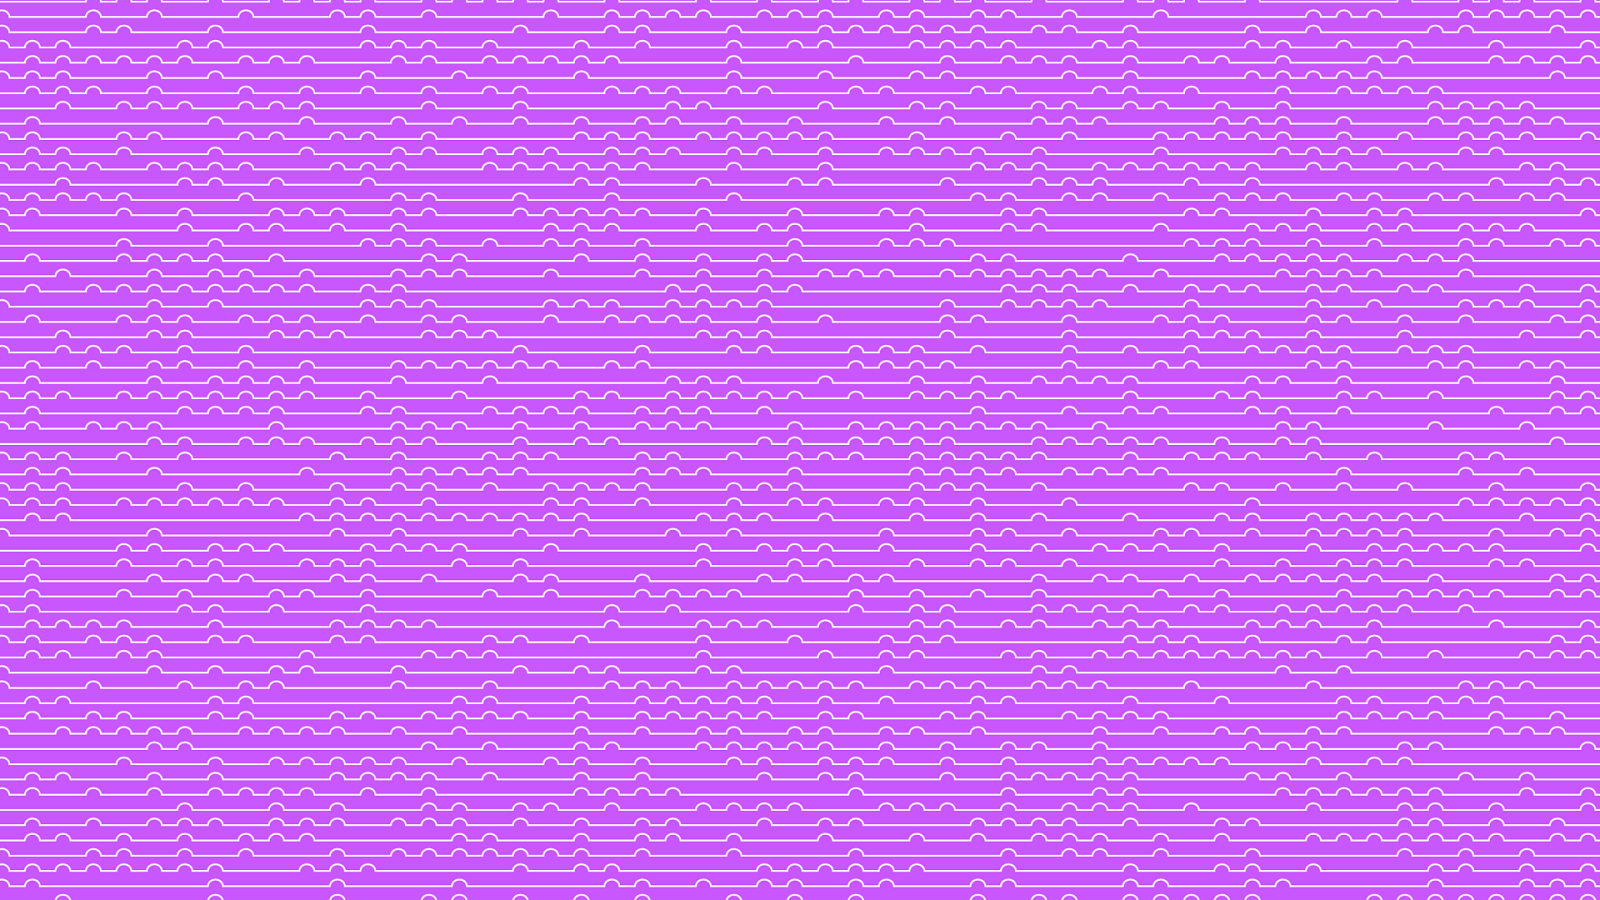
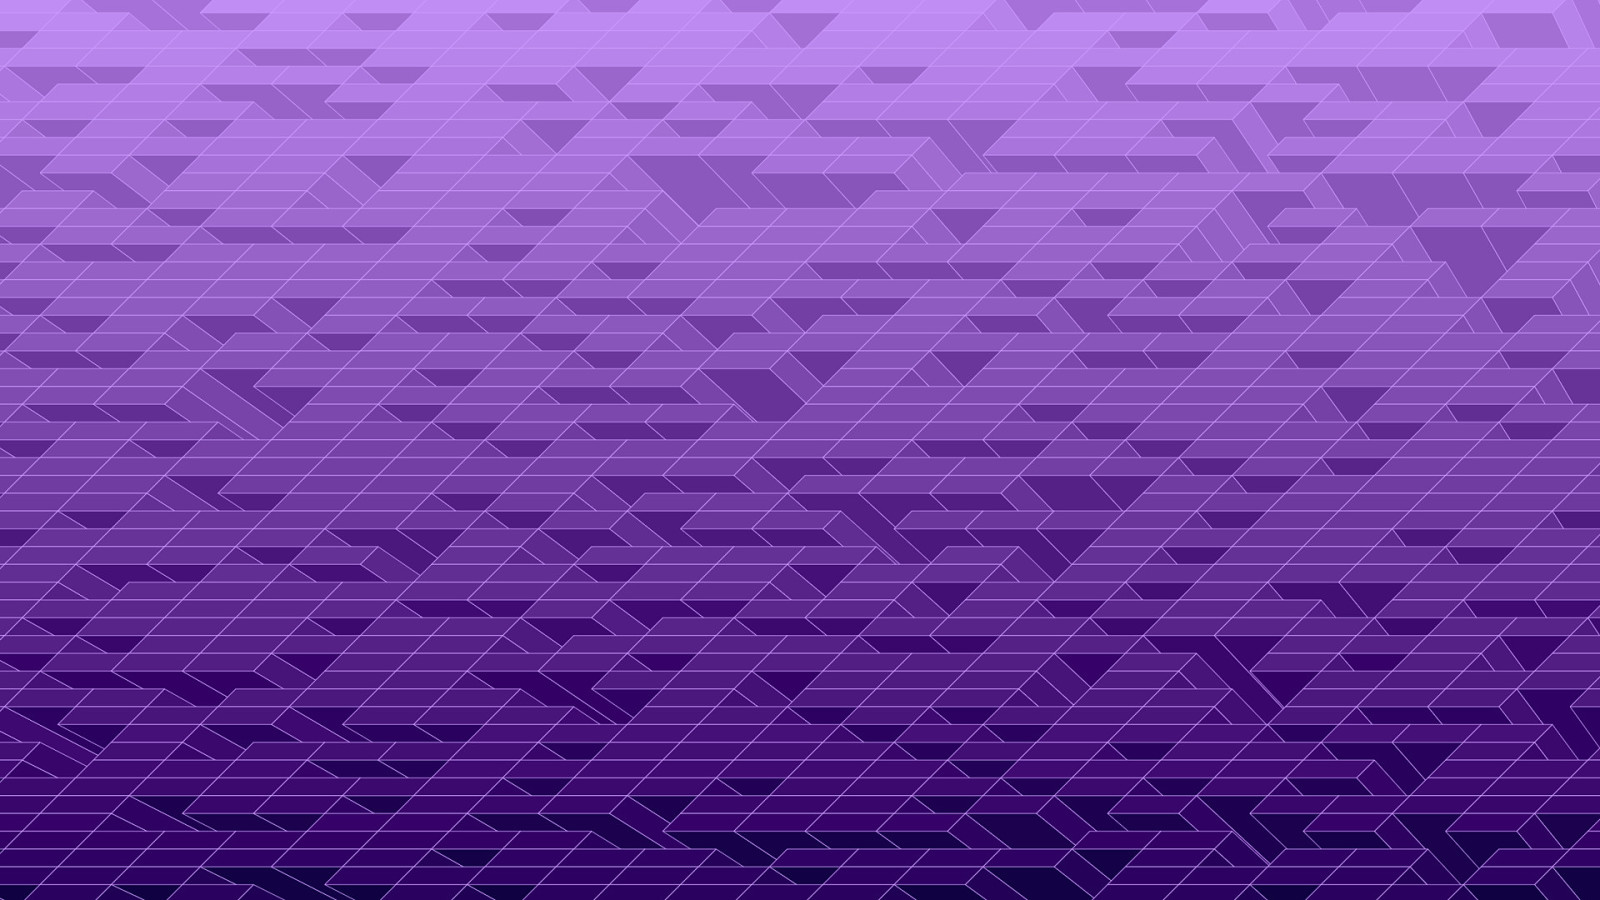
Like what if we decided to throw in a little something extra and randomly decide whether to draw a dot in upper left hand corner of each tile. This gives the final artwork a sort of circuit board appearance. We can also make the tile size a bit bigger and change the color, and because a canvas’s background is transparent, we can specify a CSS background-color property to set this artwork on whatever color we want. Imagine this pattern in a page masthead’s background, maybe at a subtle and low opacity that just gives the design just a little extra oomph without overpowering the foreground. OK, so that was cool, but let’s do a different take on this tile idea and experiment a little more.
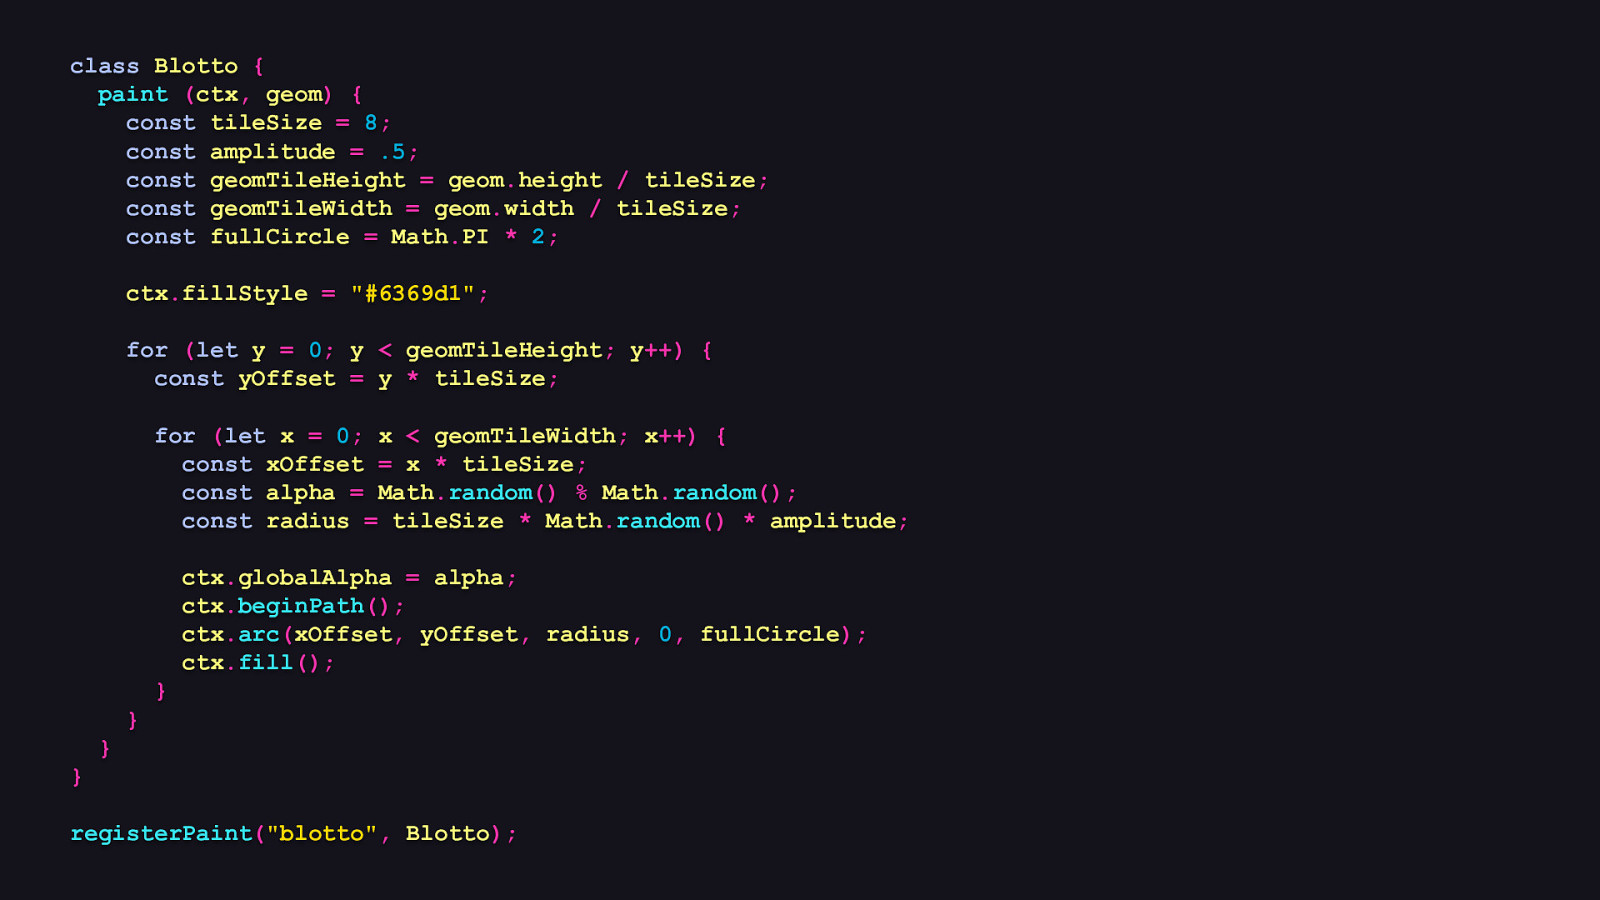
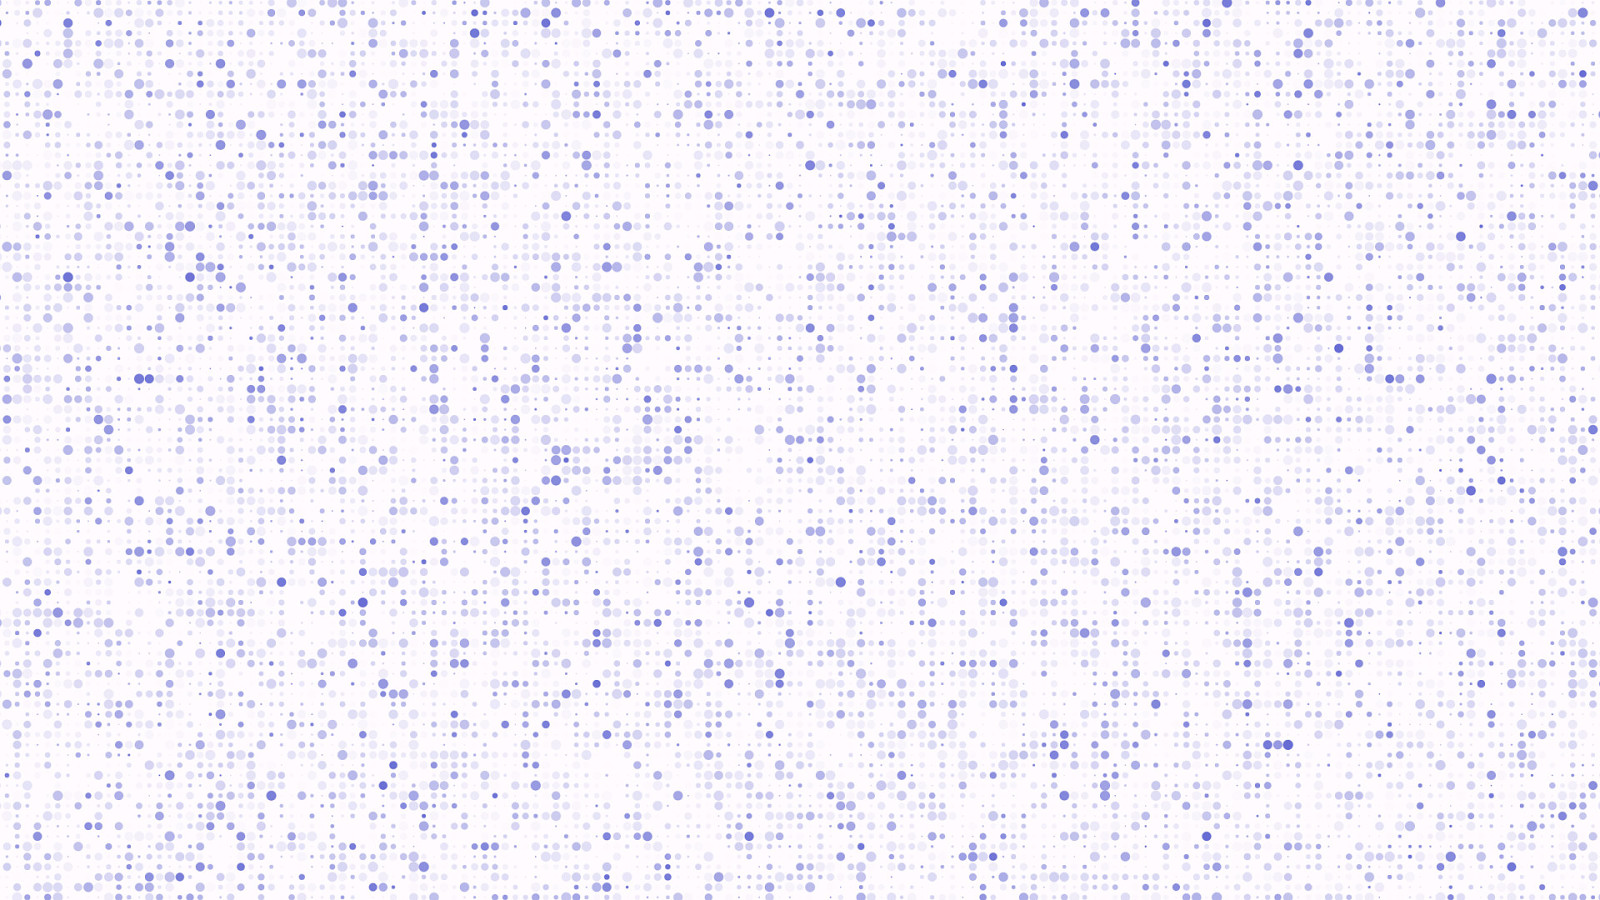
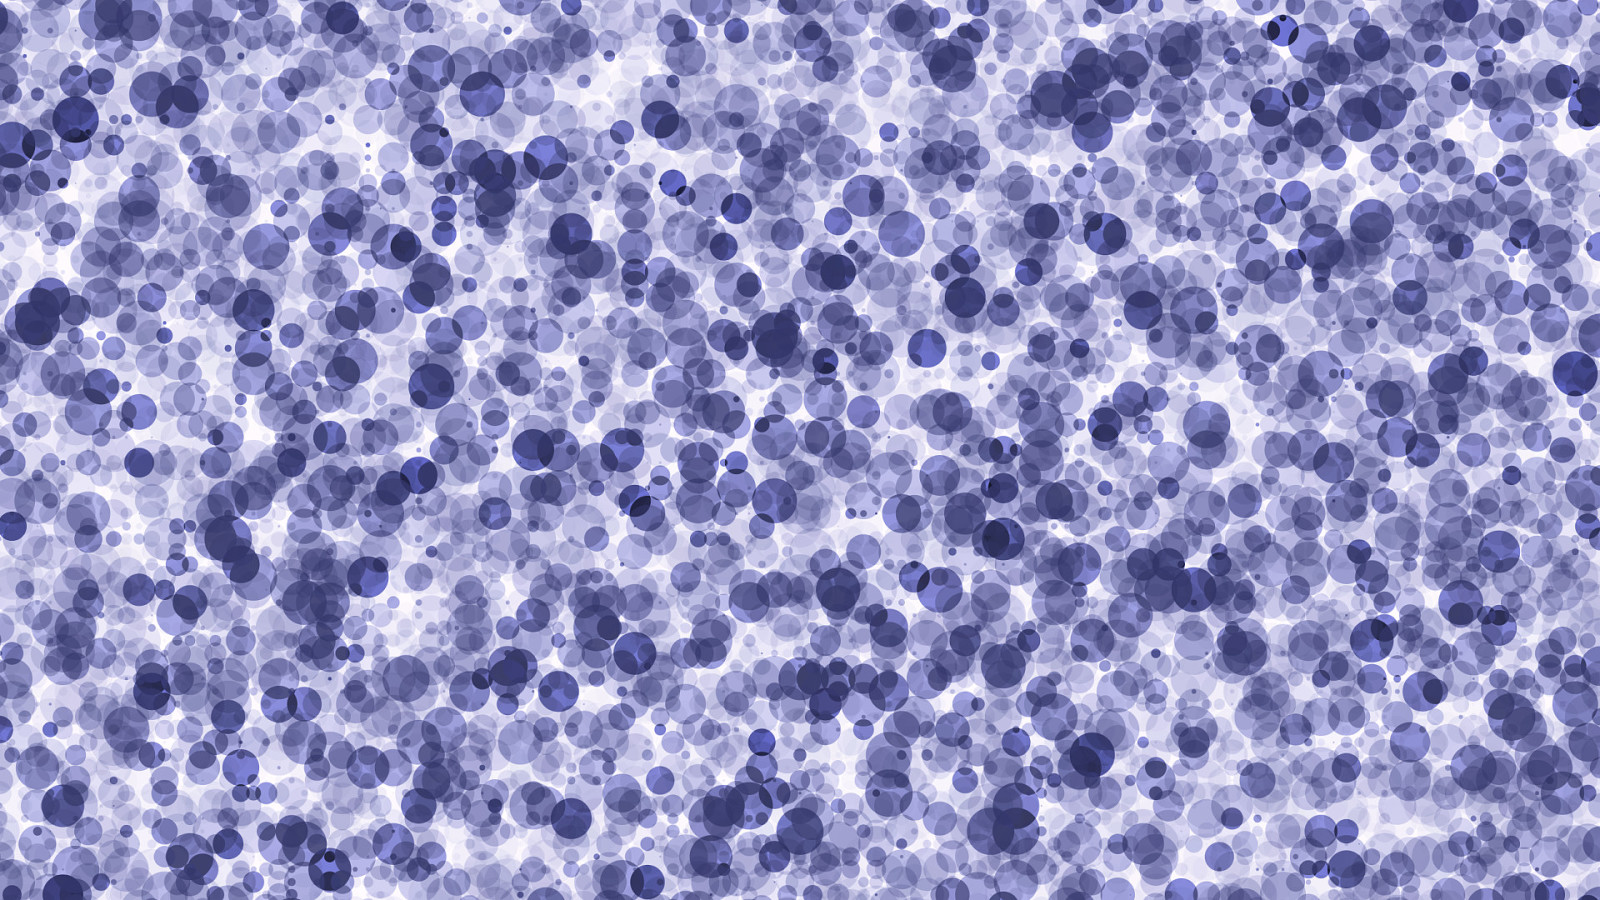
class Blotto { paint (ctx, geom) { const tileSize = 8; const amplitude = .5; const geomTileHeight = geom.height / tileSize; const geomTileWidth = geom.width / tileSize; const fullCircle = Math.PI * 2; ctx.fillStyle = “#6369d1”; for (let y = 0; y < geomTileHeight; y++) { const yOffset = y * tileSize; for (let x = 0; x < geomTileWidth; x++) { const xOffset = x * tileSize; const alpha = Math.random() % Math.random(); const radius = tileSize * Math.random() * amplitude; ctx.globalAlpha = alpha; ctx.beginPath(); ctx.arc(xOffset, yOffset, radius, 0, fullCircle); ctx.fill(); } } } } registerPaint(“blotto”, Blotto);
Here’s a paint worklet I call “blotto”, which draws circles of varying size and opacity in every tile. There’s a bit of code here, so let’s walk through it.
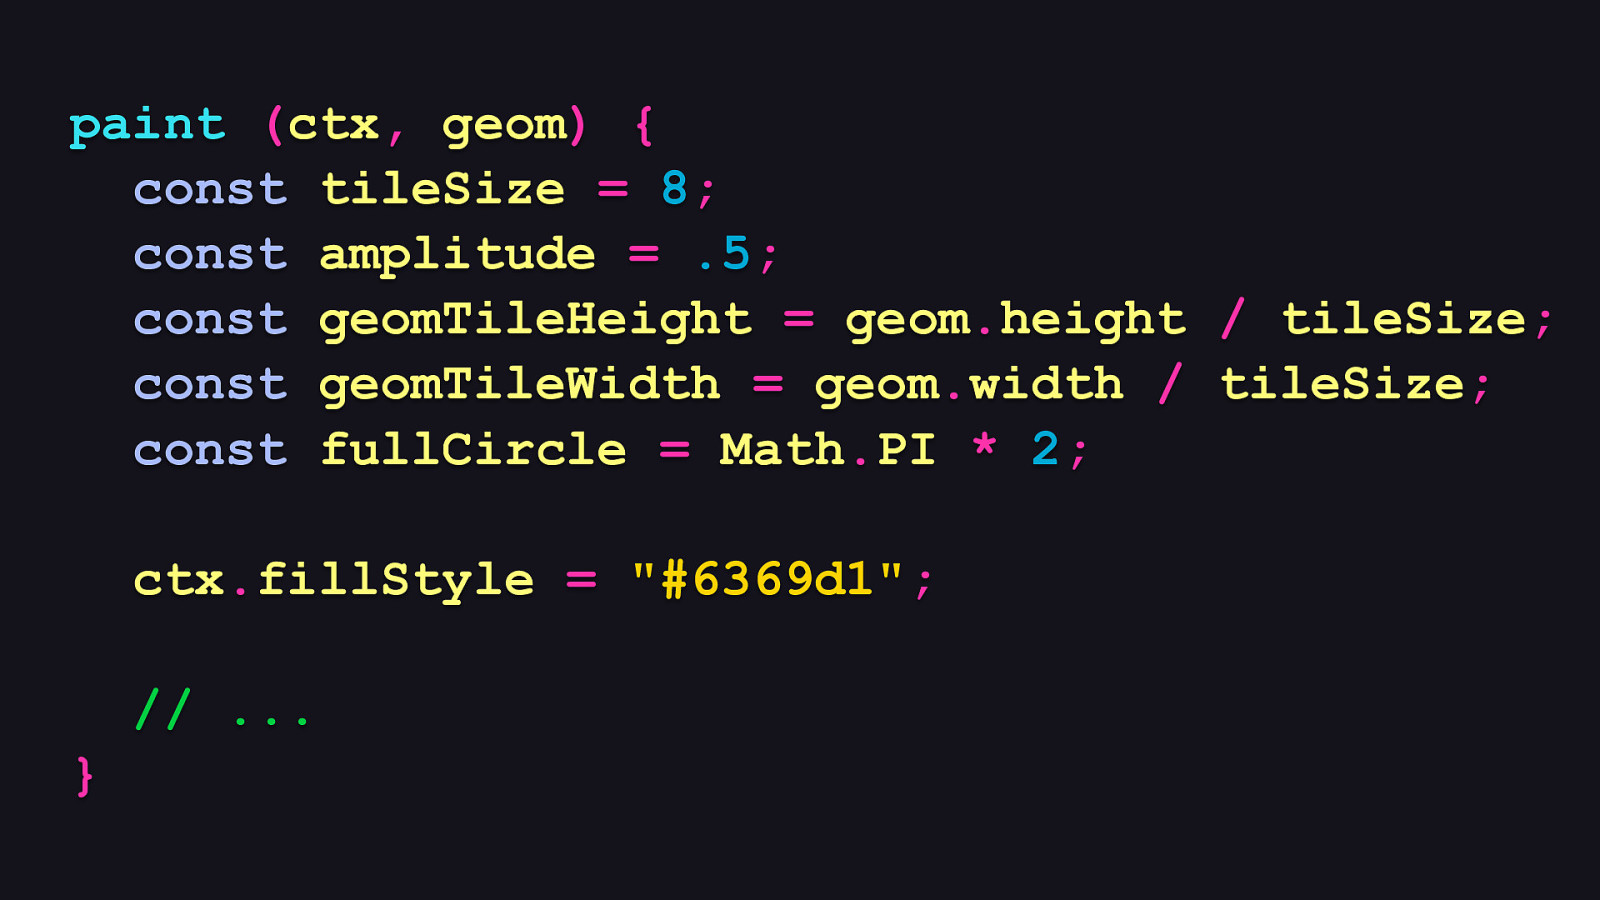
paint (ctx, geom) { const tileSize = 8; const amplitude = .5; const geomTileHeight = geom.height / tileSize; const geomTileWidth = geom.width / tileSize; const fullCircle = Math.PI * 2; ctx.fillStyle = “#6369d1”; // … }
At the beginning of Blotto’s paint method, we set some variables: - The tile size, of course, which is 8 by 8 pixels. - Then we define an amplitude variable, which aids us in generating randomly sized circles later on. - Then we calculate the number of tiles on both axes. - Then we store the result of PI times two for drawing complete circles. - And finally, we set the fill style to a nice blue.
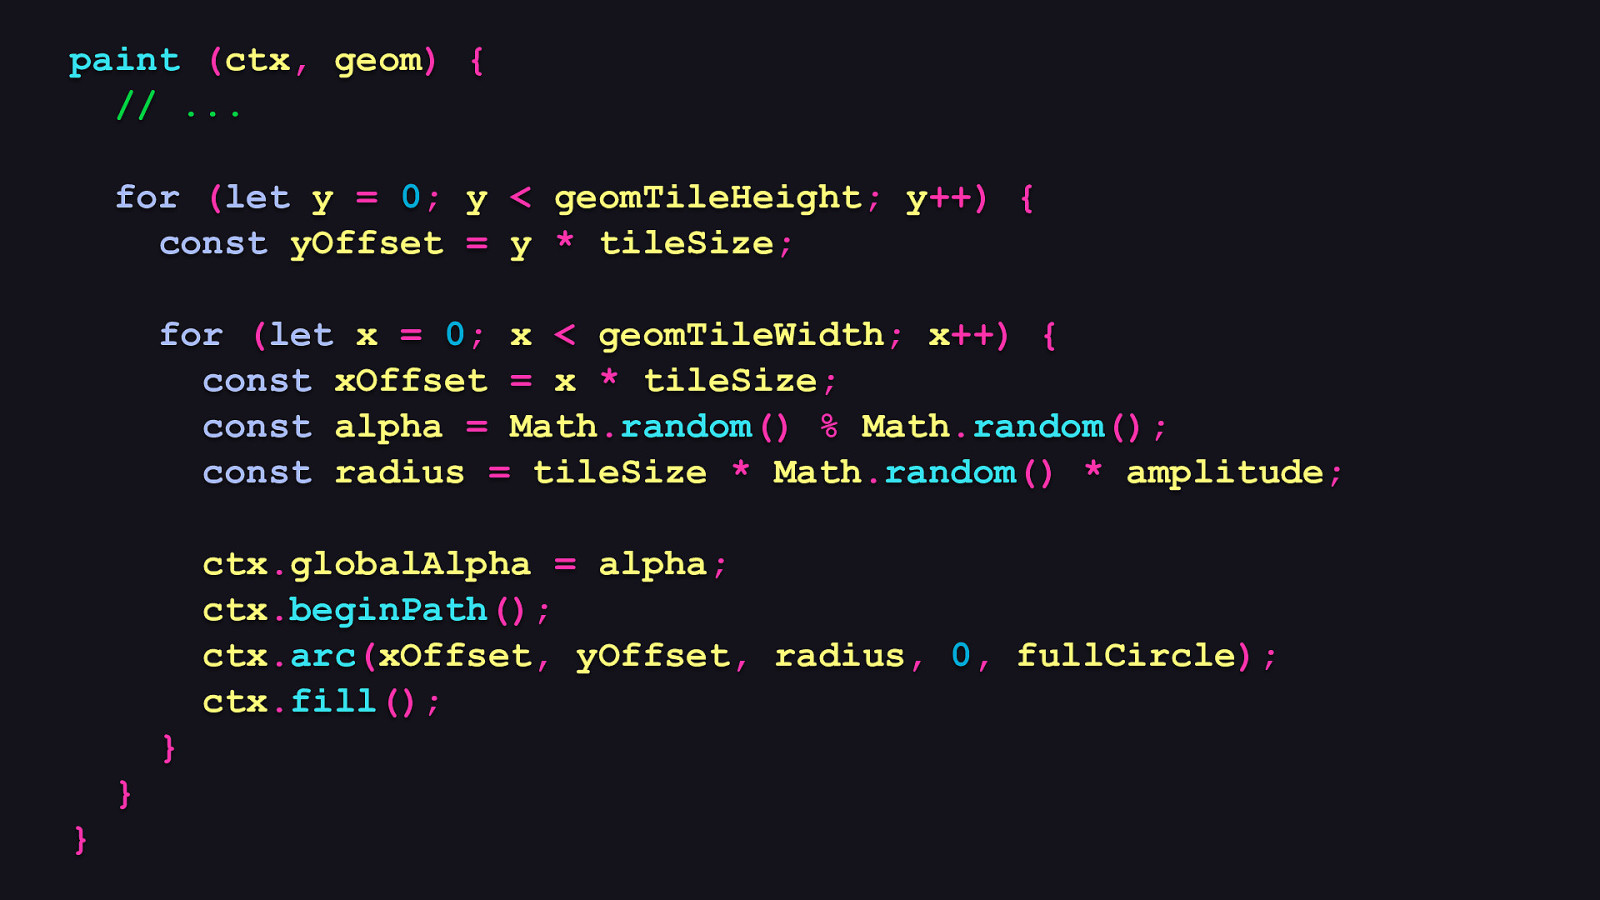
paint (ctx, geom) { // … for (let y = 0; y < geomTileHeight; y++) { const yOffset = y * tileSize; for (let x = 0; x < geomTileWidth; x++) { const xOffset = x * tileSize; const alpha = Math.random() % Math.random(); const radius = tileSize * Math.random() * amplitude; ctx.globalAlpha = alpha; ctx.beginPath(); ctx.arc(xOffset, yOffset, radius, 0, fullCircle); ctx.fill(); } } }
Now here’s where we do the heavy lifting: - You’ll note that the loops are the same as the prior example that generates the circuity pattern, and we do all the work inside of the second nested loop. - Now where it changes is that we generate a random alpha value by getting the remainder of Math.random() divided against itself. This will get us a valid transparency value from 0.0 to 1.0. - Then we multiply the tile size by Math.random() and our amplitude value from earlier. - Now all we do from here is draw a circle with that information.
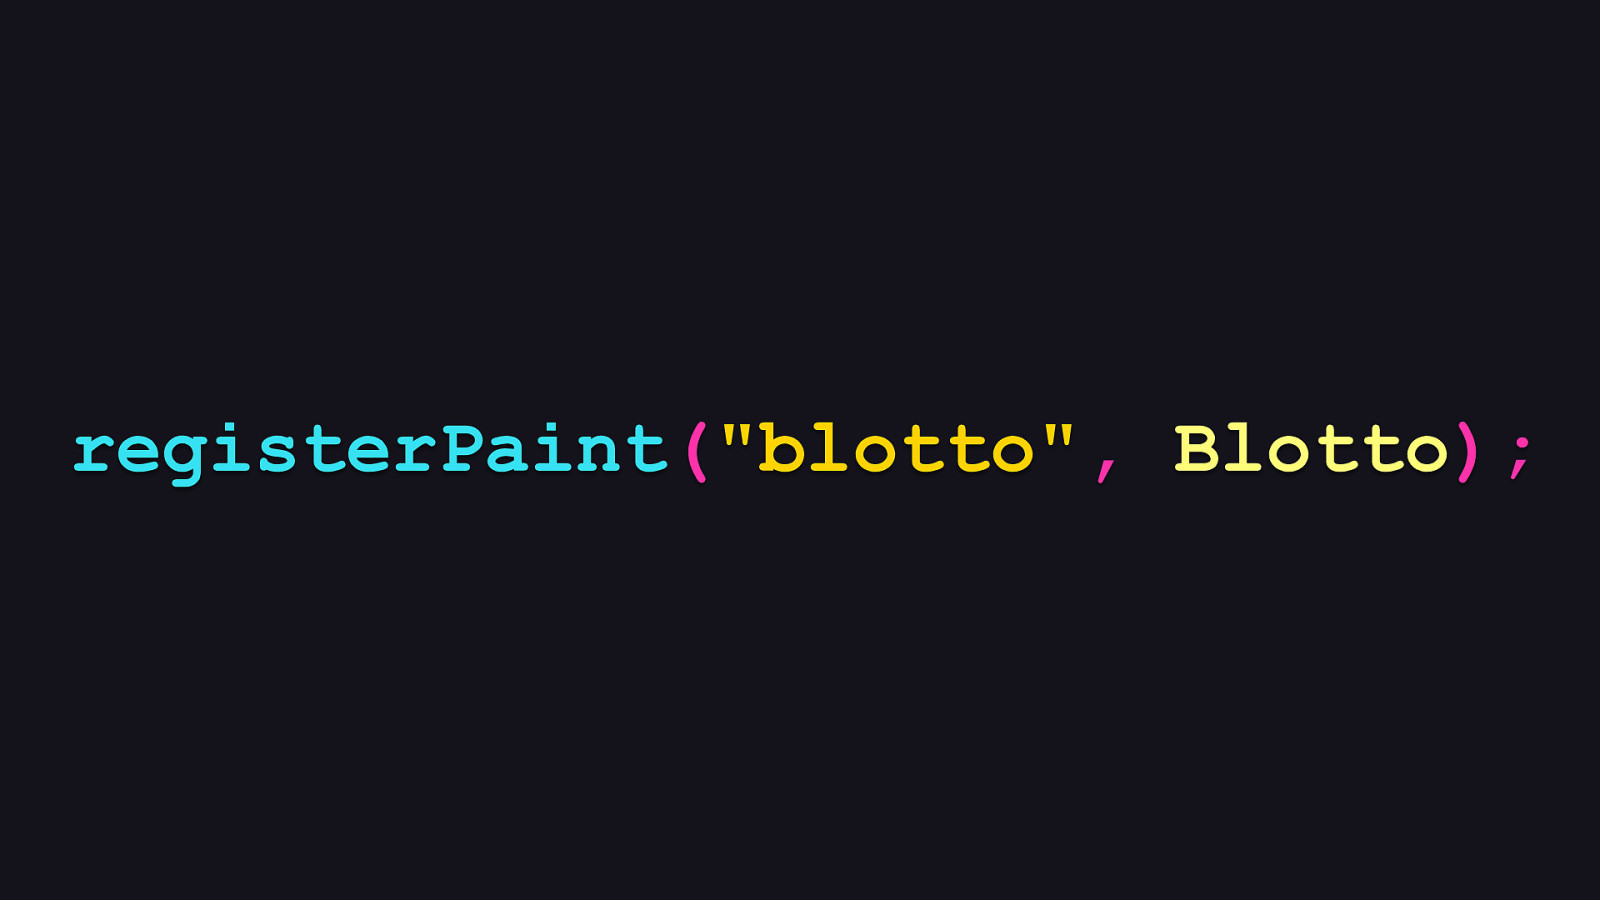
registerPaint(“blotto”, Blotto);
Then we register good ‘ol Blotto here like this.
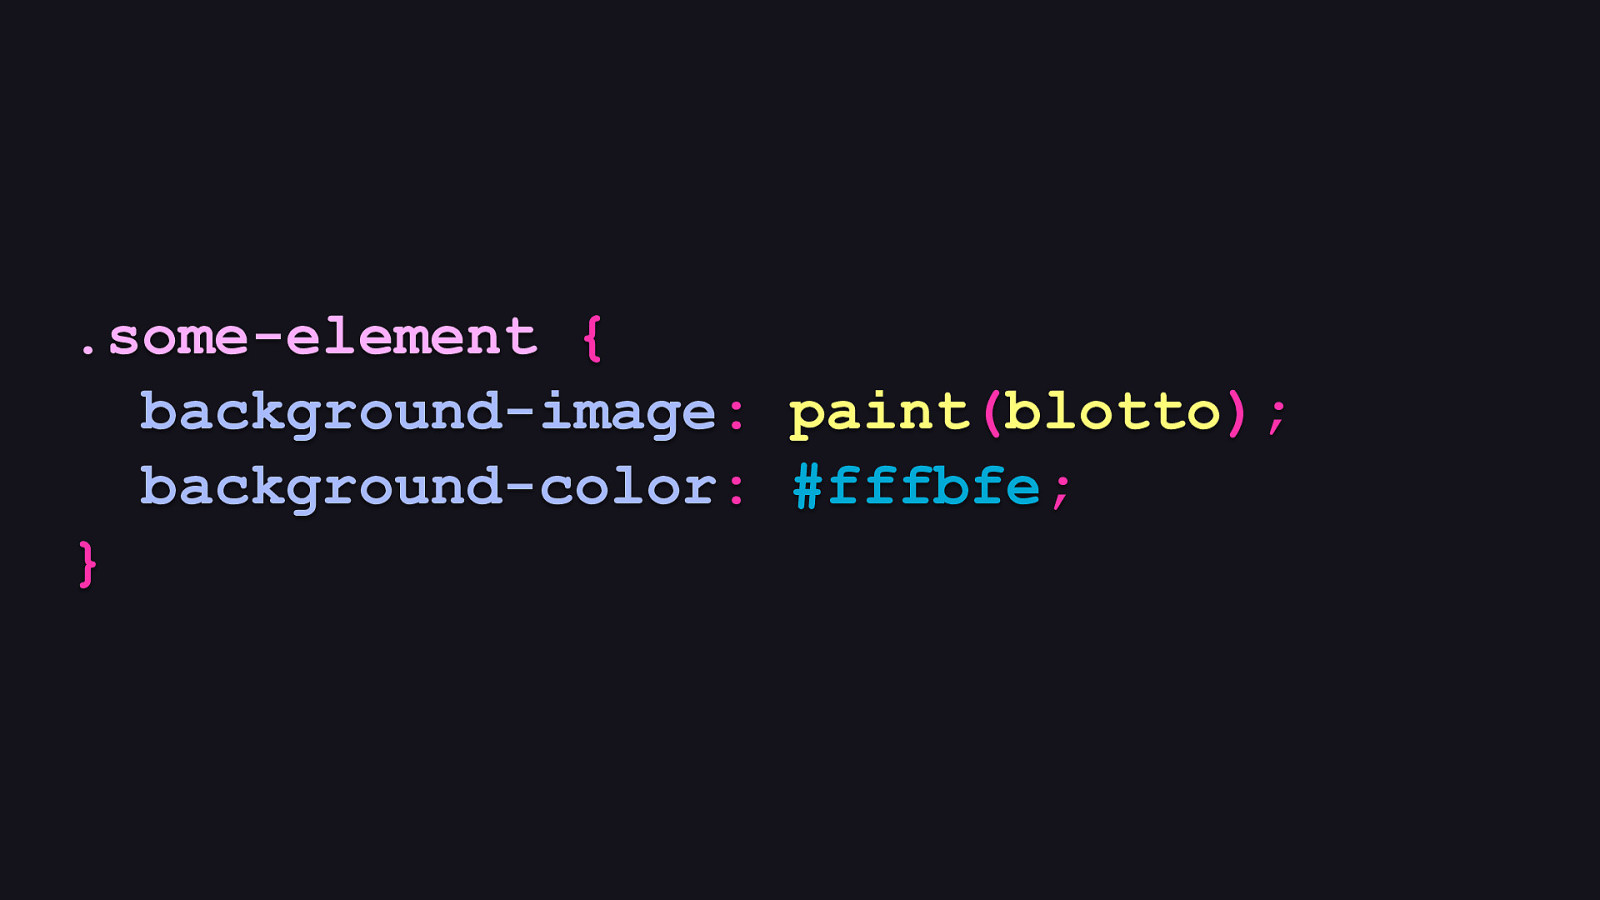
.some-element { background-image: paint(blotto); background-color: #fffbfe; }
Then we can use it in CSS like so. Because paint worklets draw on a transparent background by default, we can add a background-color property to overlay them on any color we want. Here, I’ve gone with an off-white color. So after all of that faffing about, what does it look like?
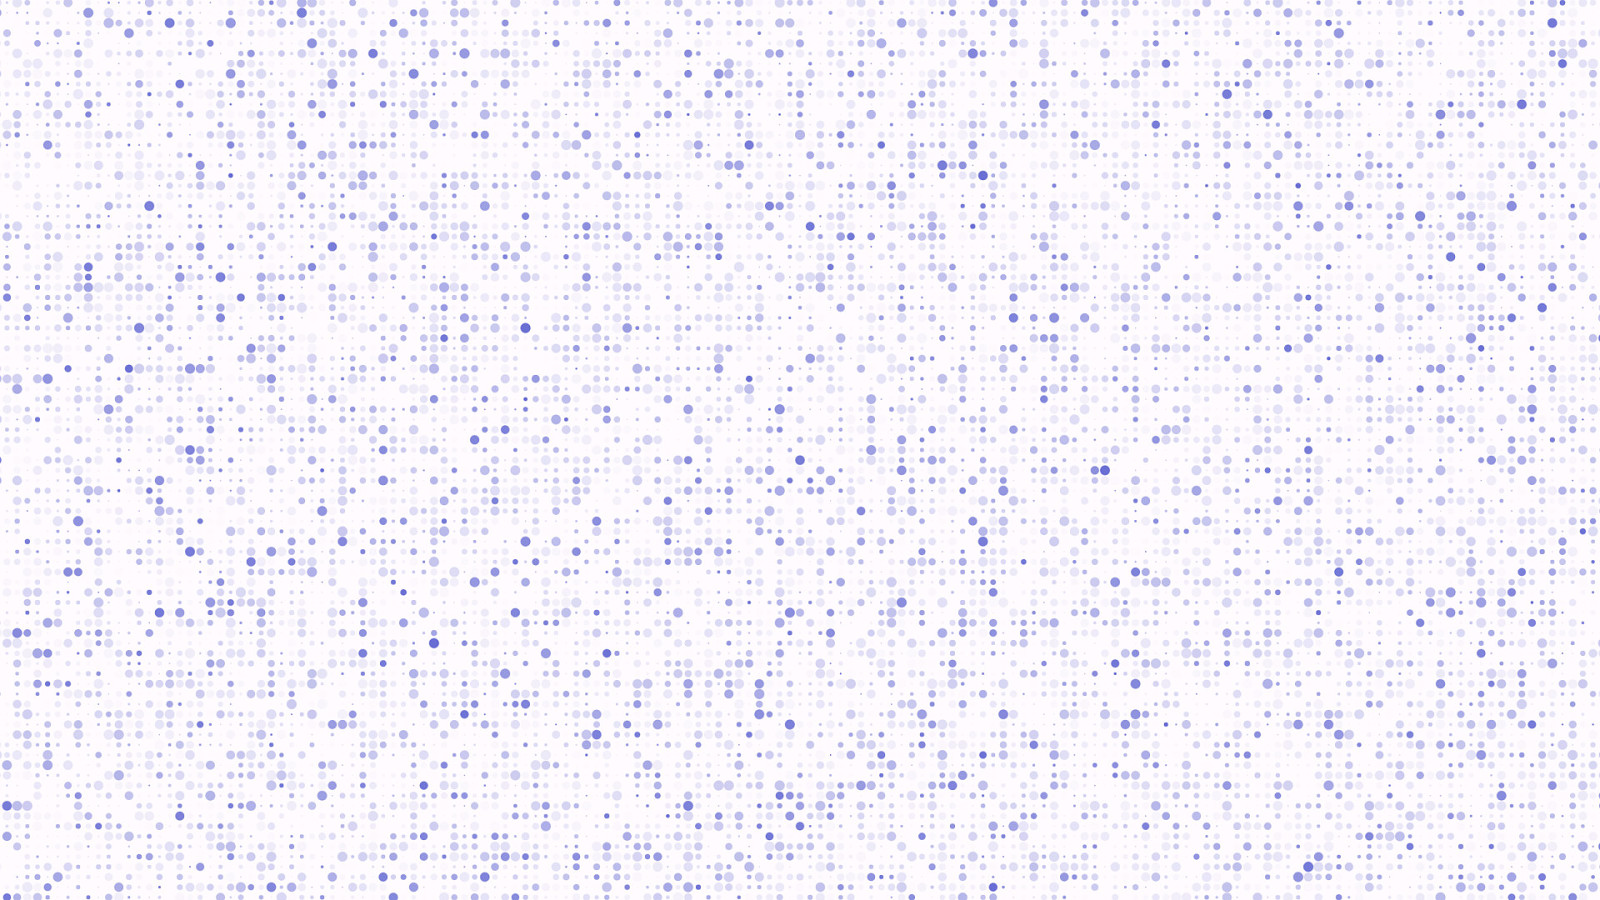
Not bad at all, if I do say so myself!
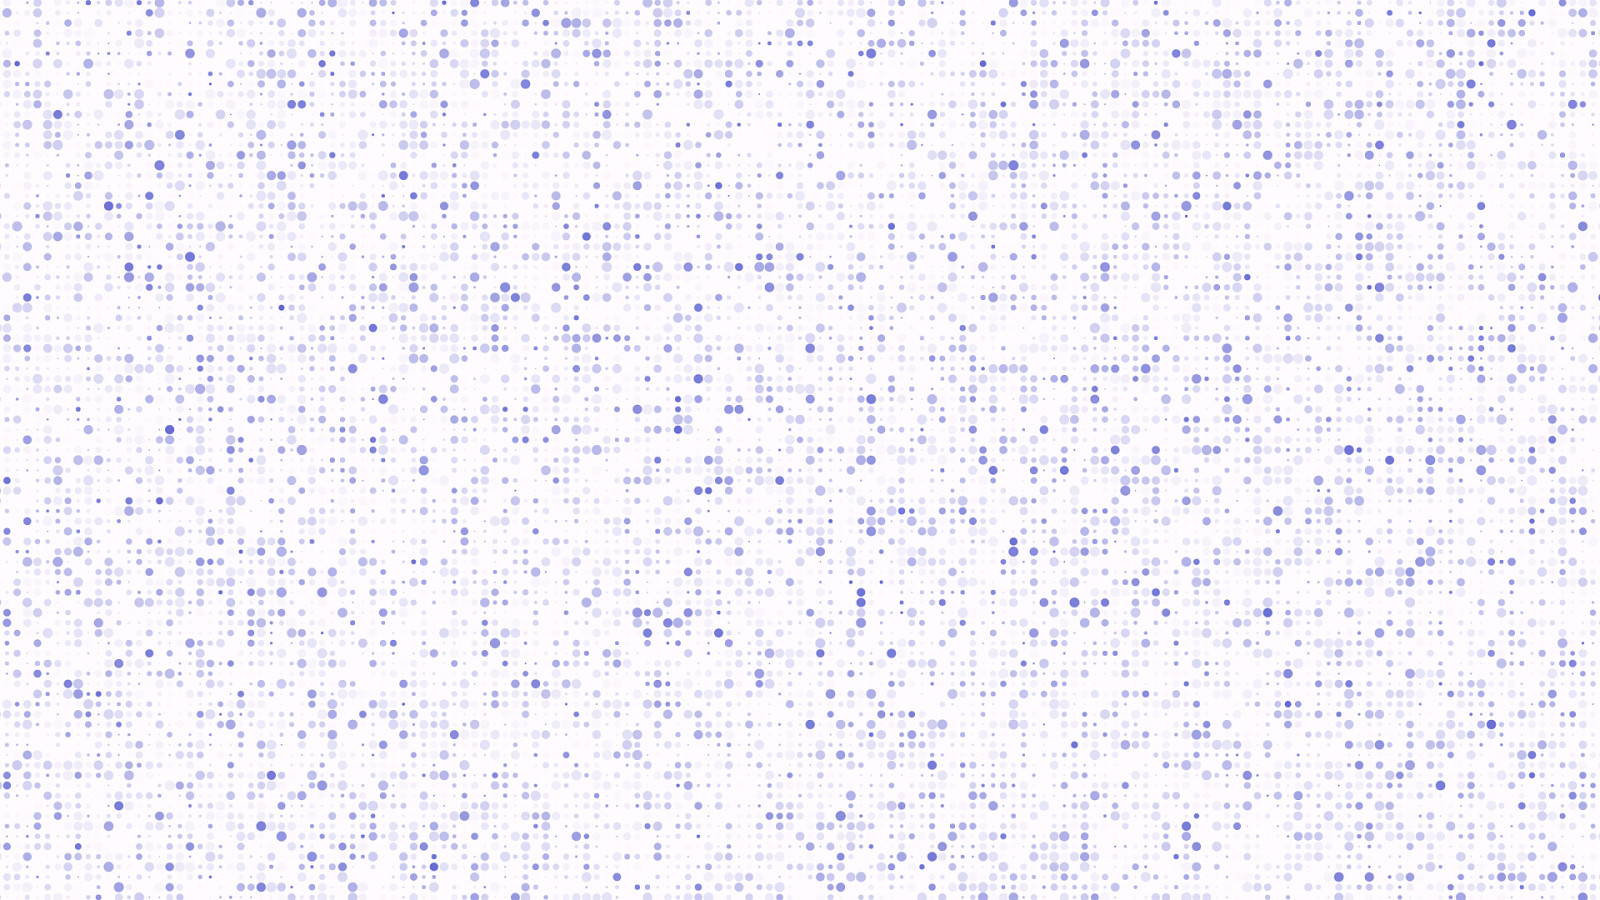
And as before, we get a unique result every time the canvas redraws, giving us an organic feel that, while stable and familiar, is still slightly chaotic and spontaneous.
Every single time!
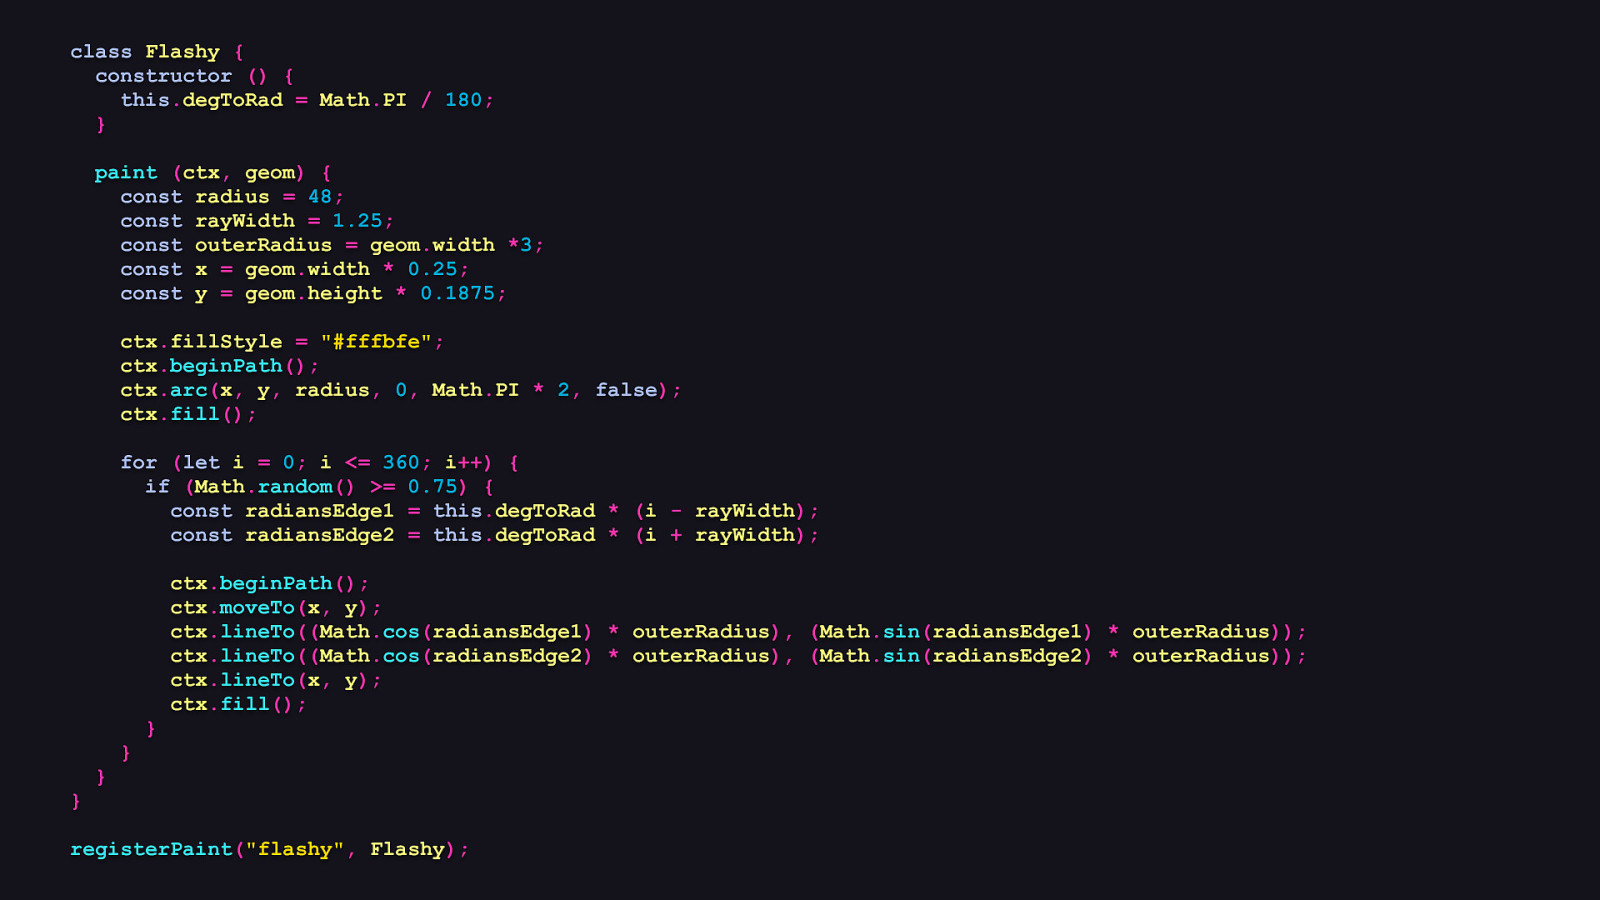
class Flashy { constructor () { this.degToRad = Math.PI / 180; } paint (ctx, geom) { const radius = 48; const rayWidth = 1.25; const outerRadius = geom.width *3; const x = geom.width * 0.25; const y = geom.height * 0.1875; ctx.fillStyle = “#fffbfe”; ctx.beginPath(); ctx.arc(x, y, radius, 0, Math.PI * 2, false); ctx.fill(); for (let i = 0; i <= 360; i++) { if (Math.random() >= 0.75) { const radiansEdge1 = this.degToRad * (i - rayWidth); const radiansEdge2 = this.degToRad * (i + rayWidth); ctx.beginPath(); ctx.moveTo(x, y); ctx.lineTo((Math.cos(radiansEdge1) * outerRadius), (Math.sin(radiansEdge1) * outerRadius)); ctx.lineTo((Math.cos(radiansEdge2) * outerRadius), (Math.sin(radiansEdge2) * outerRadius)); ctx.lineTo(x, y); ctx.fill(); } } } } registerPaint(“flashy”, Flashy);
OK, so that was cool, but let’s think outside of tiles and use a little bit of trigonometry. I’m sure most of you are pretty comfortable with trig, but if not, don’t worry. [SHOW CODE]
Here’s another paint worklet I call “flashy”, which randomly draws stylized rays of light around a circle which flare outward, which makes it looks sort of like a stylized rendering of the sun.

paint (ctx, geom) { const radius = 48; const rayWidth = 1.25; const outerRadius = geom.width * 3; const x = geom.width * 0.25; const y = geom.height * 0.1875; const fullCircle = Math.PI * 2; // … }
Let’s look at the paint method. As before, we’ll need to establish variables to use later: - The first is the radius of the circle that the rays will radiate from, which we’ve set at 48 pixels. - Next is the amount of deviation of each ray’s width. This is what we’ll use to make the rays flare outward as they extend beyond the canvas’s edge. - Next is the outer radius to which the rays will draw to. This is set to three times the width of the canvas, which ensures the edges of the rays will be drawn outside of the canvas bounds. - Finally, we have the X and Y coordinates from which the circle will be drawn, which we calculate by multiplying the width and height of the canvas’s size by some static values to ensure it sits proportionately in the upper left.
paint (ctx, geom) { // … ctx.fillStyle = “#fffbfe”; ctx.beginPath(); ctx.arc(x, y, radius, 0, fullCircle); ctx.fill(); }
// … Now it’s time to get drawin’! First, we’ll set the fill color, and then we’ll draw the circle from which the rays will radiate.
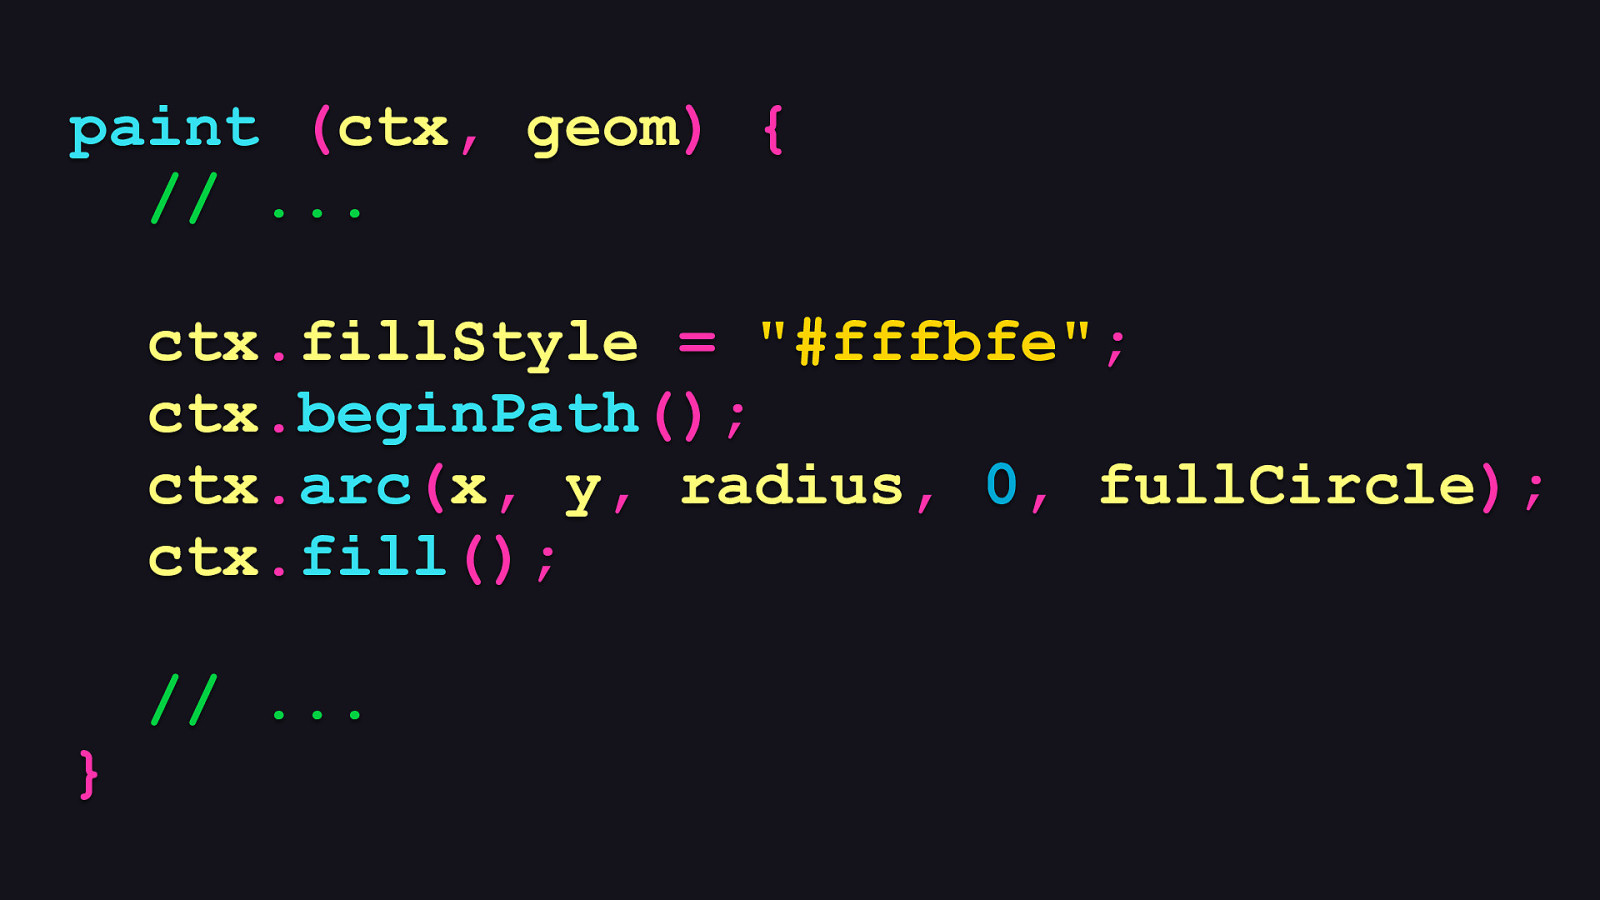
paint (ctx, geom) { // … for (let i = 0; i <= 360; i++) { if (Math.random() >= 0.75) { const radiansEdge1 = this.degToRad * (i - rayWidth); const radiansEdge2 = this.degToRad * (i + rayWidth); ctx.beginPath(); ctx.moveTo(x, y); ctx.lineTo((Math.cos(radiansEdge1) * outerRadius), (Math.sin(radiansEdge1) * outerRadius)); ctx.lineTo((Math.cos(radiansEdge2) * outerRadius), (Math.sin(radiansEdge2) * outerRadius)); ctx.lineTo(x, y); ctx.fill(); } } }
Now here’s where it gets interesting. Because we’re drawing rays radiating around a circle, we’ll just be doing a for loop that starts at 0 degrees and goes all the way around to 360. In each iteration, we’ll let Math.random() decide if it wants to draw anything. If so, we’ll calculate the X and Y coordinates at the edge of the larger circle that exists outside of the canvas bounds. We do this by converting the edge of each ray from degrees—represented by the incrementor i—to radians. From there, we then draw a polyline shape that uses trigonometry functions to figure out the X and Y coordinates to draw the lines for each ray. Once the shape is drawn, we fill it with the same solid color as we used for the circle.
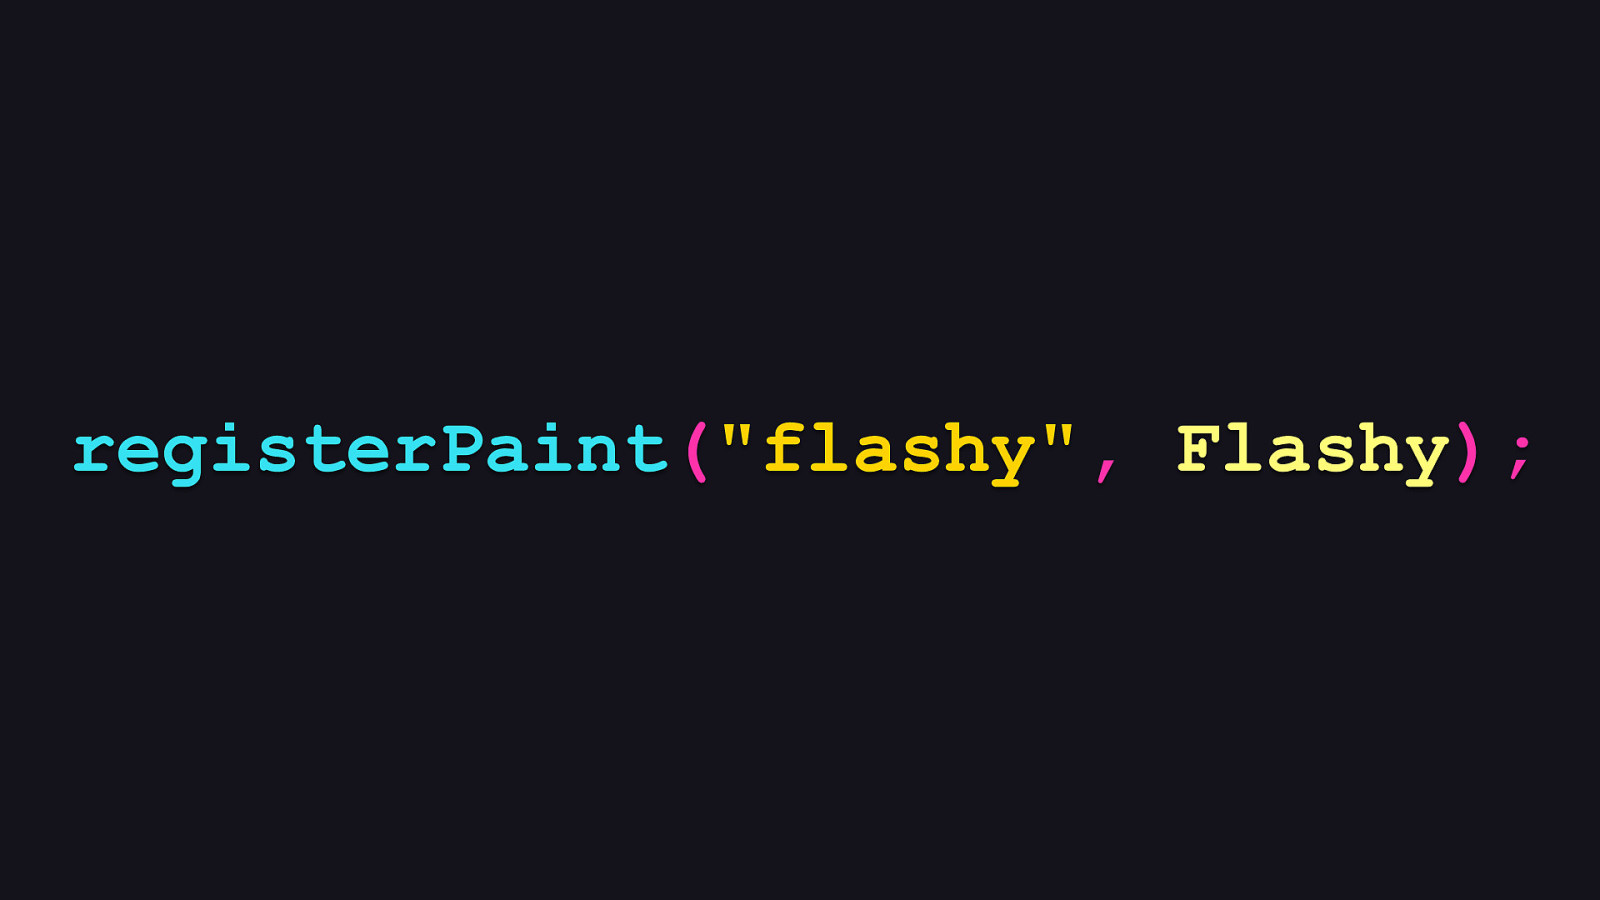
registerPaint(“flashy”, Flashy);
Then like before, we register that flashy lil’ worklet.

.some-element { background-image: paint(flashy); background-color: #e59eff; }
And like before, we use it in CSS like this and give it a nice pink-ish background color to sit on.

And it looks like this! A little bit of math goes a long way toward making this look really cool and stylish.

And we still get that spontaneity that gives it a familiar, but slightly different appearance every time it draws.
And as an aside, I sucked at math in school. [REVEAL IMAGE]
Like “barely scraped by through Algebra II” sucked, so if I can make stuff like this, pretty much anyone can make anything that looks cool.
Like this paint worklet I call “slapdash”. This is probably one of the easier ones to make, and I use it on my website currently. Although it might not be long for this world.
But that’s OK, because I’ve got some others up my sleeve. Like this one, which I call “bumpy”.
And then there’s this alternate rendering of the “blotto” paint worket I showed you earlier, just with a larger radius on the circles with a blend mode applied to give it a sort of inkblot-gone-wild effect.
Then I started getting a bit wackier and came up with this one, which I call “bytemare”. Even though it looks 3D, it’s really just a 2D drawing. I used some trigonometry functions just to make it look that way.
Then here’s my favorite one I’ve made so far, which I call “parallelowow”, and it also uses a little trig to fake that 3D look. Who knows where I’ll go with this next, but it’s a lot of fun. If you’re looking to know how I did some of these or where you can find that code, I have a little surprise for you at the end of this talk. But we’ve got some other stuff to talk about first.

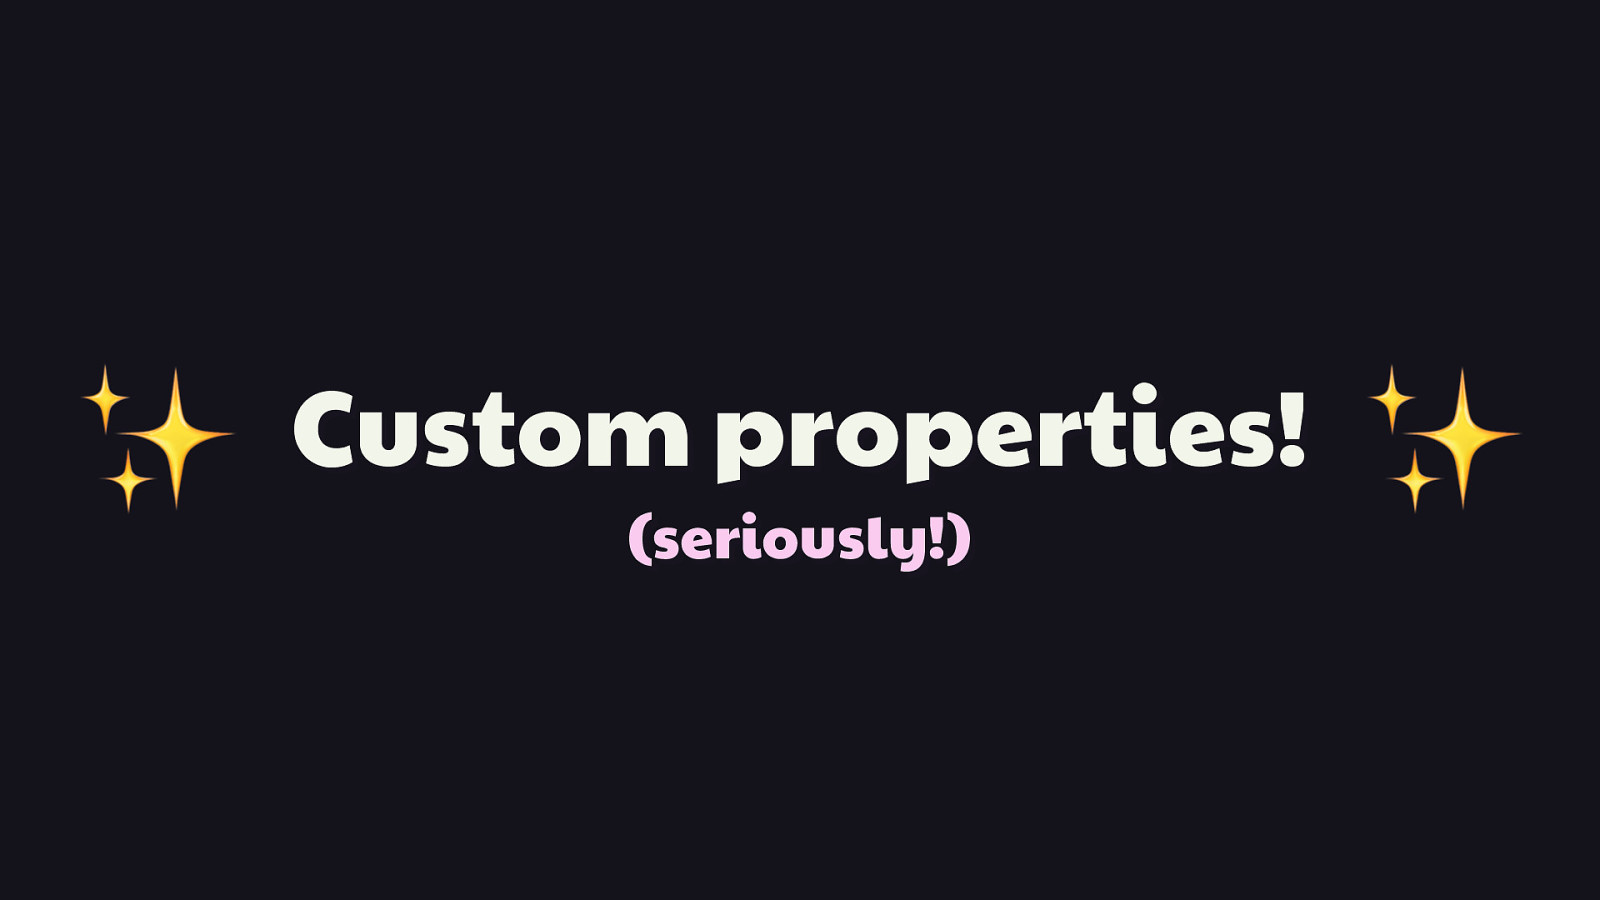
Customize!
🖍 OK, so we had some fun there for a minute, but the problem with paint worklets as I’ve described them is that they’re not very, well, flexible. You have to change the paint worklet code itself to change its appearance, and while that can work, it’s not very convenient. What if you wanted to reuse that same paint worklet in different places in the same site? What if you wanted it to do basically the same thing, but adapt it to different contexts by tweaking its appearance in CSS? That’d be cool, right?
✨
(seriously!) Well guess what? That is possible. You can set up your paint worklets so that their appearance can be altered by custom CSS rules that you define. This feature is not a part of the CSS Paint API per se, but rather another feature called custom properties. [PAUSE, REVEAL “SERIOUSLY”]
Custom properties! Seriously! ✨
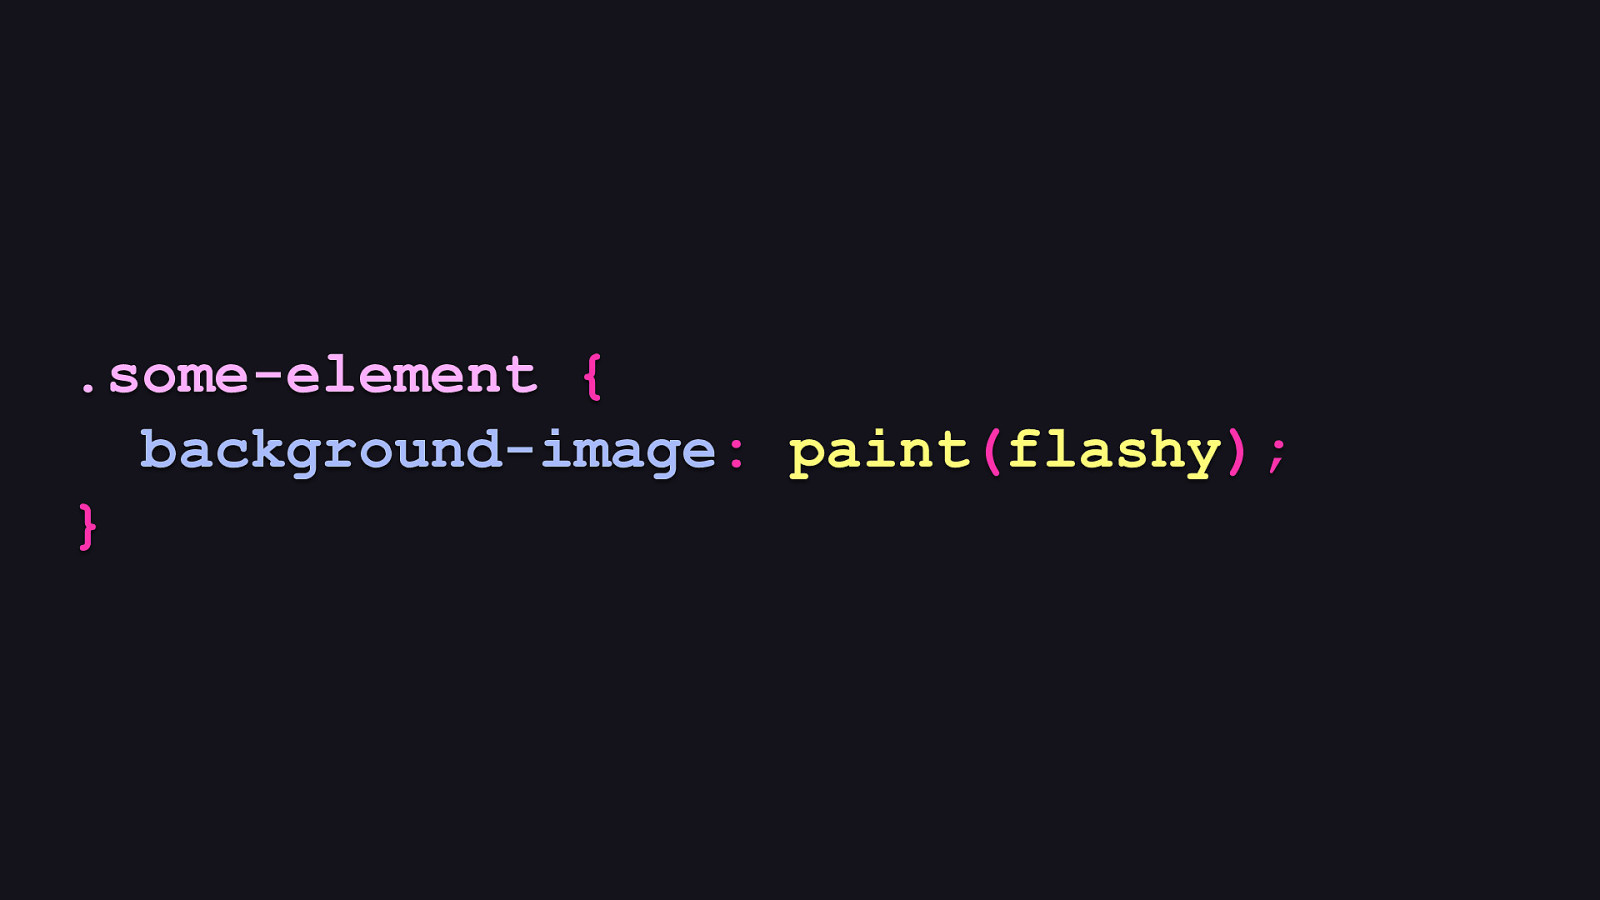
.some-element { background-image: paint(flashy); }
So let’s go back to the CSS for the “flashy” paint worklet example from earlier. What would the CSS for this look like if we could customize an aspect of its appearance through a custom property?
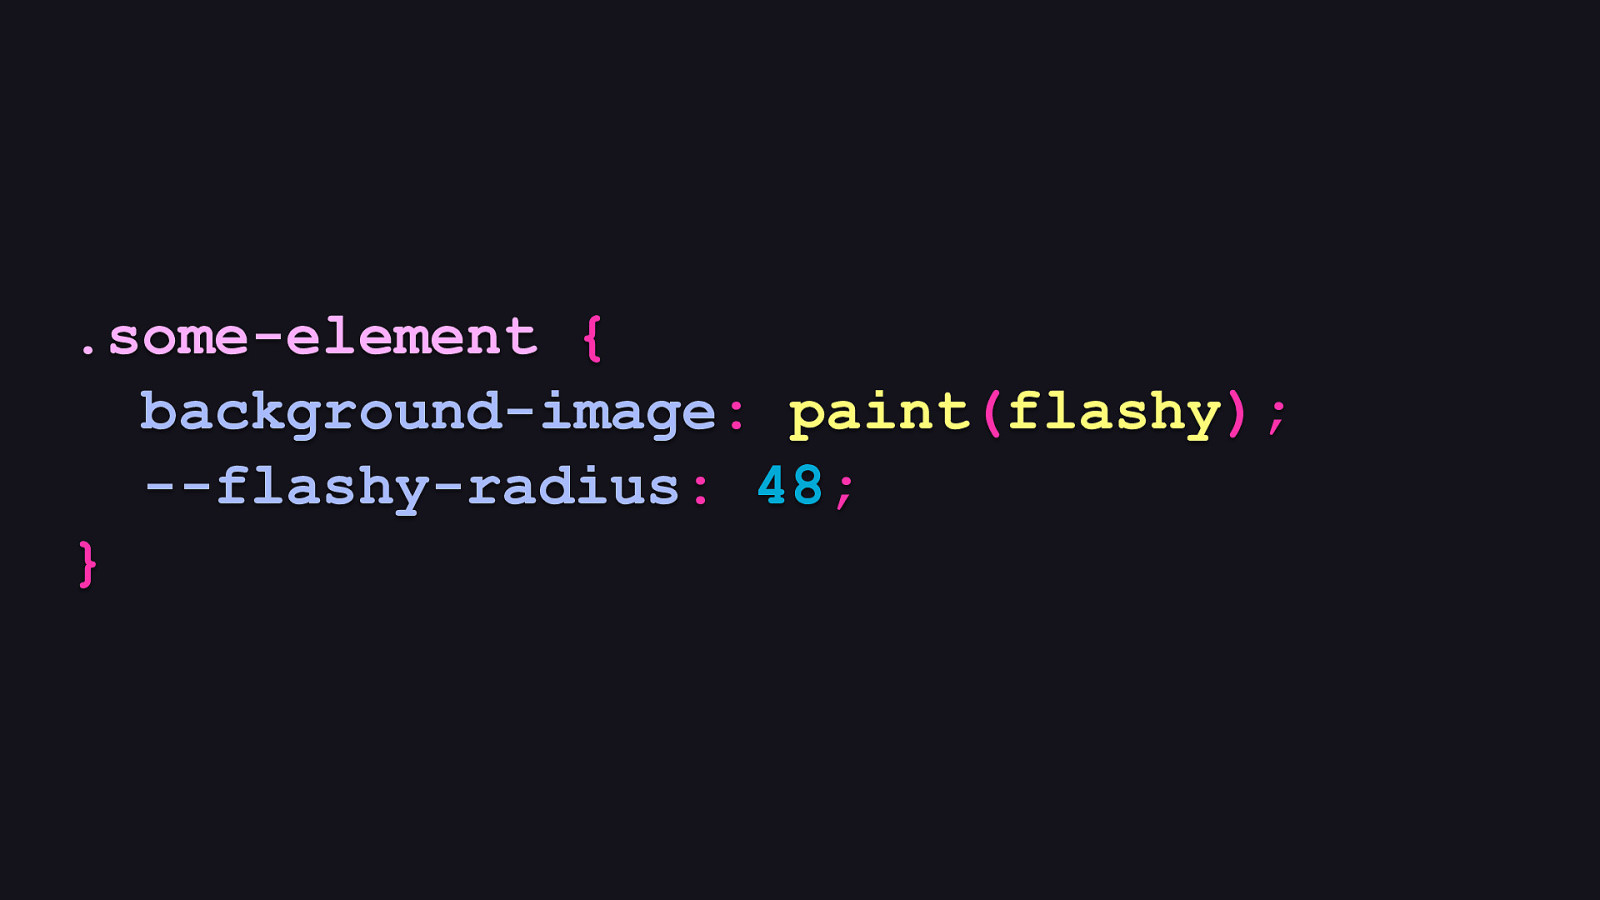
.some-element { background-image: paint(flashy); —flashy-radius: 48; }
Something like this. The property starting with double dashes is a custom property. When we set custom CSS properties on elements using a paint worklet, we can access these values within that paint worklet. Now this is where the power and practicality lies with paint worklets. Because if a paint worklet’s rendering can’t be influenced by anything outside of the paint worklet code itself, you’d have to change your worklet code every frickin’ time you wanted it to do something different. Or, you’d have to make multiple versions of that same worklet in order to customize its appearance across multiple instances. Custom properties help us to make paint worklets infinitely more useful and reusable. They’re like the hook in a good song that makes it even better.

if (“registerProperty” in CSS) { CSS.registerProperty({ name: “—flashy-radius”, syntax: “<integer>”, inherits: false, initialValue: 48 }); }
The next step is to use a little thing called the Properties and Values API to establish the identity and shape of a custom property in your application JavaScript. Even though it’s not strictly necessary to do this, it’s not a bad idea for a few reasons: - One, you can control what the data type is for the custom property via the syntax setting. In this case, you can see that we’re specifying this property’s value as an integer. The value we set here is called a CSS syntax string, and it helps the API to enforce what’s considered a valid value for a given custom property. - Two, we can decide whether or not the value for this property can be inherited by child elements using the inherits option. - And three, we decide what the property’s default value should be via the the initialValue option if that property is not specified in CSS.
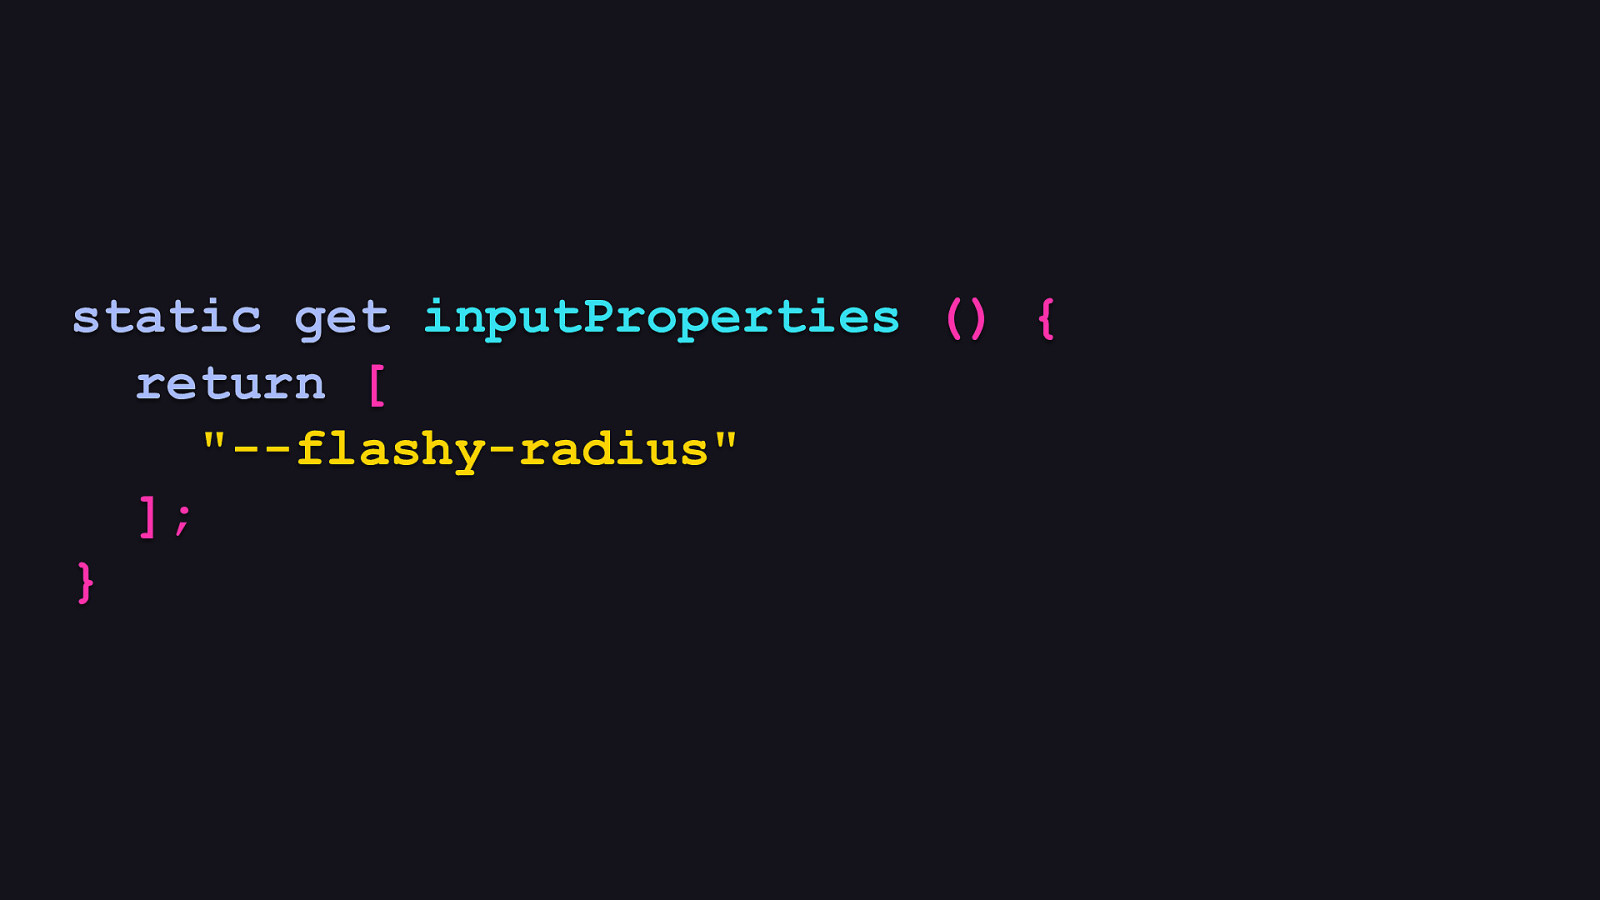
static get inputProperties () { return [ “—flashy-radius” ]; }
So what does it look like when want paint worklets to access those custom properties? [REVEAL CODE]
Not too onerous, really. It’s a two-step process. The first step is to add a static getter method to your worklet class called inputProperties which returns an array of all the custom properties we’ve registered.
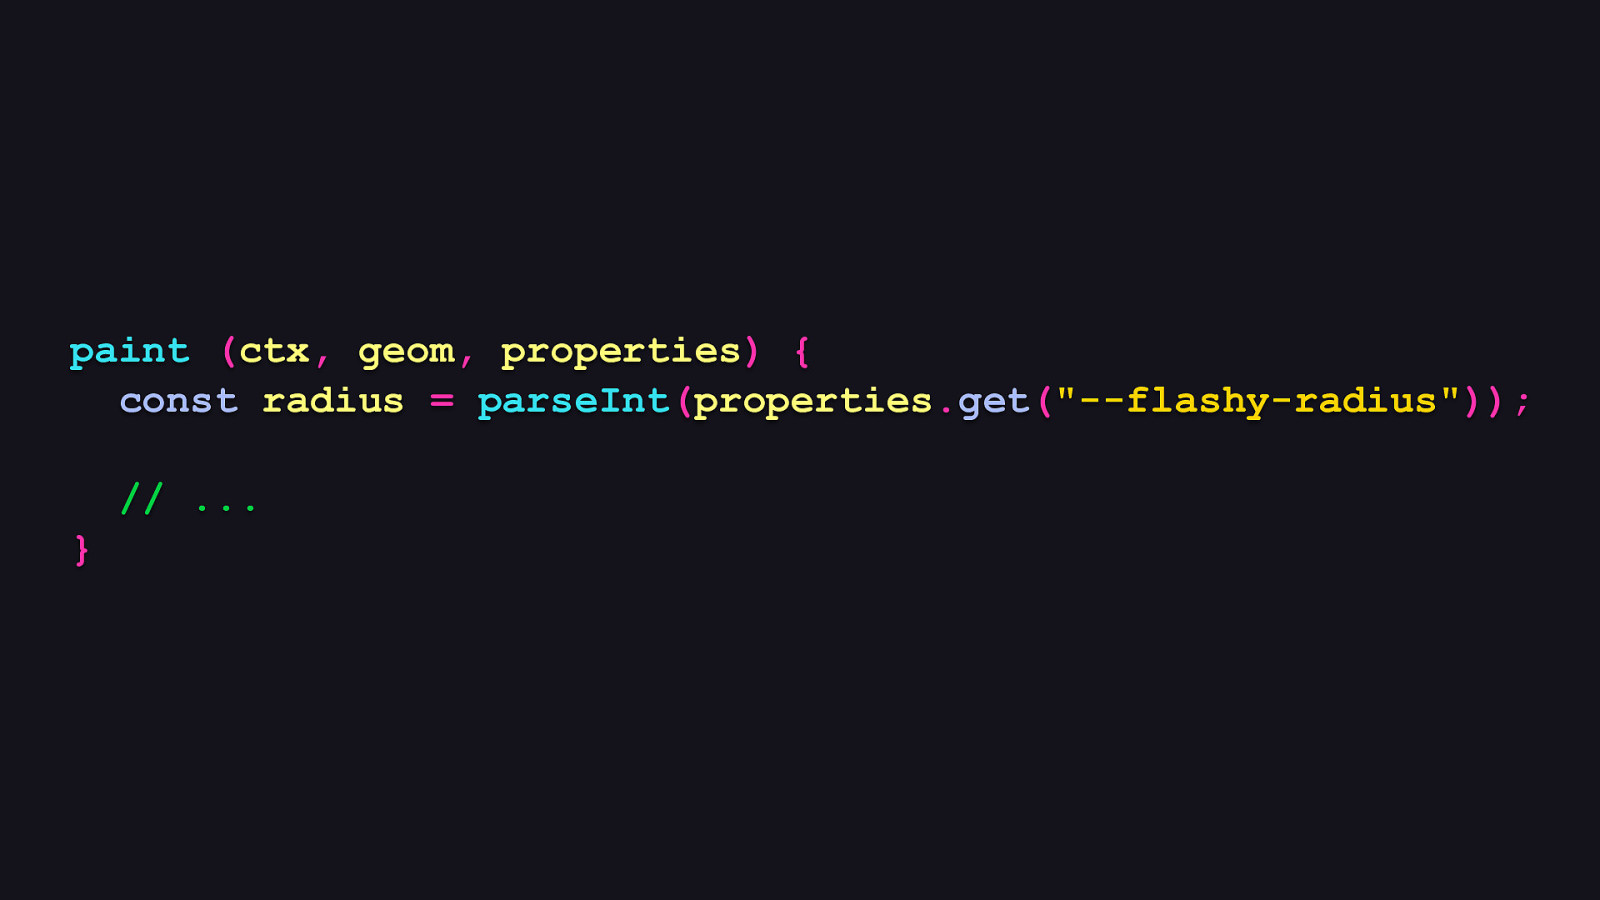
paint (ctx, geom, properties) { const radius = parseInt(properties.get(“—flashy-radius”)); // … }
Then in the worklet, we can access these properties through a third argument in the paint method’s signature called properties. This argument’s get method allows access to the custom property values passed in CSS. Here, you can see that we cast the value to the type we need in order to work with it in the paint worklet itself. At this point, we can then control the paint worklet’s presentation entirely in CSS!
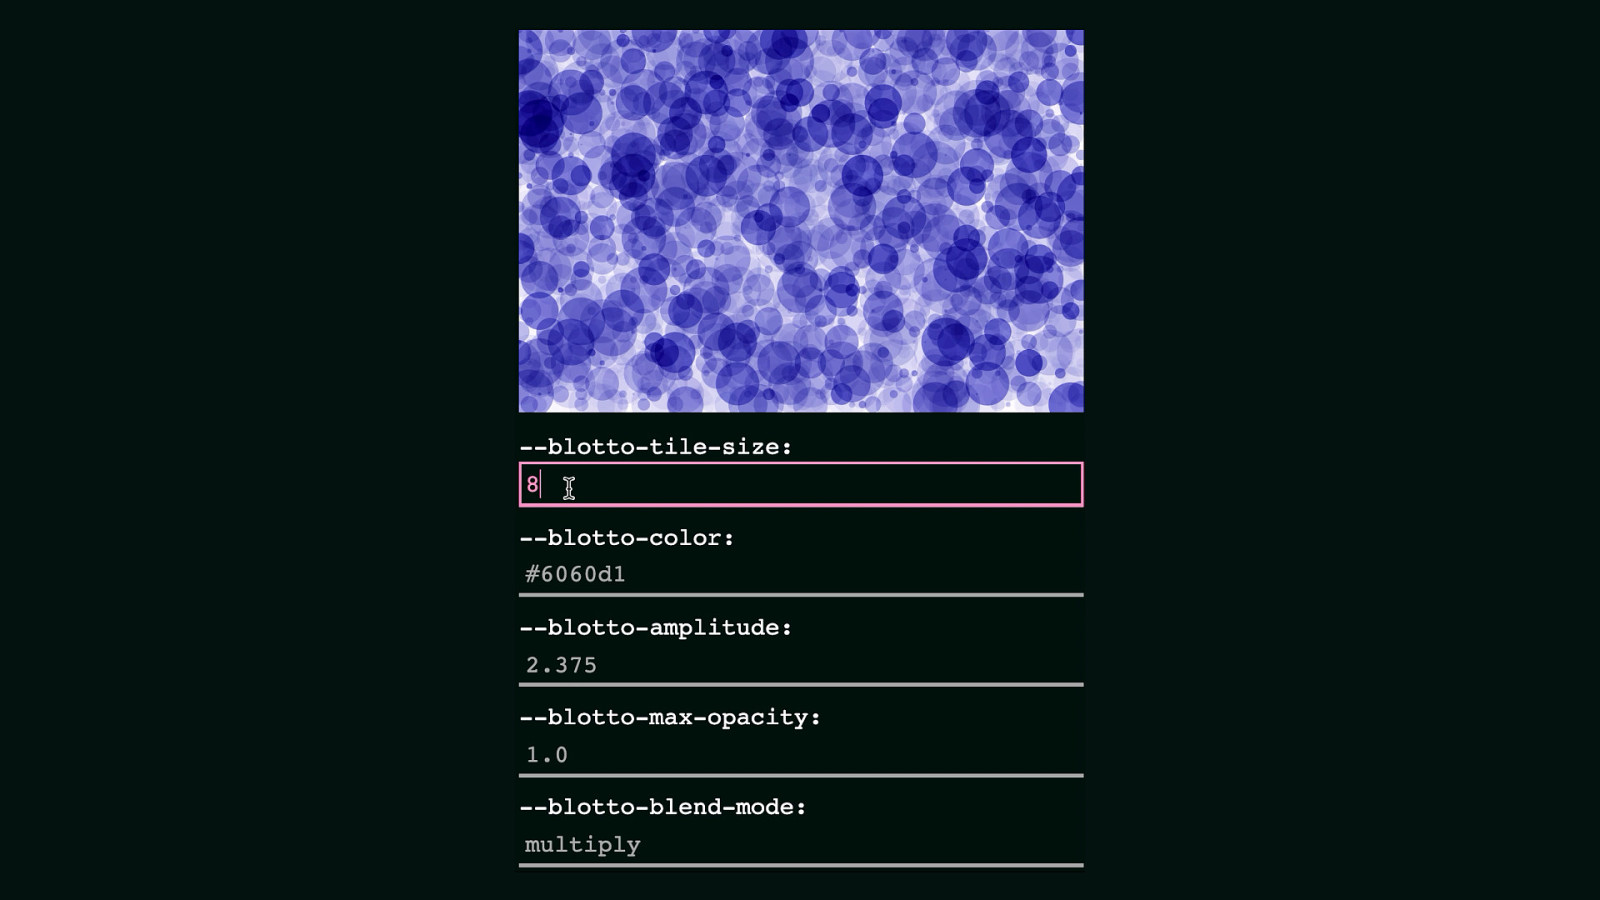
What we can achieve with this is very powerful. When we parameterize paint worklets, we make them customizable in ways we didn’t even think possible. Here, you can see that we can dynamically change the tile size of this worklet’s output, as well as the color used, as well as other influential properties. That’s the beauty of generative artwork applied in this context. It’s one thing to generate art with JavaScript. It’s an entirely different thing to control it this way. We can make paint worklets fit in practically anywhere we need them to without having to do much outside of tweaking CSS properties.
Resiliency!
🛠 Now that I’ve showed you all the cool stuff, it is time I inform of the unfortunate, yet entirely predictable reality that you must eat your vegetables. By which I mean, it’s time to tell you paint worklets don’t have solid browser support, and that means you must treat them as a progressive enhancement and therefore, you’ll need a backup plan. Furthermore, because paint worklets are JavaScript, you need that backup plan even in browsers that do support them.
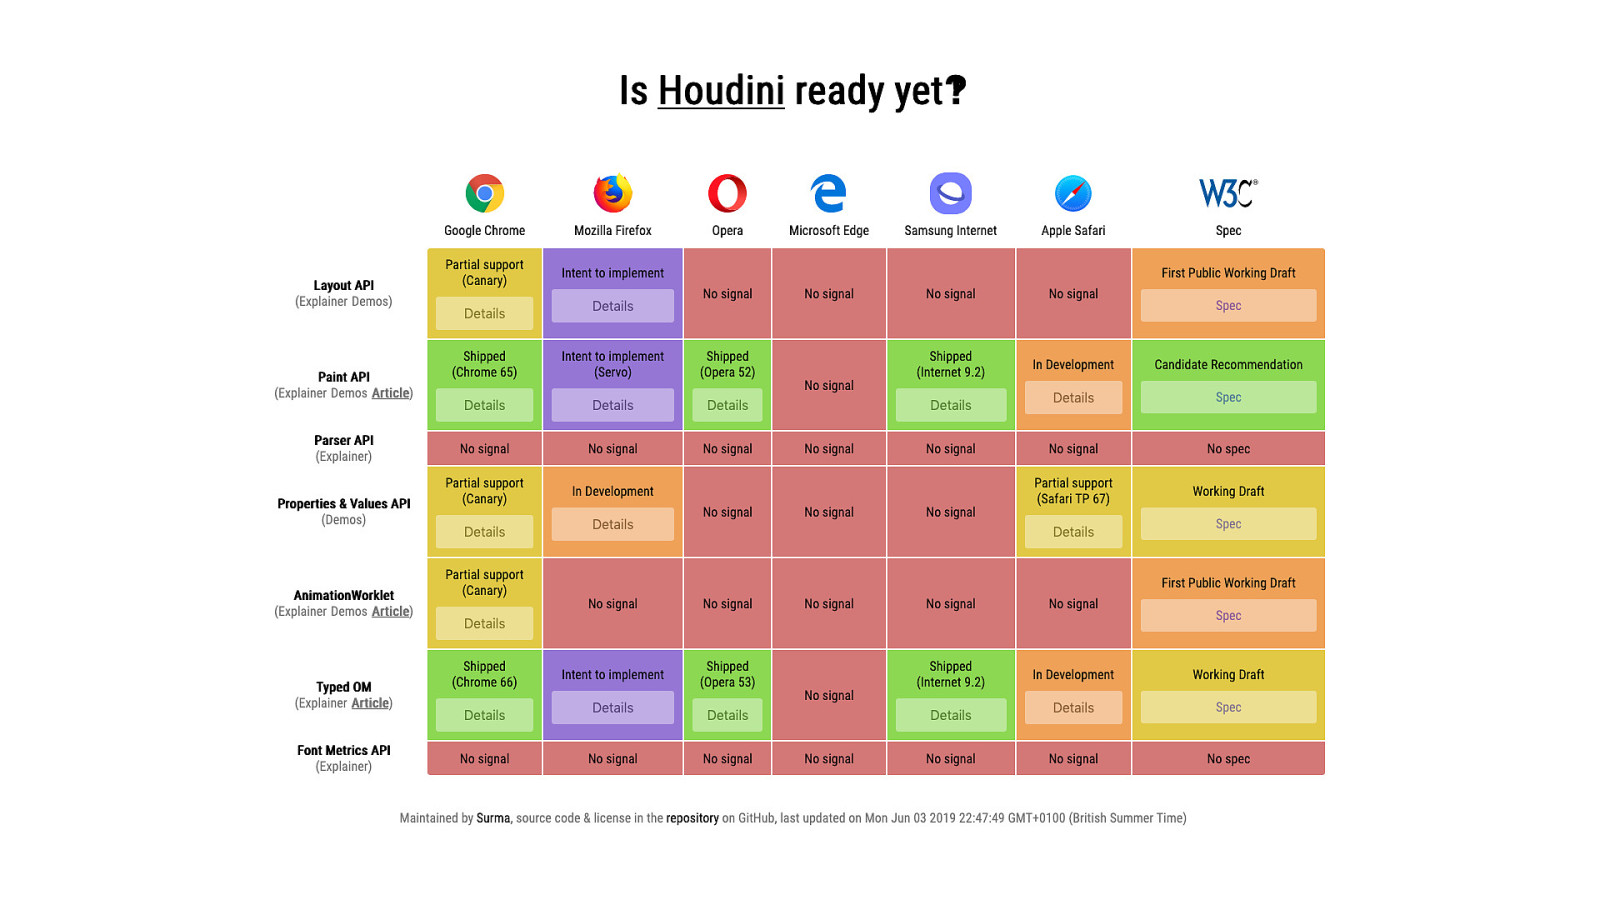
Support isn’t terrible for the paint API when you look at the bigger picture. In fact, it’s the only part of Houdini that’s at the Candidate Recommendation stage. But support for it isn’t universal, so you need to know how to adapt.

.masthead { background-image: paint(flashy); }
That said, you shouldn’t have to break your back to provide a fallback, because CSS itself can usually solve this. The thing to remember about resiliency when with the CSS Paint API is that the order in which we specify CSS properties matters, and this is what’s going to save you.
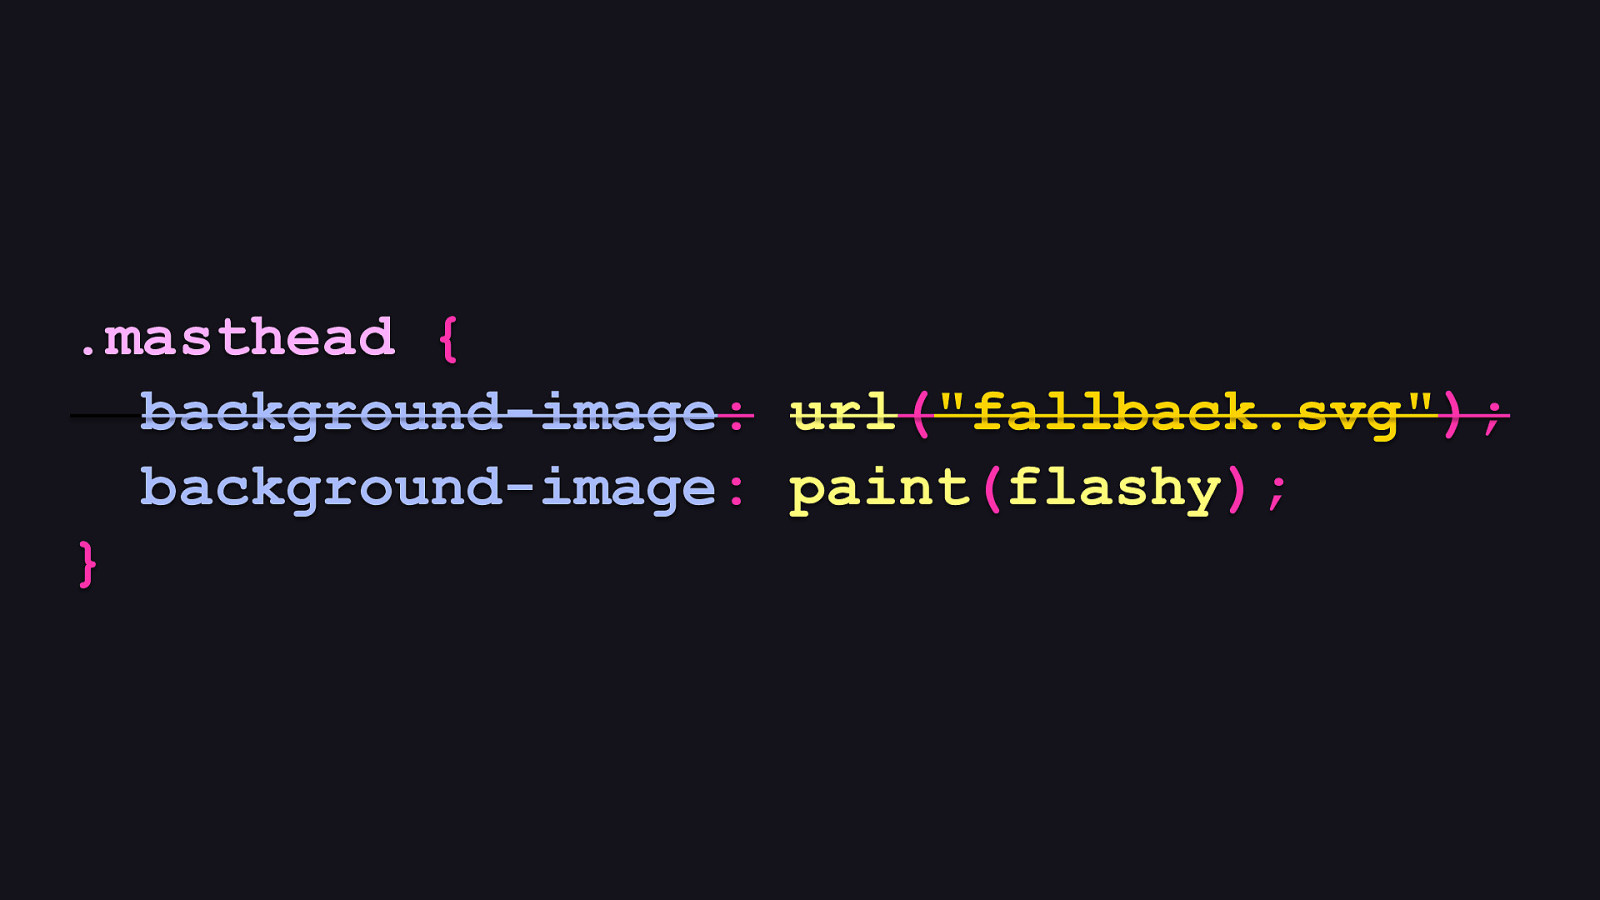
.masthead { background-image: url(“fallback.svg”); background-image: paint(flashy); }
Going this route is usually enough for a fallback. Browsers that understand the paint API will use the second rule.
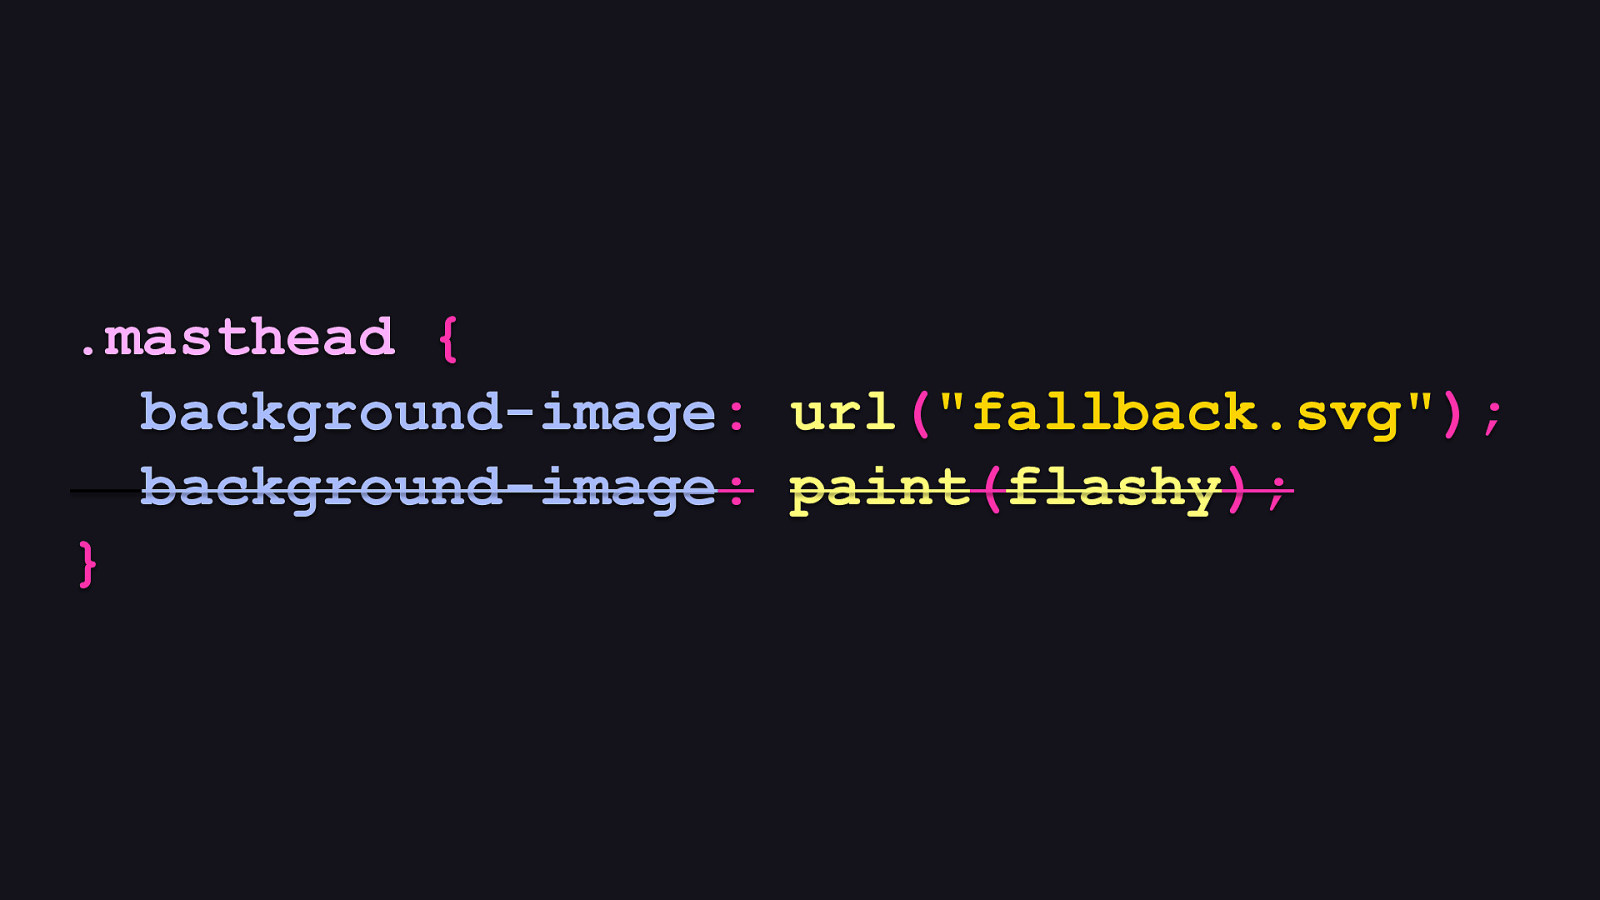
.masthead { background-image: url(“fallback.svg”); background-image: paint(flashy); }
But those that don’t will fall back to the first occurrence of a rule they consider to be valid. In this case, a browser like, say, Firefox, will fall back to the first rule. Most of the time, this approach is enough.

The idea is that your fallback should resemble the paint worklet somewhat. It doesn’t usually have to be much more than an approximation. To illustrate, this is my personal website in Chrome with a paint worklet used in the backgrounds of different sections.
Now here it is in a browser that doesn’t. It’s not exactly the same, but it’s a reasonable approximation. It works well enough. Just be sure you’re optimizing your fallback images. If possible, try to create tileable patterns to keep those fallback images as small as possible, because simple paint worklets will usually be smaller over the wire.
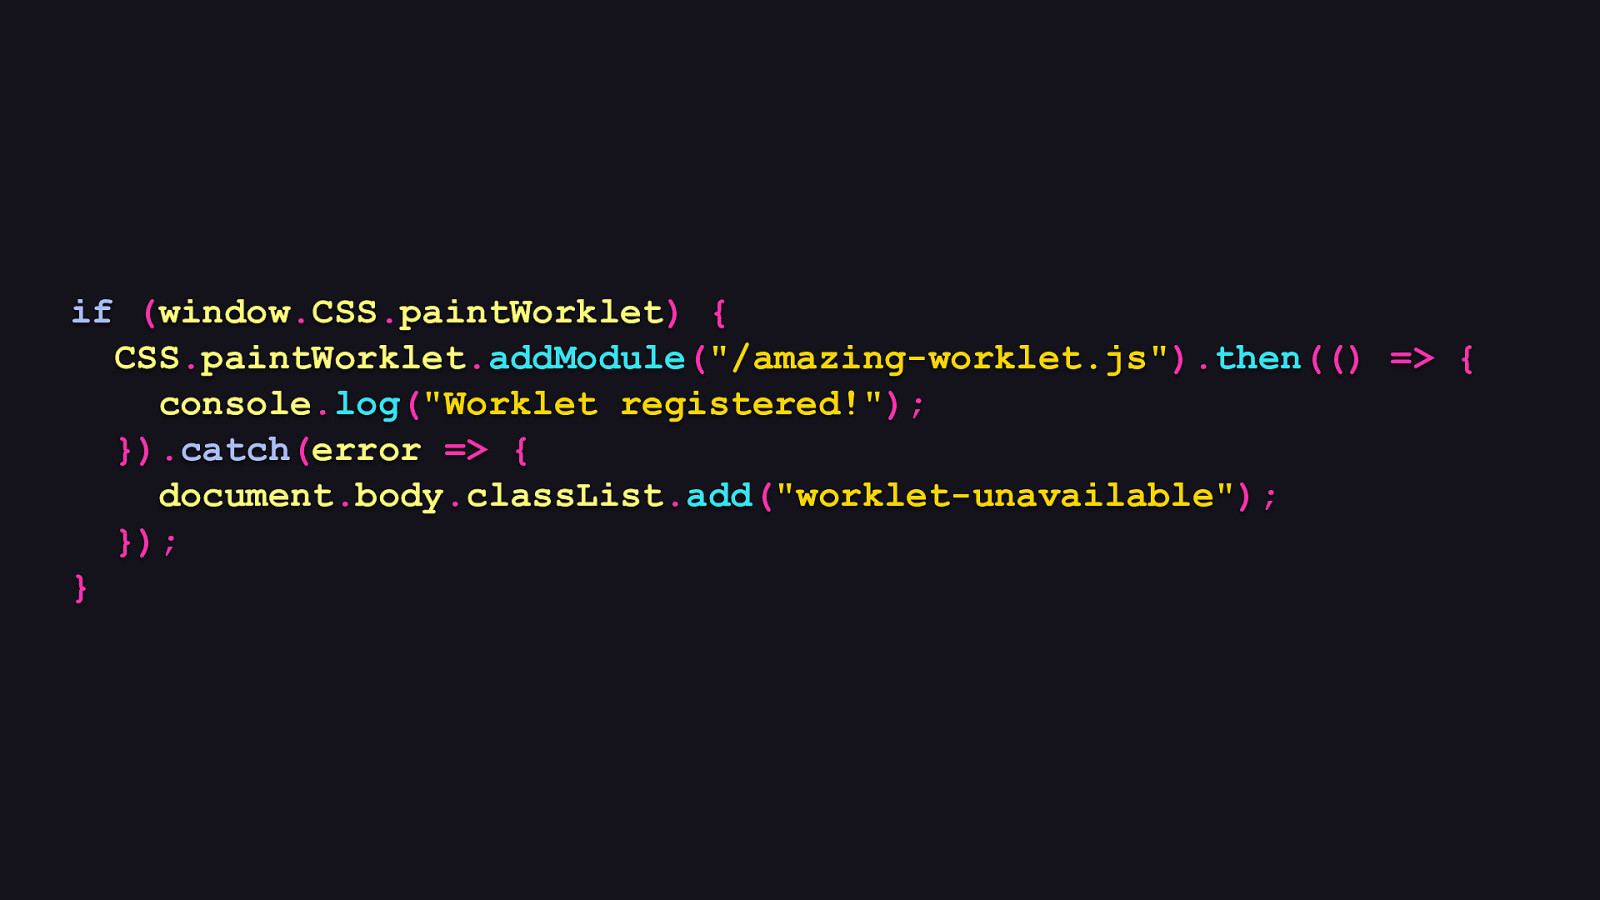
if (window.CSS.paintWorklet) { CSS.paintWorklet.addModule(“/amazing-worklet.js”).then(() => { console.log(“Worklet registered!”); }).catch(error => { document.body.classList.add(“worklet-unavailable”); }); }
Now for another question: what if a paint worklet fails to load for whatever reason? This is where promises are your friend. You might recall that in order to load a paint worklet, we have access to a promise when it completely loads—or fails to load. In this case, we can compensate for this in the promise’s catch method, which executes if the promise was rejected. If it does fail, we add a class to the <body> element, which we then target with CSS to provide the fallback.
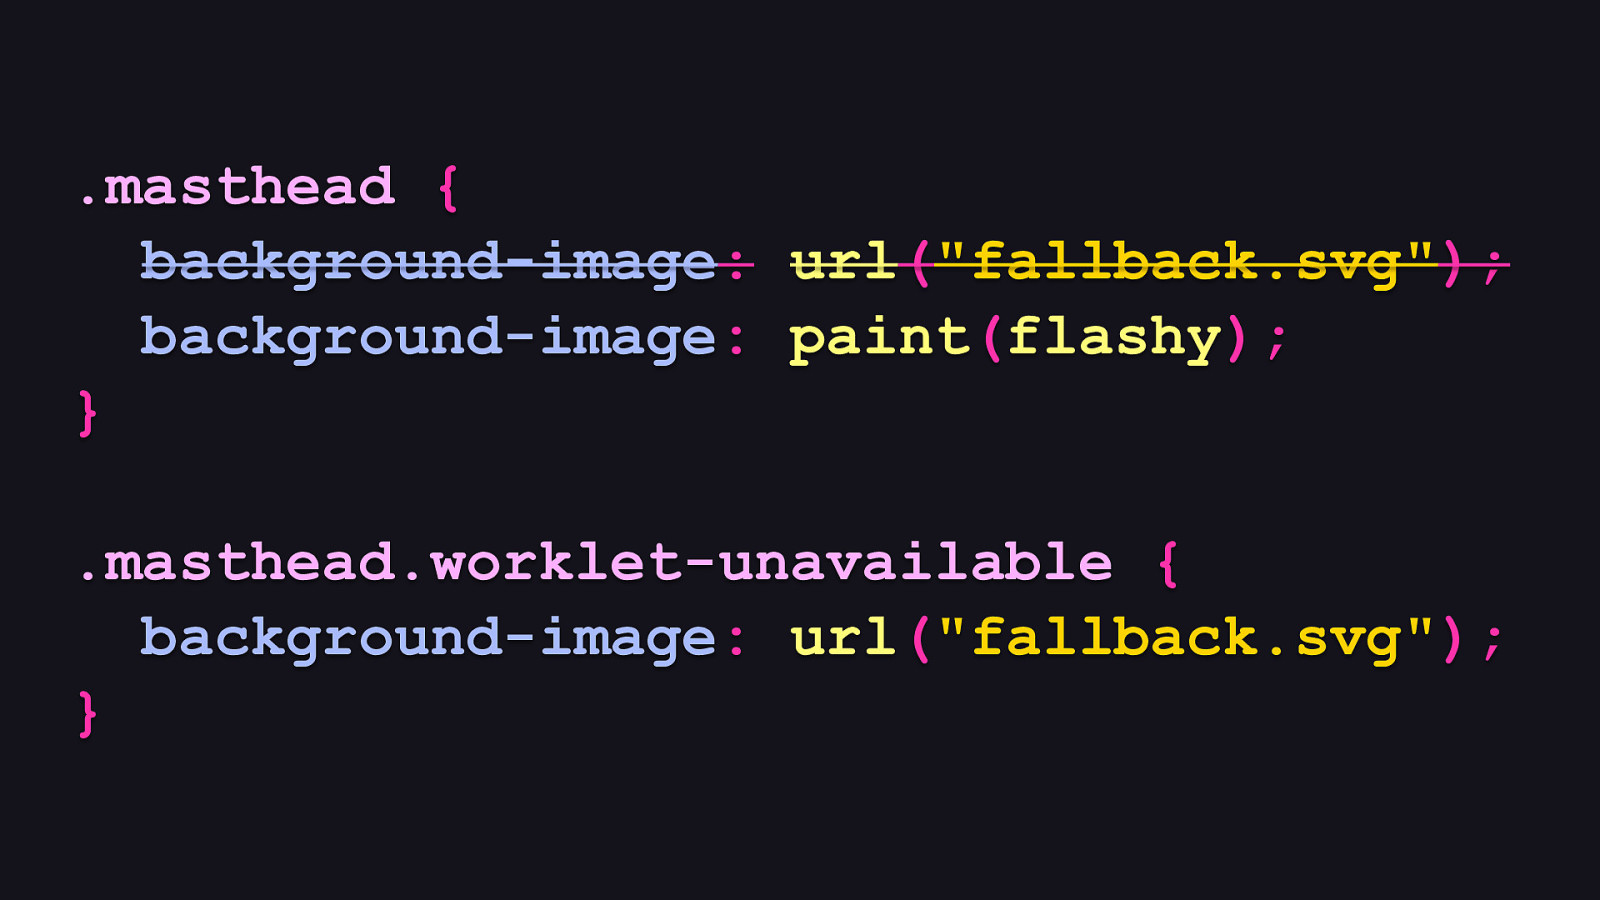
.masthead { background-image: url(“fallback.svg”); background-image: paint(flashy); } .masthead.worklet-unavailable { background-image: url(“fallback.svg”); }
That CSS would look something like this. In the event the paint worklet fails to load, we’ll still get a fallback background image that we can use. It’s important to note that, at least in Chrome, if a paint worklet fails to load, the CSS-only fallback for non-supporting browsers described earlier will not kick in. You will need to provide an explicit fallback, otherwise you won’t have a background at all if a paint worklet craps out somehow.

Performance!
⚡ Most of the talks I give are about performance, and I thought maybe I could get through this one without any perf talk, but 🎵 I was wrooooong! 🎶 Turns out there’s a couple quick things to keep in mind when it comes to keeping your paint worklets fast, as well as being considerate with what can be a rather taxing API if not used carefully.
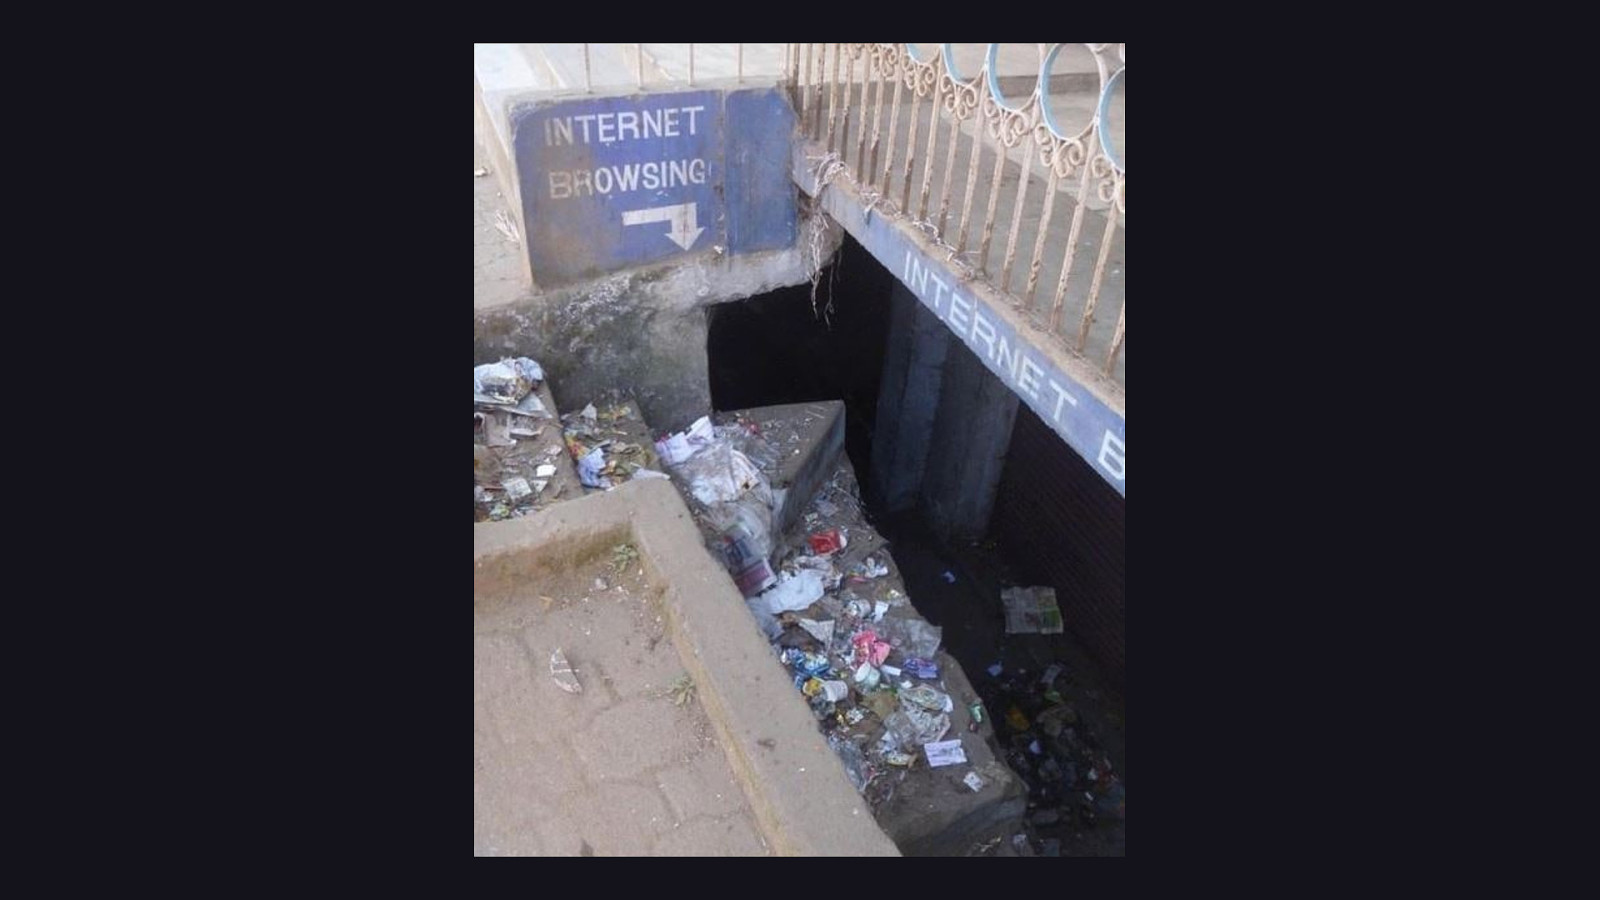
Because if you don’t, you risk making the internet more like this for people. [REVEAL IMAGE]
So let’s avoid that, and talk about what you can do to make paint worklets work as optimally as they can.
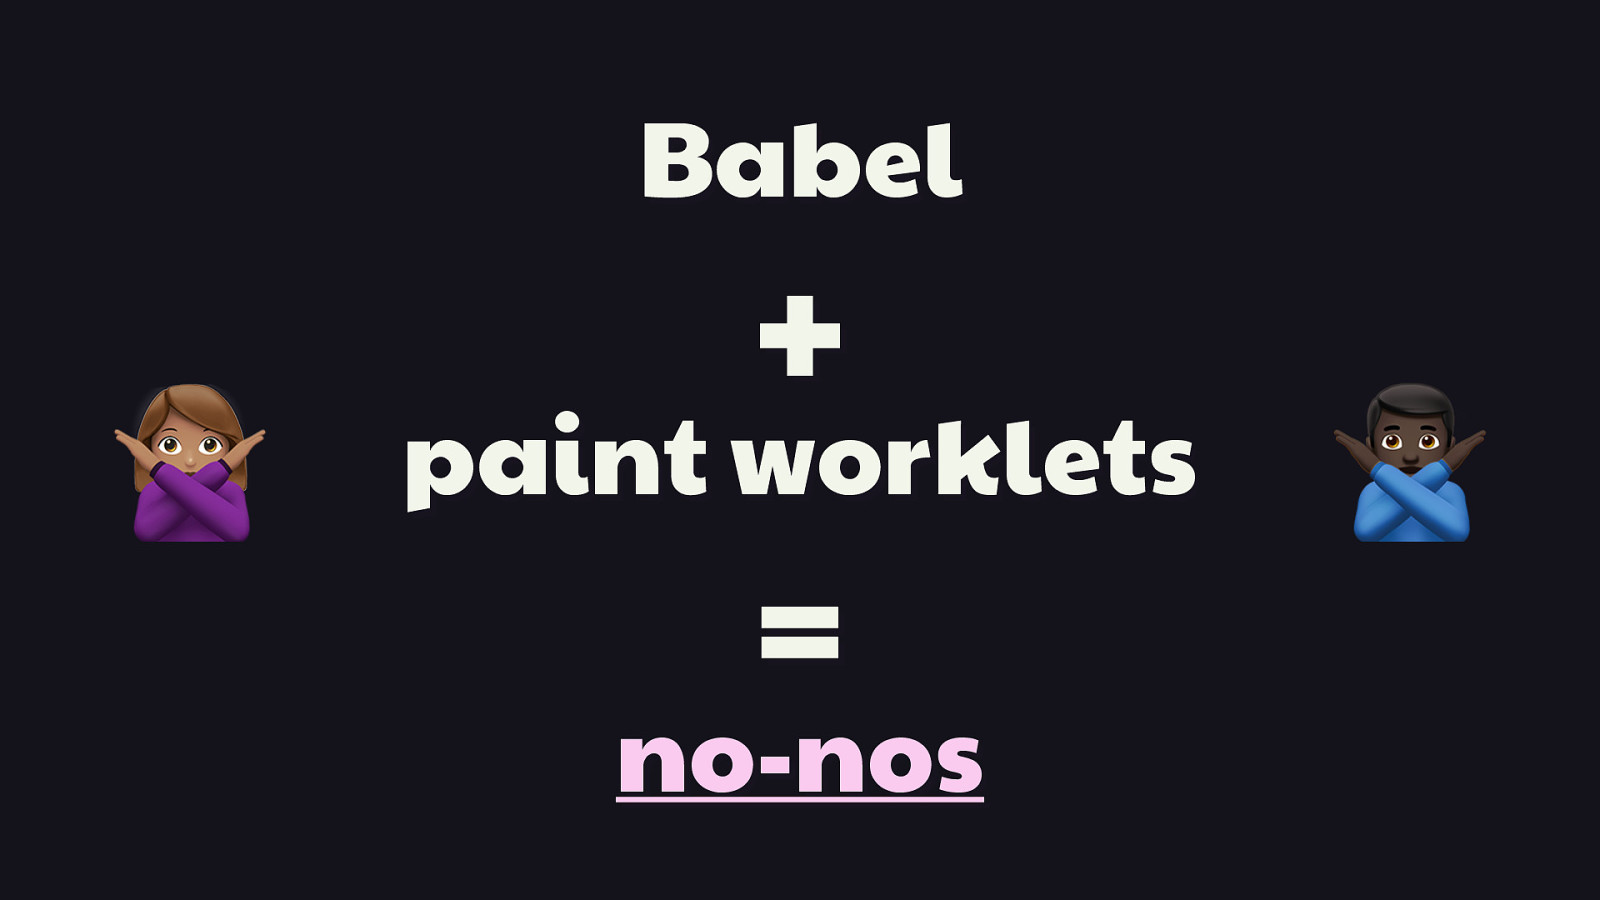
Babel + + paint worklets
, no-nos
Because of their restricted scope, paint worklets won’t often be very large. The ones I’ve written usually end up being less than two kilobytes before compression. [REVEAL TEXT, REVEAL ICONS]
But if you can help it, do not run your paint worklets through Babel! That is no-nos.
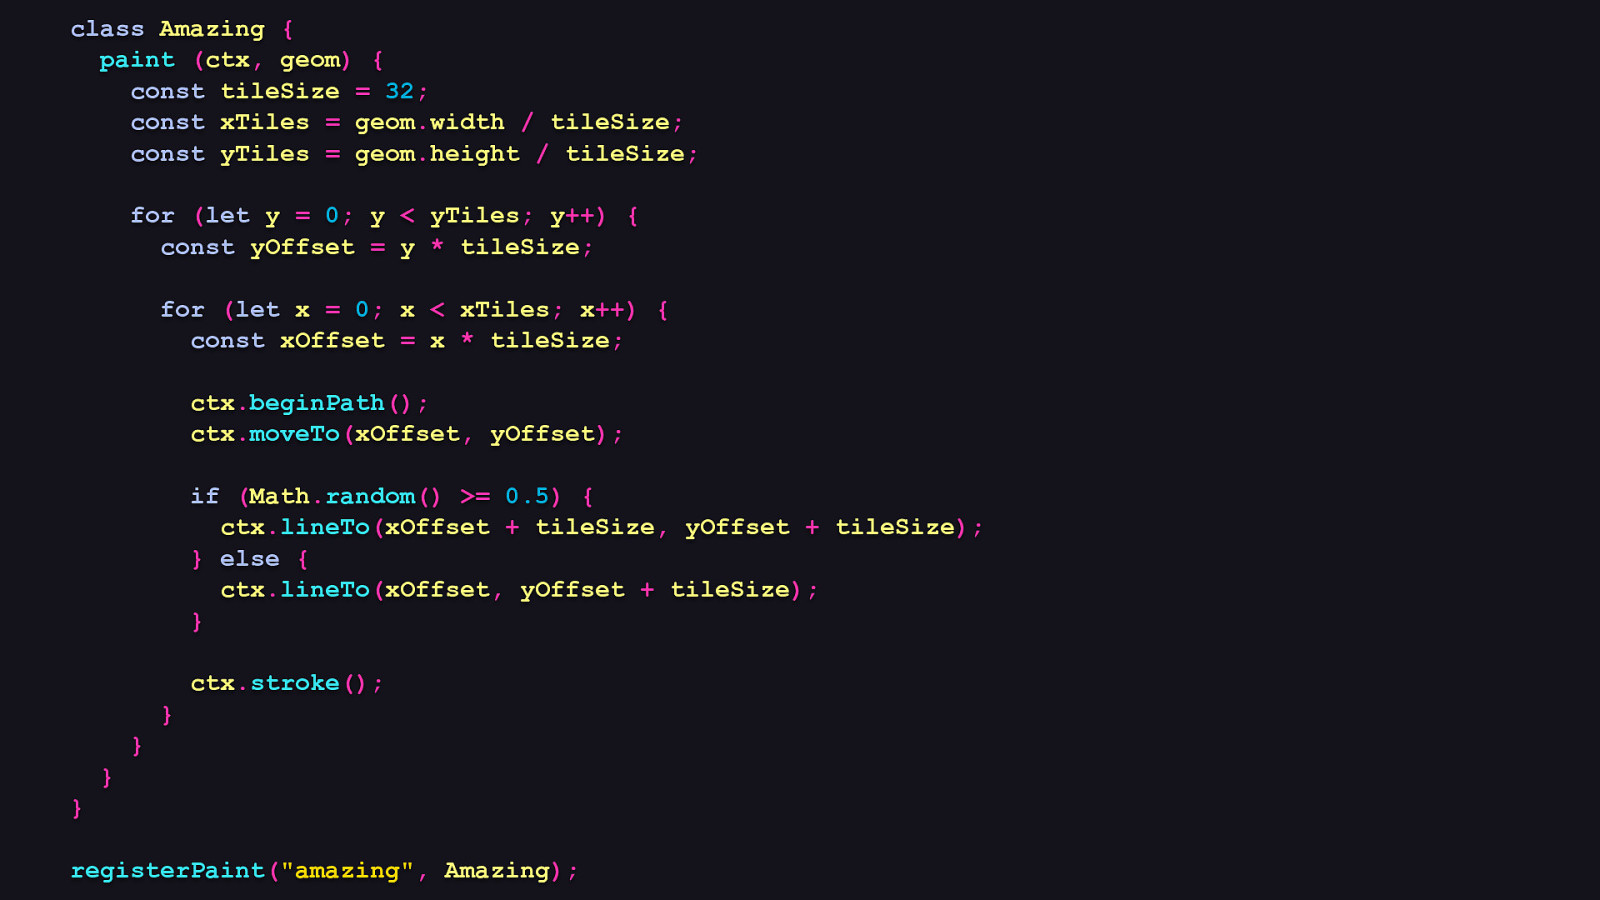
class Amazing { paint (ctx, geom) { const tileSize = 32; const xTiles = geom.width / tileSize; const yTiles = geom.height / tileSize; for (let y = 0; y < yTiles; y++) { const yOffset = y * tileSize; for (let x = 0; x < xTiles; x++) { const xOffset = x * tileSize; ctx.beginPath(); ctx.moveTo(xOffset, yOffset); if (Math.random() >= 0.5) { ctx.lineTo(xOffset + tileSize, yOffset + tileSize); } else { ctx.lineTo(xOffset, yOffset + tileSize); } ctx.stroke(); } } } } registerPaint(“amazing”, Amazing);
Let look at the impact Babel transforms have by taking the circuitry paint worklet from the beginning of this talk as an example. Even when it’s un-uglified, it’s very small. It also works in every browser that supports paint worklets without Babel’s help. Paint worklets do not need to be transformed in order for them to work.
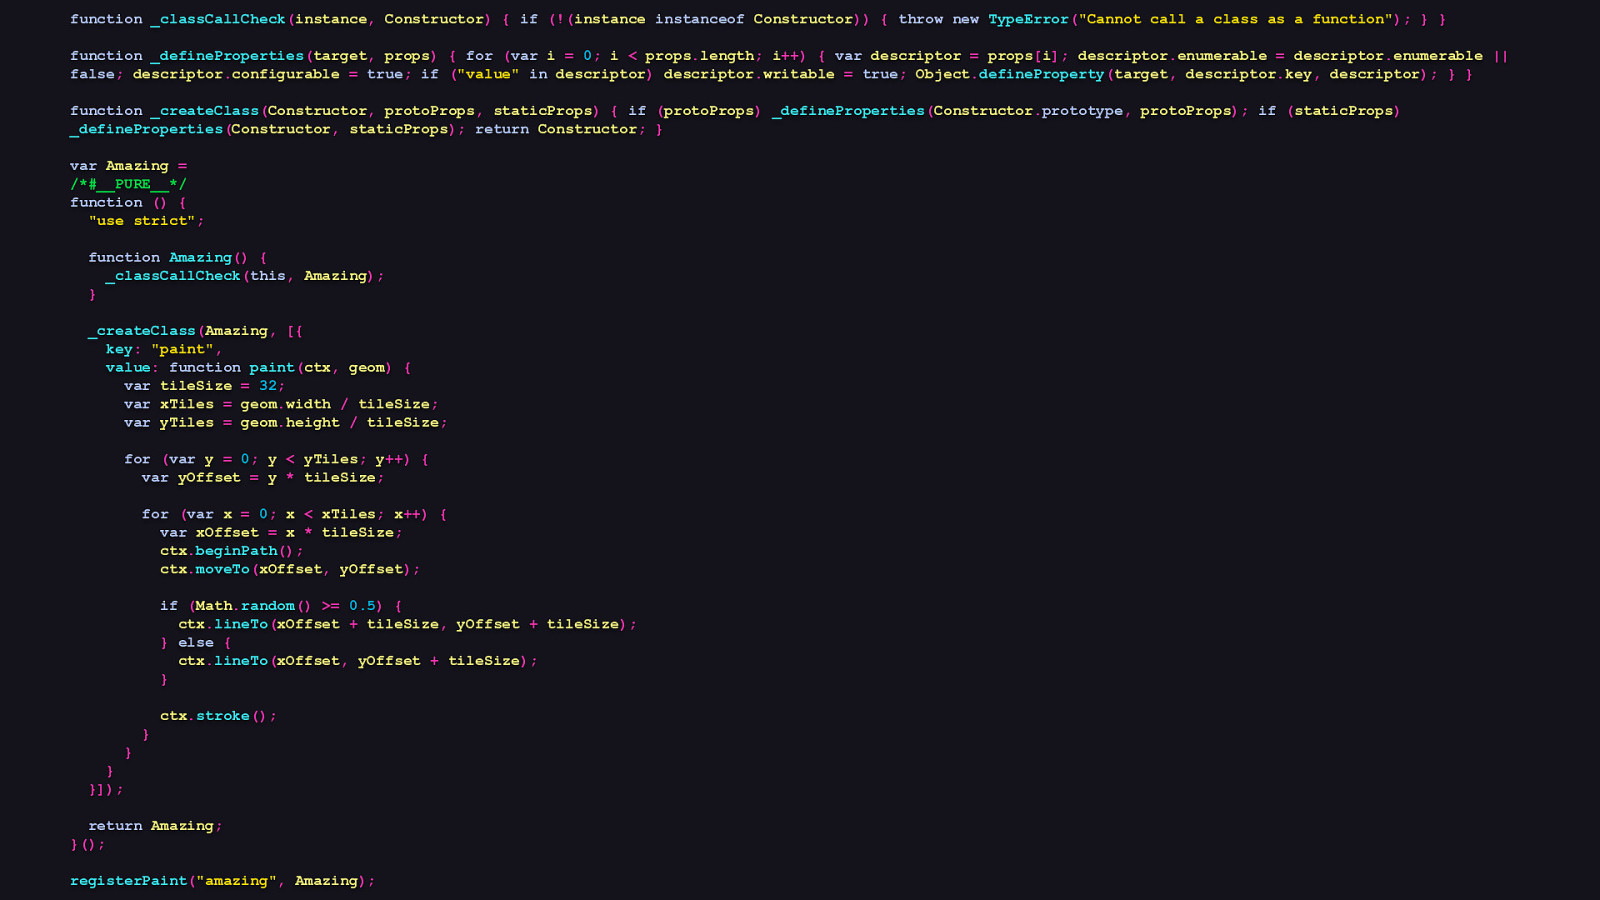
function _classCallCheck(instance, Constructor) { if (!(instance instanceof Constructor)) { throw new TypeError(“Cannot call a class as a function”); } } function _defineProperties(target, props) { for (var i = 0; i < props.length; i++) { var descriptor = props[i]; descriptor.enumerable = descriptor.enumerable || false; descriptor.configurable = true; if (“value” in descriptor) descriptor.writable = true; Object.defineProperty(target, descriptor.key, descriptor); } } function _createClass(Constructor, protoProps, staticProps) { if (protoProps) _defineProperties(Constructor.prototype, protoProps); if (staticProps) _defineProperties(Constructor, staticProps); return Constructor; } var Amazing = /#PURE/ function () { “use strict”; function Amazing() { _classCallCheck(this, Amazing); } _createClass(Amazing, [{ key: “paint”, value: function paint(ctx, geom) { var tileSize = 32; var xTiles = geom.width / tileSize; var yTiles = geom.height / tileSize; for (var y = 0; y < yTiles; y++) { var yOffset = y * tileSize; for (var x = 0; x < xTiles; x++) { var xOffset = x * tileSize; ctx.beginPath(); ctx.moveTo(xOffset, yOffset); if (Math.random() >= 0.5) { ctx.lineTo(xOffset + tileSize, yOffset + tileSize); } else { ctx.lineTo(xOffset, yOffset + tileSize); } ctx.stroke(); } } }]); } return Amazing; }(); registerPaint(“amazing”, Amazing);
Now here’s that same paint worklet after Babel transforms it. If you can’t read this code, that’s kind of the point. There’s a lot Babel cruft here, which affects parsing, compilation, and execution time. The omnipresent question of web development seems to inevitably be “should this work in every browser?”, and in this case, there are two answers: no, and hell no. Paint worklets aren’t supported in all modern browsers yet. So we don’t need to treat them with the web compatibility mindset we clung to in the 2000s. If you must process paint worklets with Babel—perhaps out of a matter of convenience, and I can understand—ensure you know how to configure it to minimize transforms. I tend to avoid including them in the asset graph of any bundler until I know they’ll be able to process them the way I want.
Be considerate!
The last piece of perf advice I have is to be be considerate of your users. Particularly mobile users. Not everyone has a Pixel 3 or a 2018 MacBook Pro that can obliterate whatever comes down the rendering pipeline without turning a fully-functioning panini grill.
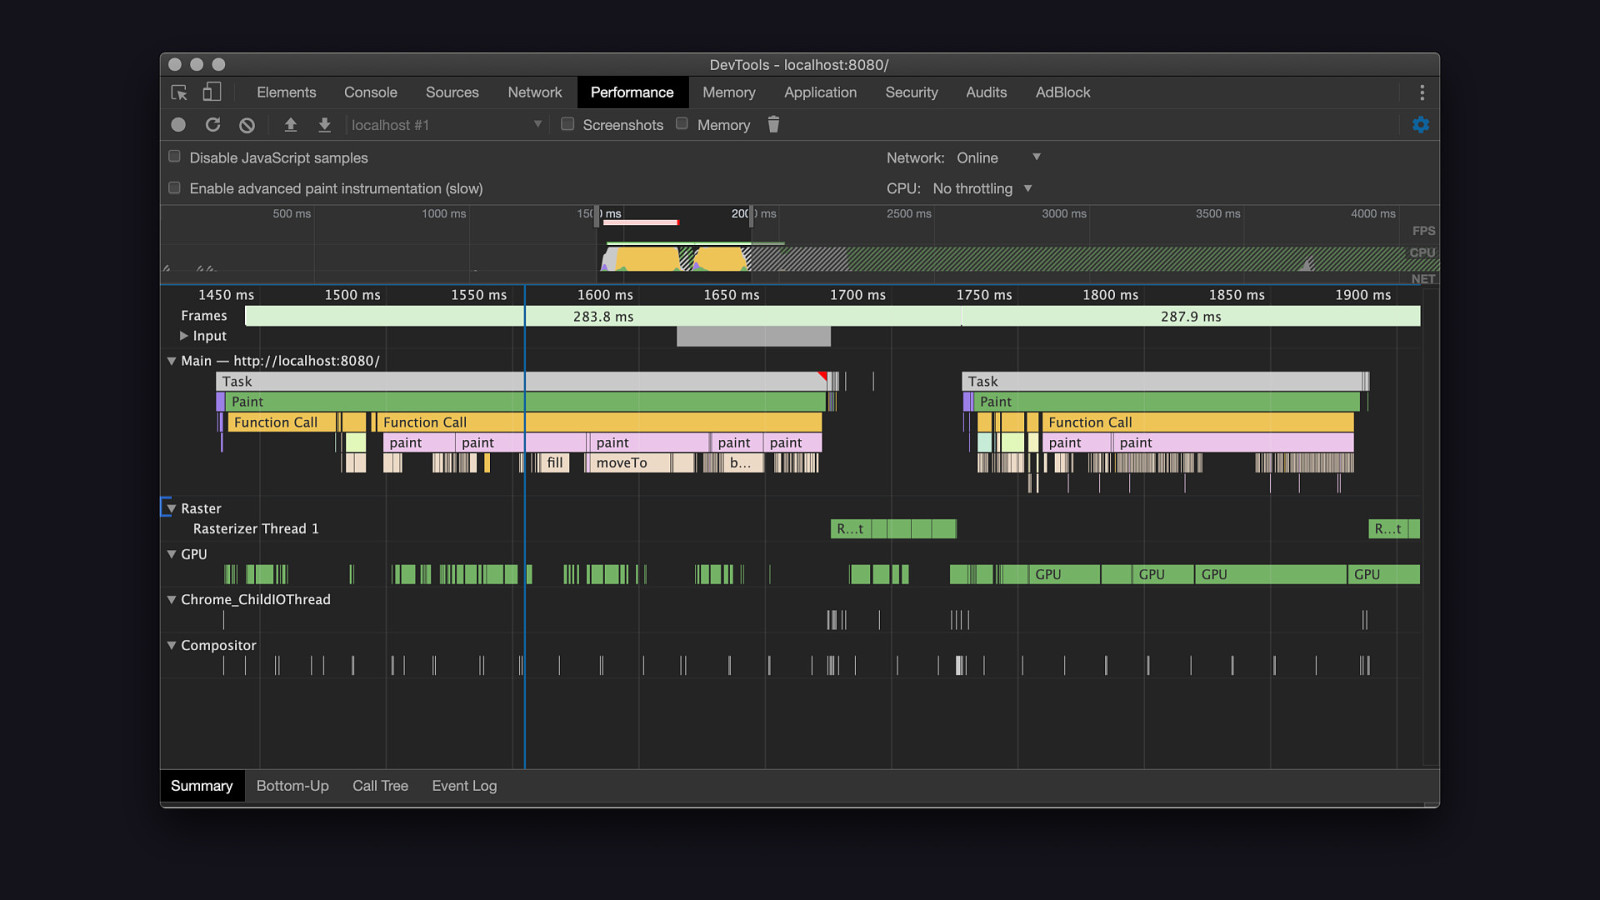
When paint worklets draw in normal scenarios, such as on load or when the orientation of the device changes, they can be resource-intensive, but not ludicrously so. [REVEAL IMAGE]
But that does not mean that, even though worklets do their work off the main thread like web workers, they can’t impact page responsiveness. This screenshot is from a performance profiling session where a paint worklet was continuously redrawing as the browser window was resized. Paint worklets redraw any time the dimensions of their container change, or if CSS properties on that container change. So, please, resist the tempation to do stuff like make them redraw constantly, or otherwise for no sensible reason.
// Check for Device Memory API support. // Default to 8 GiB if the API is absent. const deviceMemory = navigator.deviceMemory || 8; // // // if Only register a paint worklet if the CSS Paint API is available and the memory on the device is at least 4 GiB. (window.CSS.paintWorklet && deviceMemory >= 4) { CSS.paintWorklet.addModule(“/js/blotto.js”); } else { document.body.classList.add(“no-paint-worklets”); }
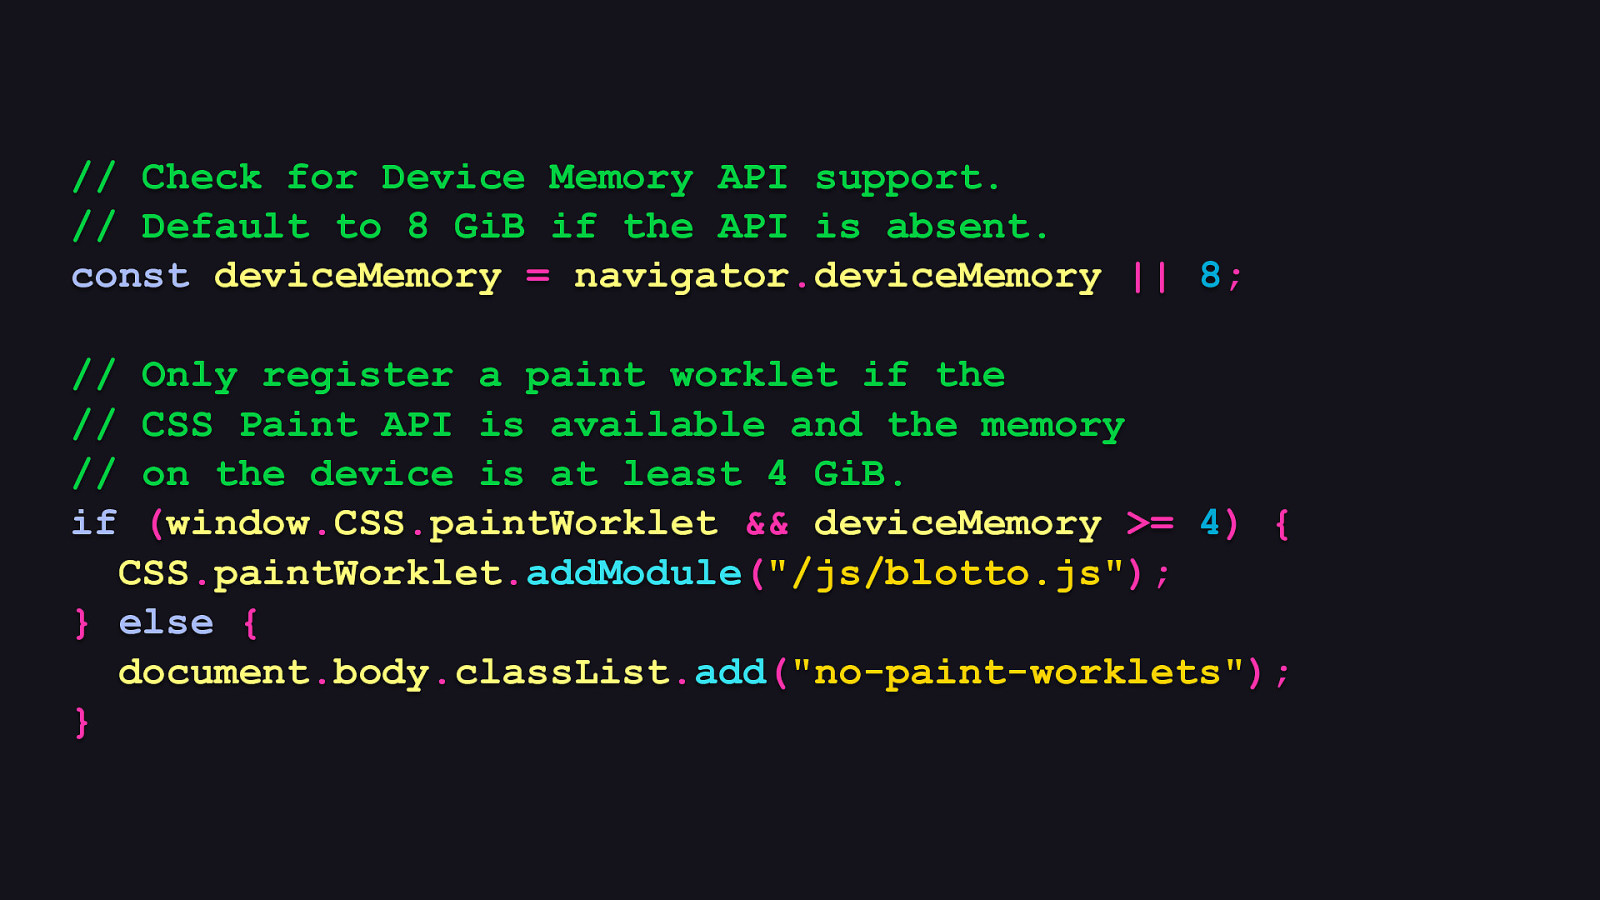
Additionally, make a call on when it’s not appropriate to use paint worklets. Unfortunately, we can’t look at the device’s battery level, since the Battery Status API is deprecated and scheduled for removal—and for good reason. But we do have another signal we can look at when deciding whether or not we should allow a paint worklet to load, and that’s the Device Memory API. [REVEAL CODE]
And as usual, it’s not supported everywhere, but checking for support is as trivial as seeing if navigator.deviceMemory is defined. If it is, we can get a device’s coarse memory amount in gigabytes, or default to the highest value, which is 8. Here, we decide that if a device has as little as 4 gigabytes of memory or less, we won’t register the paint worklet and instead add a class on the body to target in CSS to provide the fallback image. This is a considerate thing to do, because if a device has a low amount of memory, it’s not unreasonable to assume that its processing power may also be limited.
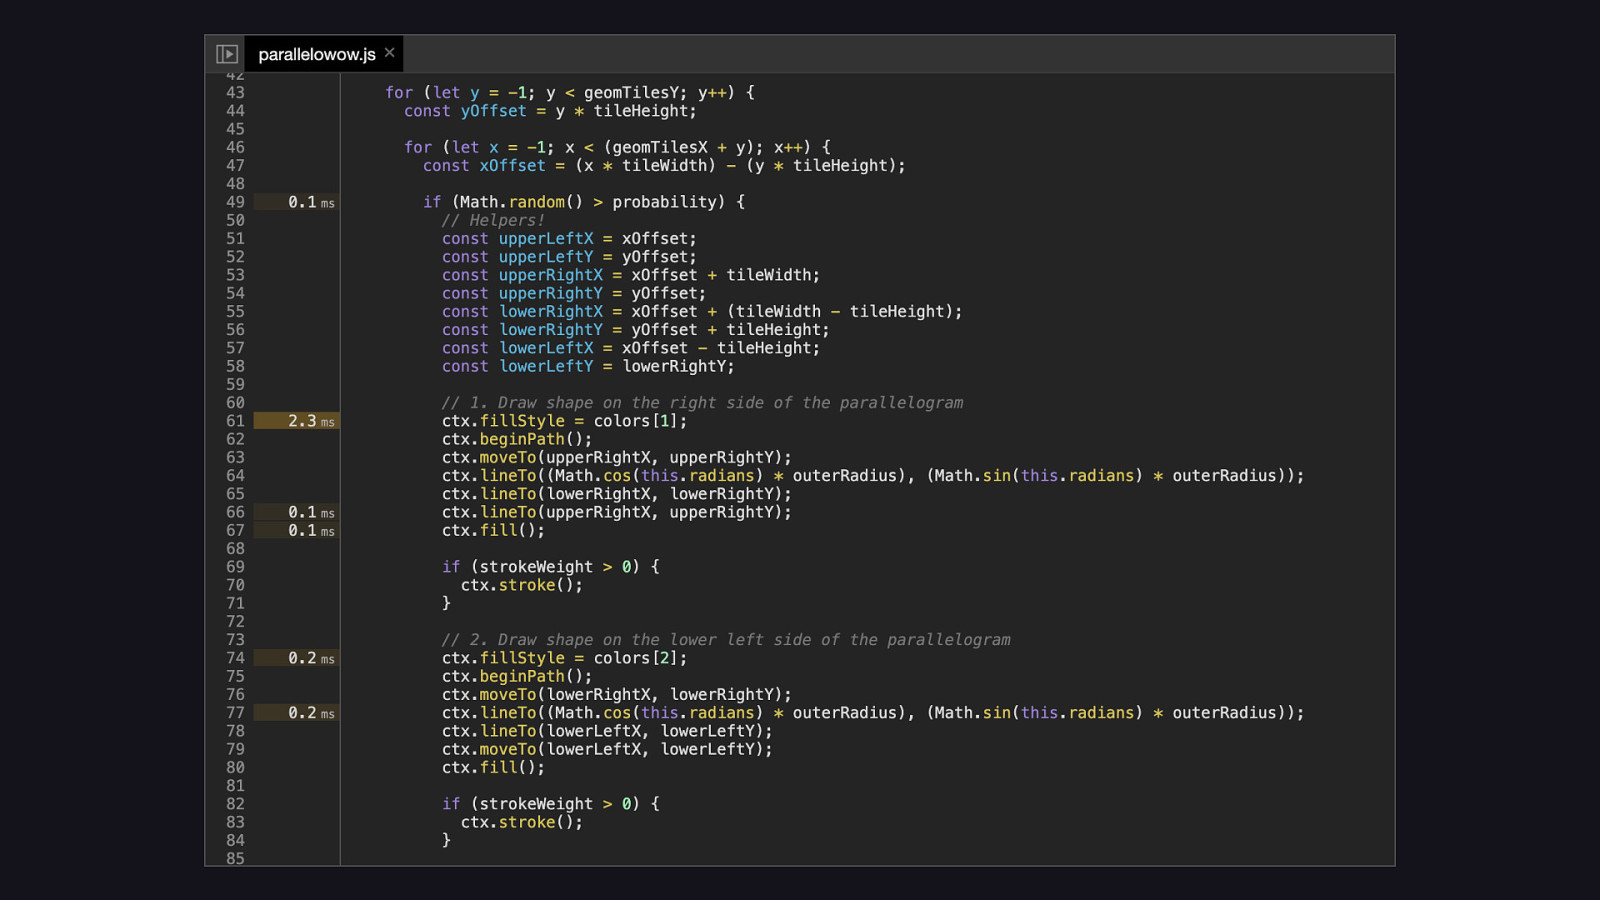
In any case, if you’re concerned that any part of your paint worklet code is inefficient in any way, you can find out what parts of it are the most expensive by running the performance profiler in Chrome’s dev tools, and then going to your paint worklet file in the sources tab. Once there, each line number will report how much CPU time that worklet used, and then you can decide how or if you’ll address any suboptimal behavior. When you profile, just don’t forget to enable network and CPU throttling to better approximate what lower-end devices might be experiencing. Or better yet, if you have an Android device with Chrome installed, set it up as a remote device in your desktop version of Chrome and profile from there.

Wrapping up
Well, it’s that time. But before I properly part from you all, I want to call out a few resources I think are well worth your time. 😢
tinyurl.com/unapaints
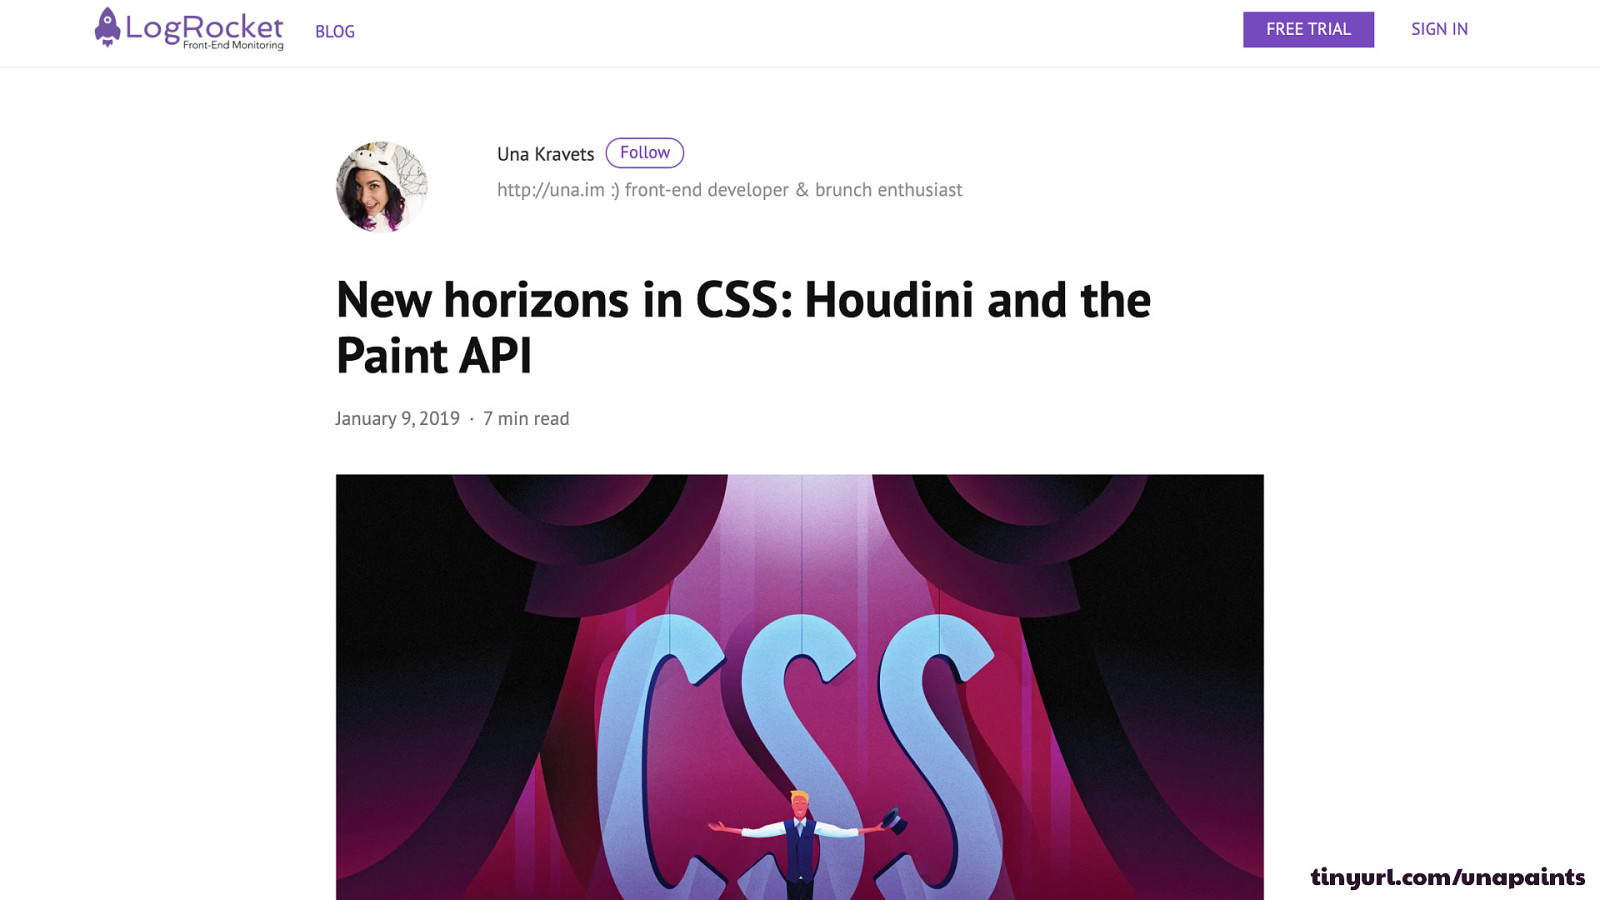
First off, Una Kravets has been jamming on paint worklets for a long time. If you feel like my quick intro to the technology just didn’t cut it, then Una’s article on the API will not fail you.
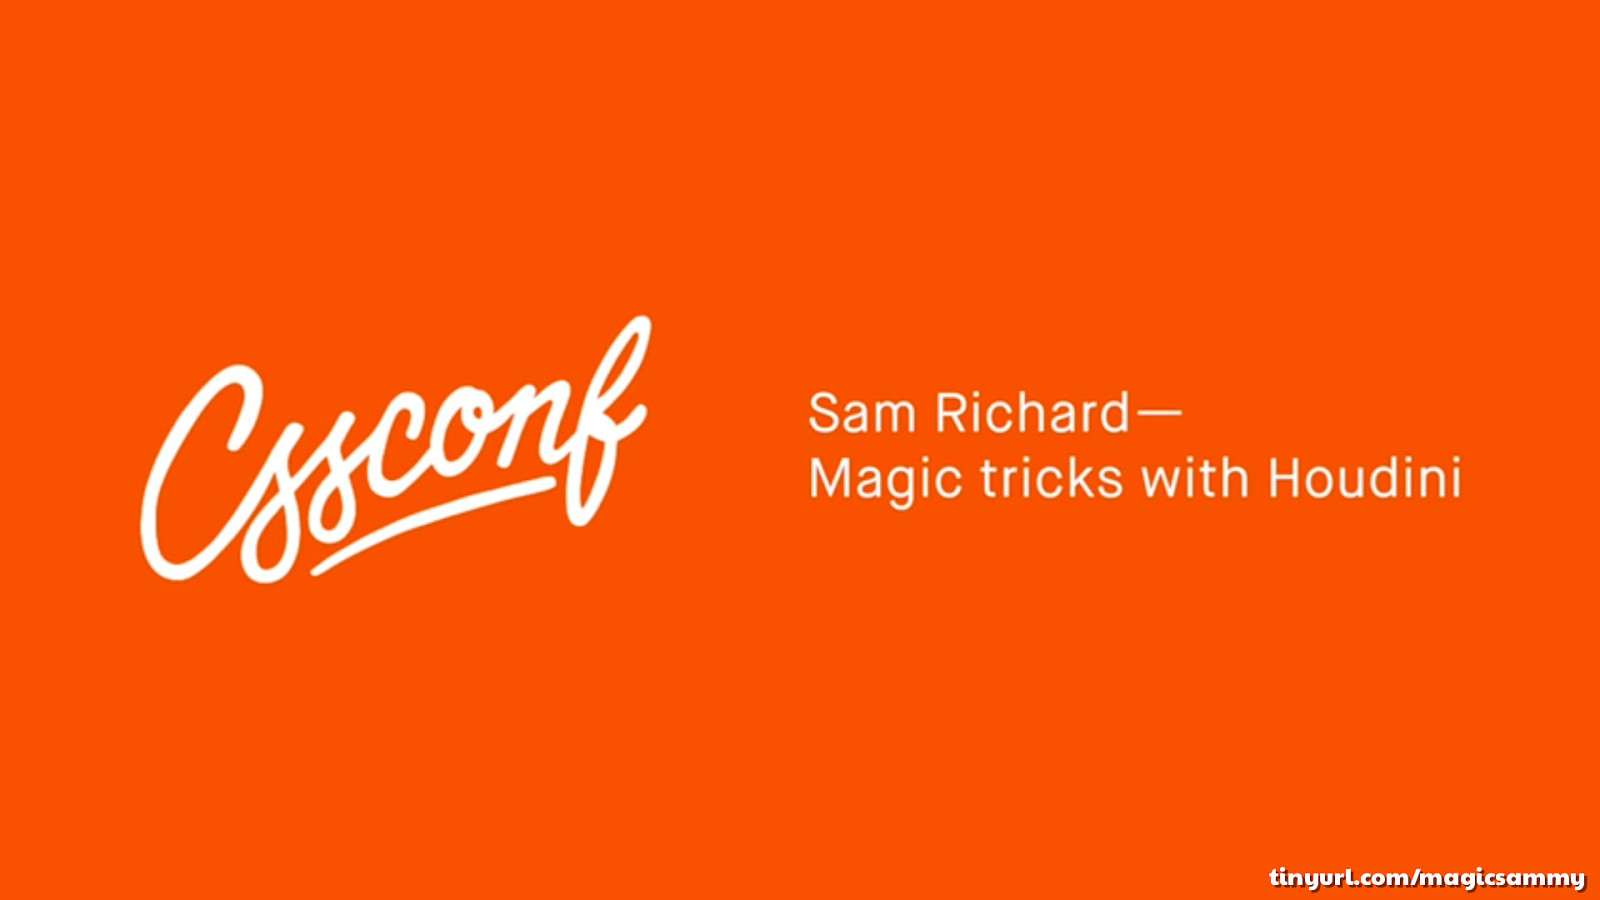
tinyurl.com/magicsammy
Secondly, Sam Richards did a more broadly scoped talk on Houdini in general last year at CSSConf AU. Some of what he talked about may have changed a bit since, as Houdini is evolving, but it’s still a great talk for anyone who wants to know more about Houdini beyond paint worklets.
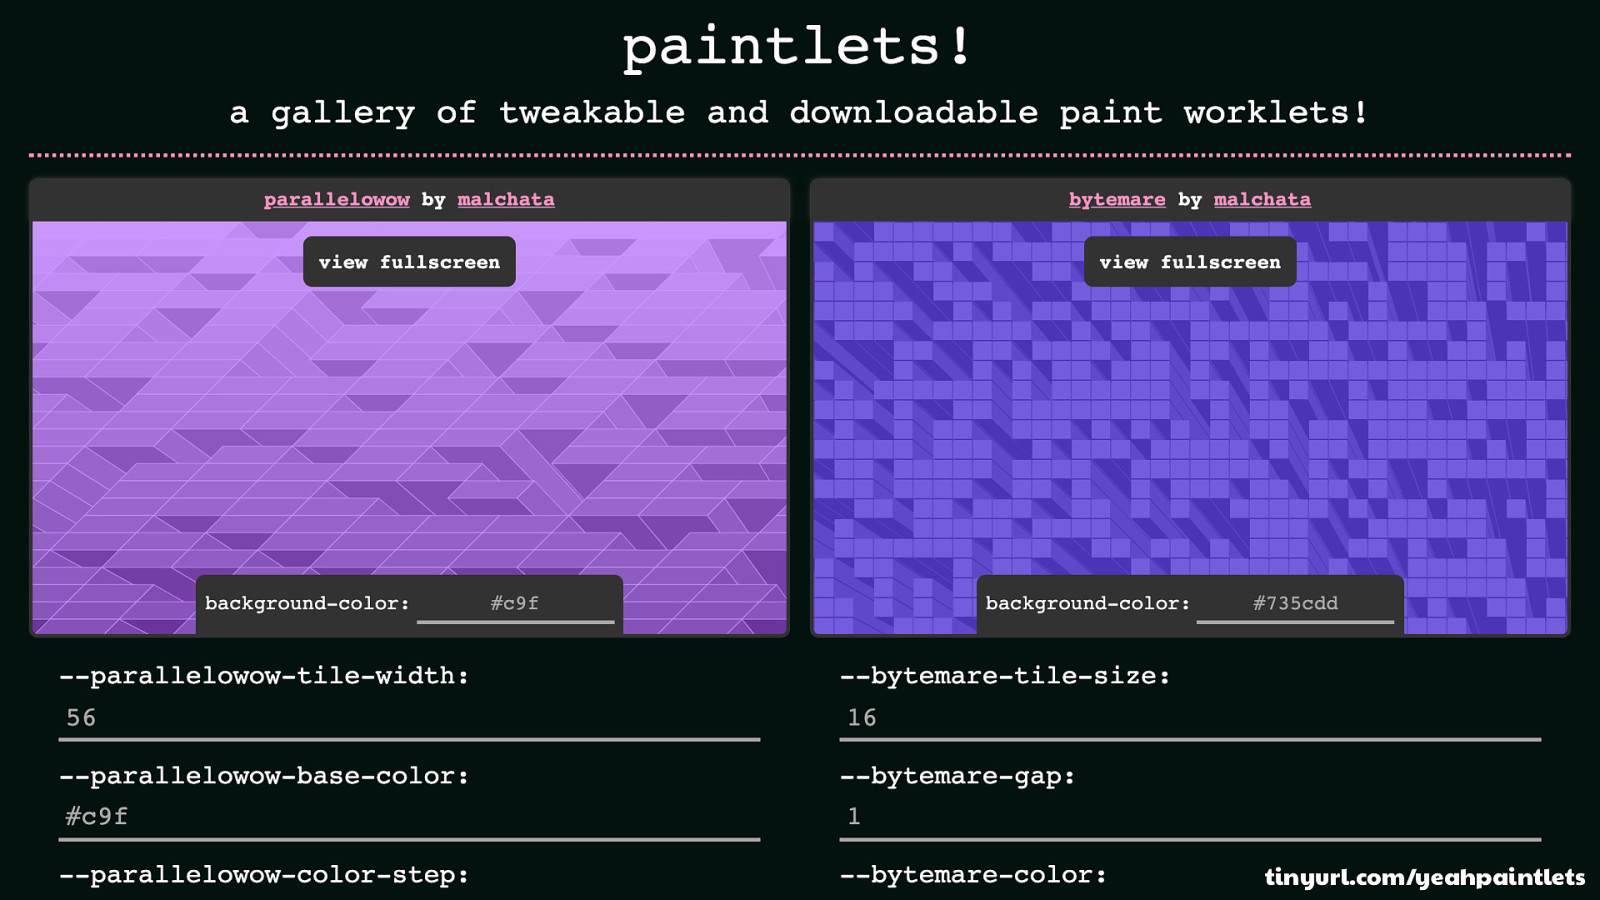
tinyurl.com/yeahpaintlets
Now remember when I said there was a suprise? Here it is. [REVEAL IMAGE]
If you’re interested in seeing an open source showcase of paint worklets I’ve written, you can check out a site I’ve made called Paintlets. Paintlets shows each paint worklet and its custom properties, so you can experiment with each one. Plus, each paint worklet is downloadable for you to use.
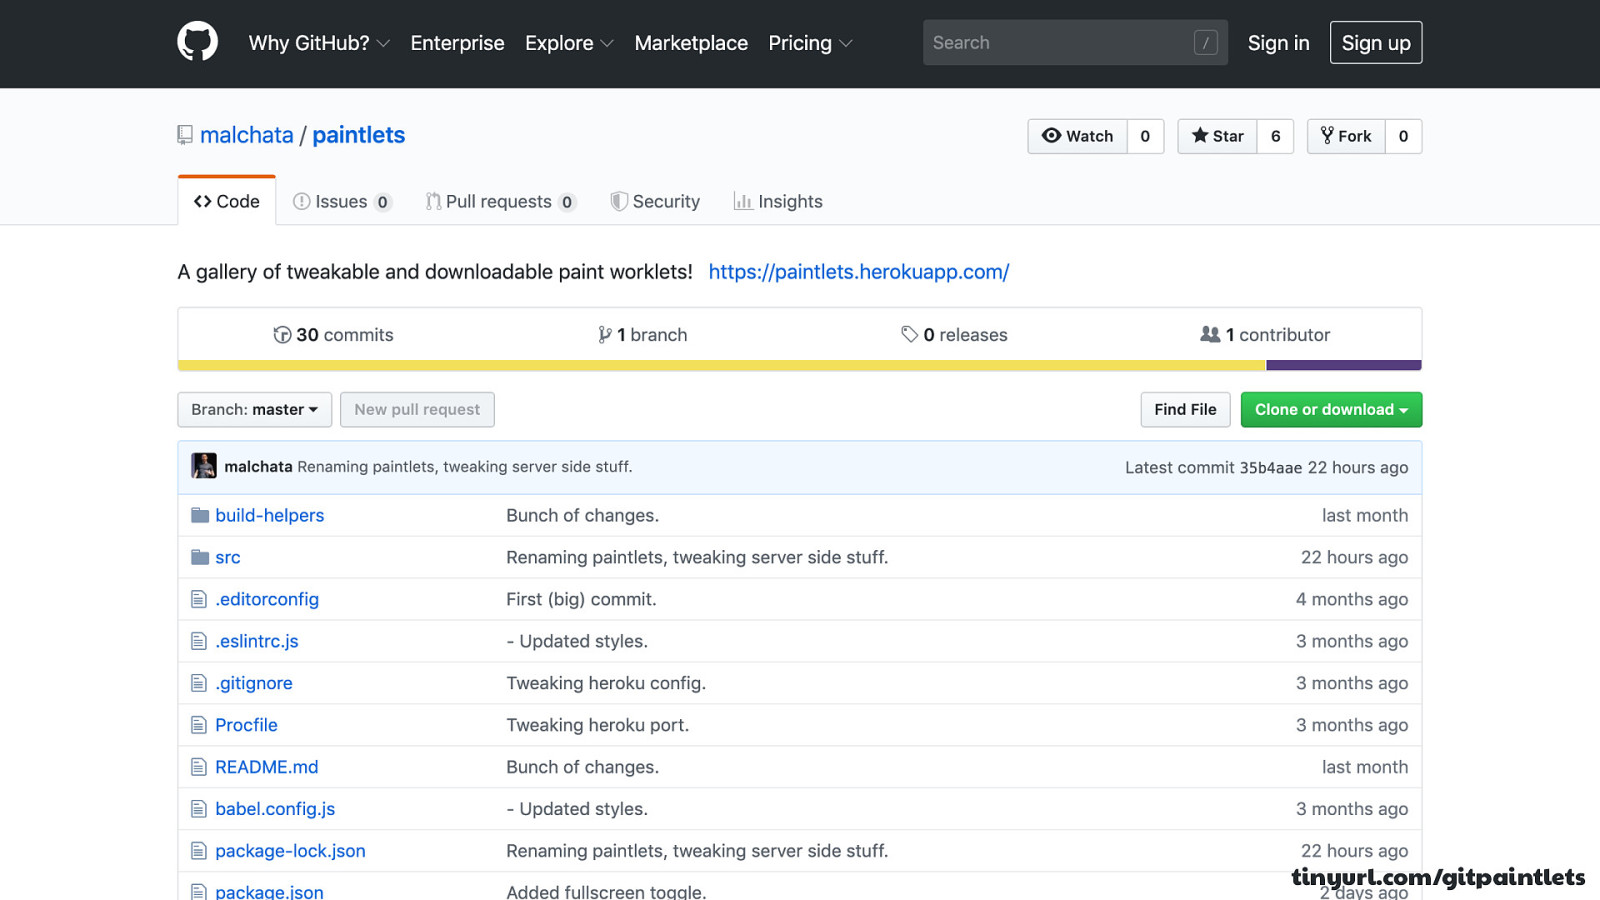
tinyurl.com/gitpaintlets
And! And! If you have a paint worklet you’ve written that you think is pretty cool, I welcome you to submit a pull request to the repo.
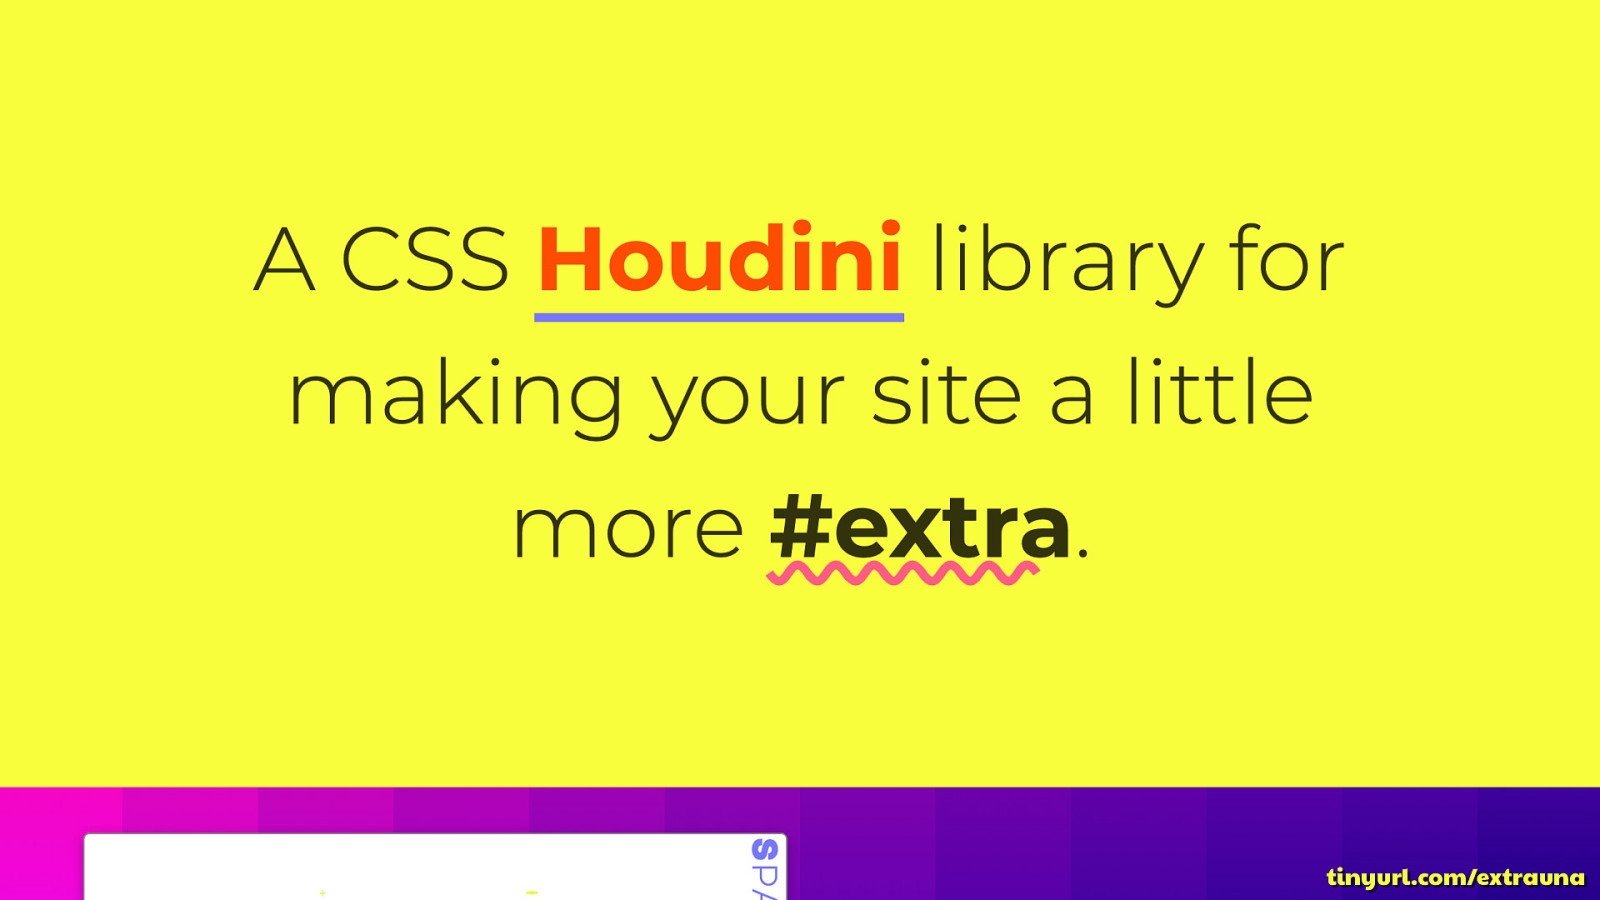
tinyurl.com/extrauna
And, of course, at the time I thought I was being a clever little fella when I wrote paintlets, but it unsurprisingly turns out that someone had the same idea, and before I did. And that person was, not surprisingly, Una Kravets. So if you want a different take on the idea, check out her extra.css site, which has some cool paint worklet demos of her own that you can put to use on your site as well.
💖 Thank you! 💖 slides: jlwagner.net/talks/csspaint
And with that, I thank you for your time, your interest, and your everlasting love of of all things web, which gives me no shortage of hope and admiration for this community. [REVEAL SLIDE DECK LINK]
Here are my slides, which will be available at that URL shortly, if not already. And thank you all so very, very much.

Of all the fun stuff in Houdini, paint worklets are arguably the most fun. It’s blends what’s great about the Canvas API, and makes the art you can create with it easily usable in CSS. Such a blend of technologies can only lead to very best kind of fun and experimentation the web is known for.
Come to this session and you’ll understand how paint worklets, well, work. But the really good stuff will be in all the inspired experimentation that can come from experimenting with the programatic generation of art and graphics, and how we can practically use it in our designs. If the intersection between weird and usable is your thing, you’ll feel right at home with paint worklets!
 for free. You
can too.
for free. You
can too.
Video
Buzz and feedback
Here’s what was said about this presentation on social media.